¶ IFRC Local Units
Local Units are the core of the IFRC network, directly connecting National Societies with communities to deliver essential services. With 177,000 units across 192 National Societies, they form the operational backbone ensuring humanitarian aid reaches those most in need.
¶ Types of IFRC Local Units
The IFRC categorizes local units into six distinct types, each serving specific functions within the broader humanitarian framework:
¶ Administrative Units
These units form the organizational infrastructure of National Societies and include branch offices, volunteer offices, and headquarters. Administrative units coordinate operations, manage resources, and provide the structural foundation necessary for effective humanitarian service delivery.
¶ Healthcare Units
Healthcare local units encompass a comprehensive range of medical facilities and services, including hospitals, clinics, pharmacies, blood centers, and ambulances. These units ensure that National Societies can provide essential health services, emergency medical care, and life-saving interventions to communities in need.
¶ Emergency Response Units
Emergency response local units are strategically positioned to provide rapid humanitarian assistance during crises. These include cyclone centers, evacuation centers, first aid stations, search and rescue bases, emergency communication hubs, and warehouses. Such units enable National Societies to respond swiftly to disasters and emergencies, providing immediate relief and support to affected populations.
¶ Humanitarian Assistance Centres
These specialized units focus on providing comprehensive support to vulnerable populations and include temporary shelters, aid distribution centers, community resource centers, and recovery and rehabilitation hubs. Humanitarian assistance centers serve as focal points for coordinating relief efforts and ensuring sustained support during both emergency and recovery phases.
¶ Training and Education Units
Training and education local units are facilities primarily used for training purposes, such as schools and first aid training centers. These units play a crucial role in building local capacity, developing volunteer skills, and promoting community preparedness and resilience.
¶ Other Units
This category encompasses units that do not belong to the above categories but are key for National Societies, such as business hubs and shops. These diverse units contribute to the sustainability and operational effectiveness of National Societies through various specialized functions.
The effectiveness of this local unit structure is exemplified by successful implementations such as the Burundi Red Cross, which has mobilized 624,000 volunteers organized into 2,926 local volunteer units, demonstrating how well-developed local networks can achieve remarkable community impact and self-sustainability.
This guide covers the full process of managing local unit records—adding, editing, validating, and deleting entries. User actions depend on their permission level, and every change follows a validation workflow. Accurate records help maintain up-to-date, reliable data for operations and planning. Details on roles and permissions are provided separately in the Admin Guide
¶ Managing Local Unit Data: Two Approaches for National Societies
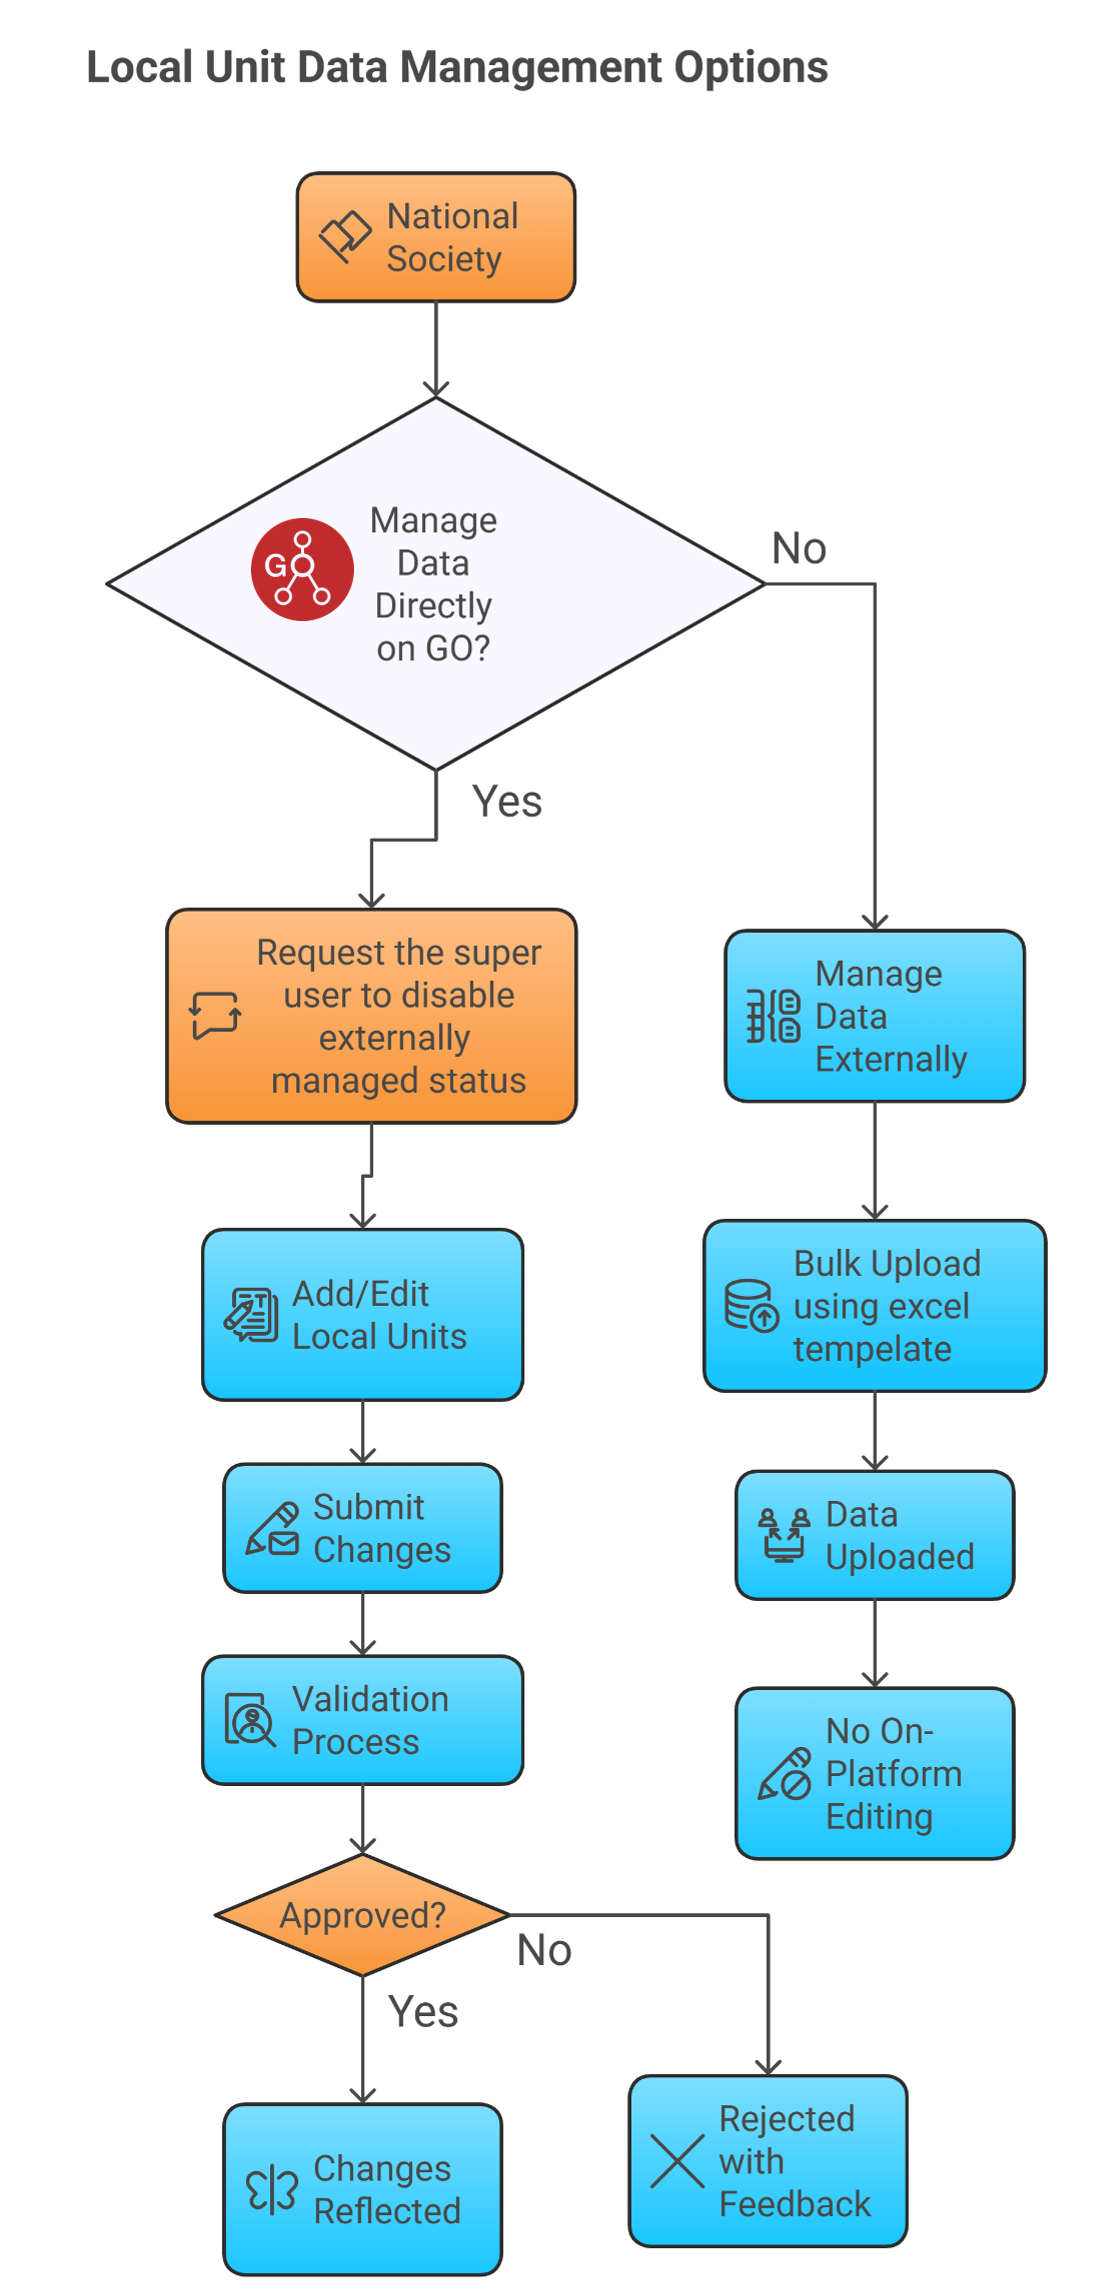
National Society users have two options for managing local unit data:
Manage Data Directly on GO:
Local units can be added and edited directly on the GO platform. With this option, you may allow other users to suggest additions or edits to the local unit data for your country, and all changes follow a validation process. The user submits a new or edited local unit, which is then reviewed by validators—if approved, the change is accepted and reflected on the platform; if not, it is rejected with feedback. The full process and step-by-step instructions are detailed in the “Adding Local Unit” and “Editing a Local Unit” sections below, which show how to add new entries, make changes, and how these actions go through the approval workflow.
Manage Data Externally and Bulk Upload:
Alternatively, National Societies can manage certain types of local unit data externally, by maintaining records outside GO (such as in Excel or CSV files), and bulk uploading them using the CSV template available on the platform. The complete process for bulk upload—including required templates and steps—is explained in the “Bulk Uploading Local Units” section.
Note: By default all Local units are set to be Externally Managed, if a National Society requests and they have a person to validate the local units, they can request the super user (Information Management Team) to change the status of a Local unit type by disabling externally managed option. After that they can start adding/ editing local units.
Note: Bulk uploaded (externally managed) local units cannot be edited on the platform by validators or regular users; editing or updates must be made externally and re-uploaded. This allows organizations to manage, for example, administrative local units on GO with collaborative features, while managing healthcare units externally for later upload.
In summary: The “Adding a Local Unit” and “Editing a Local Unit” sections on this page describe the procedures for managing data directly on GO, including how suggestions, edits, and approvals work through the validation process. For data that is managed externally and bulk uploaded, please see the Bulk Uploading section for all requirements and limitations.
¶ Adding a Local Unit
To add a Local Unit on the GO platform:
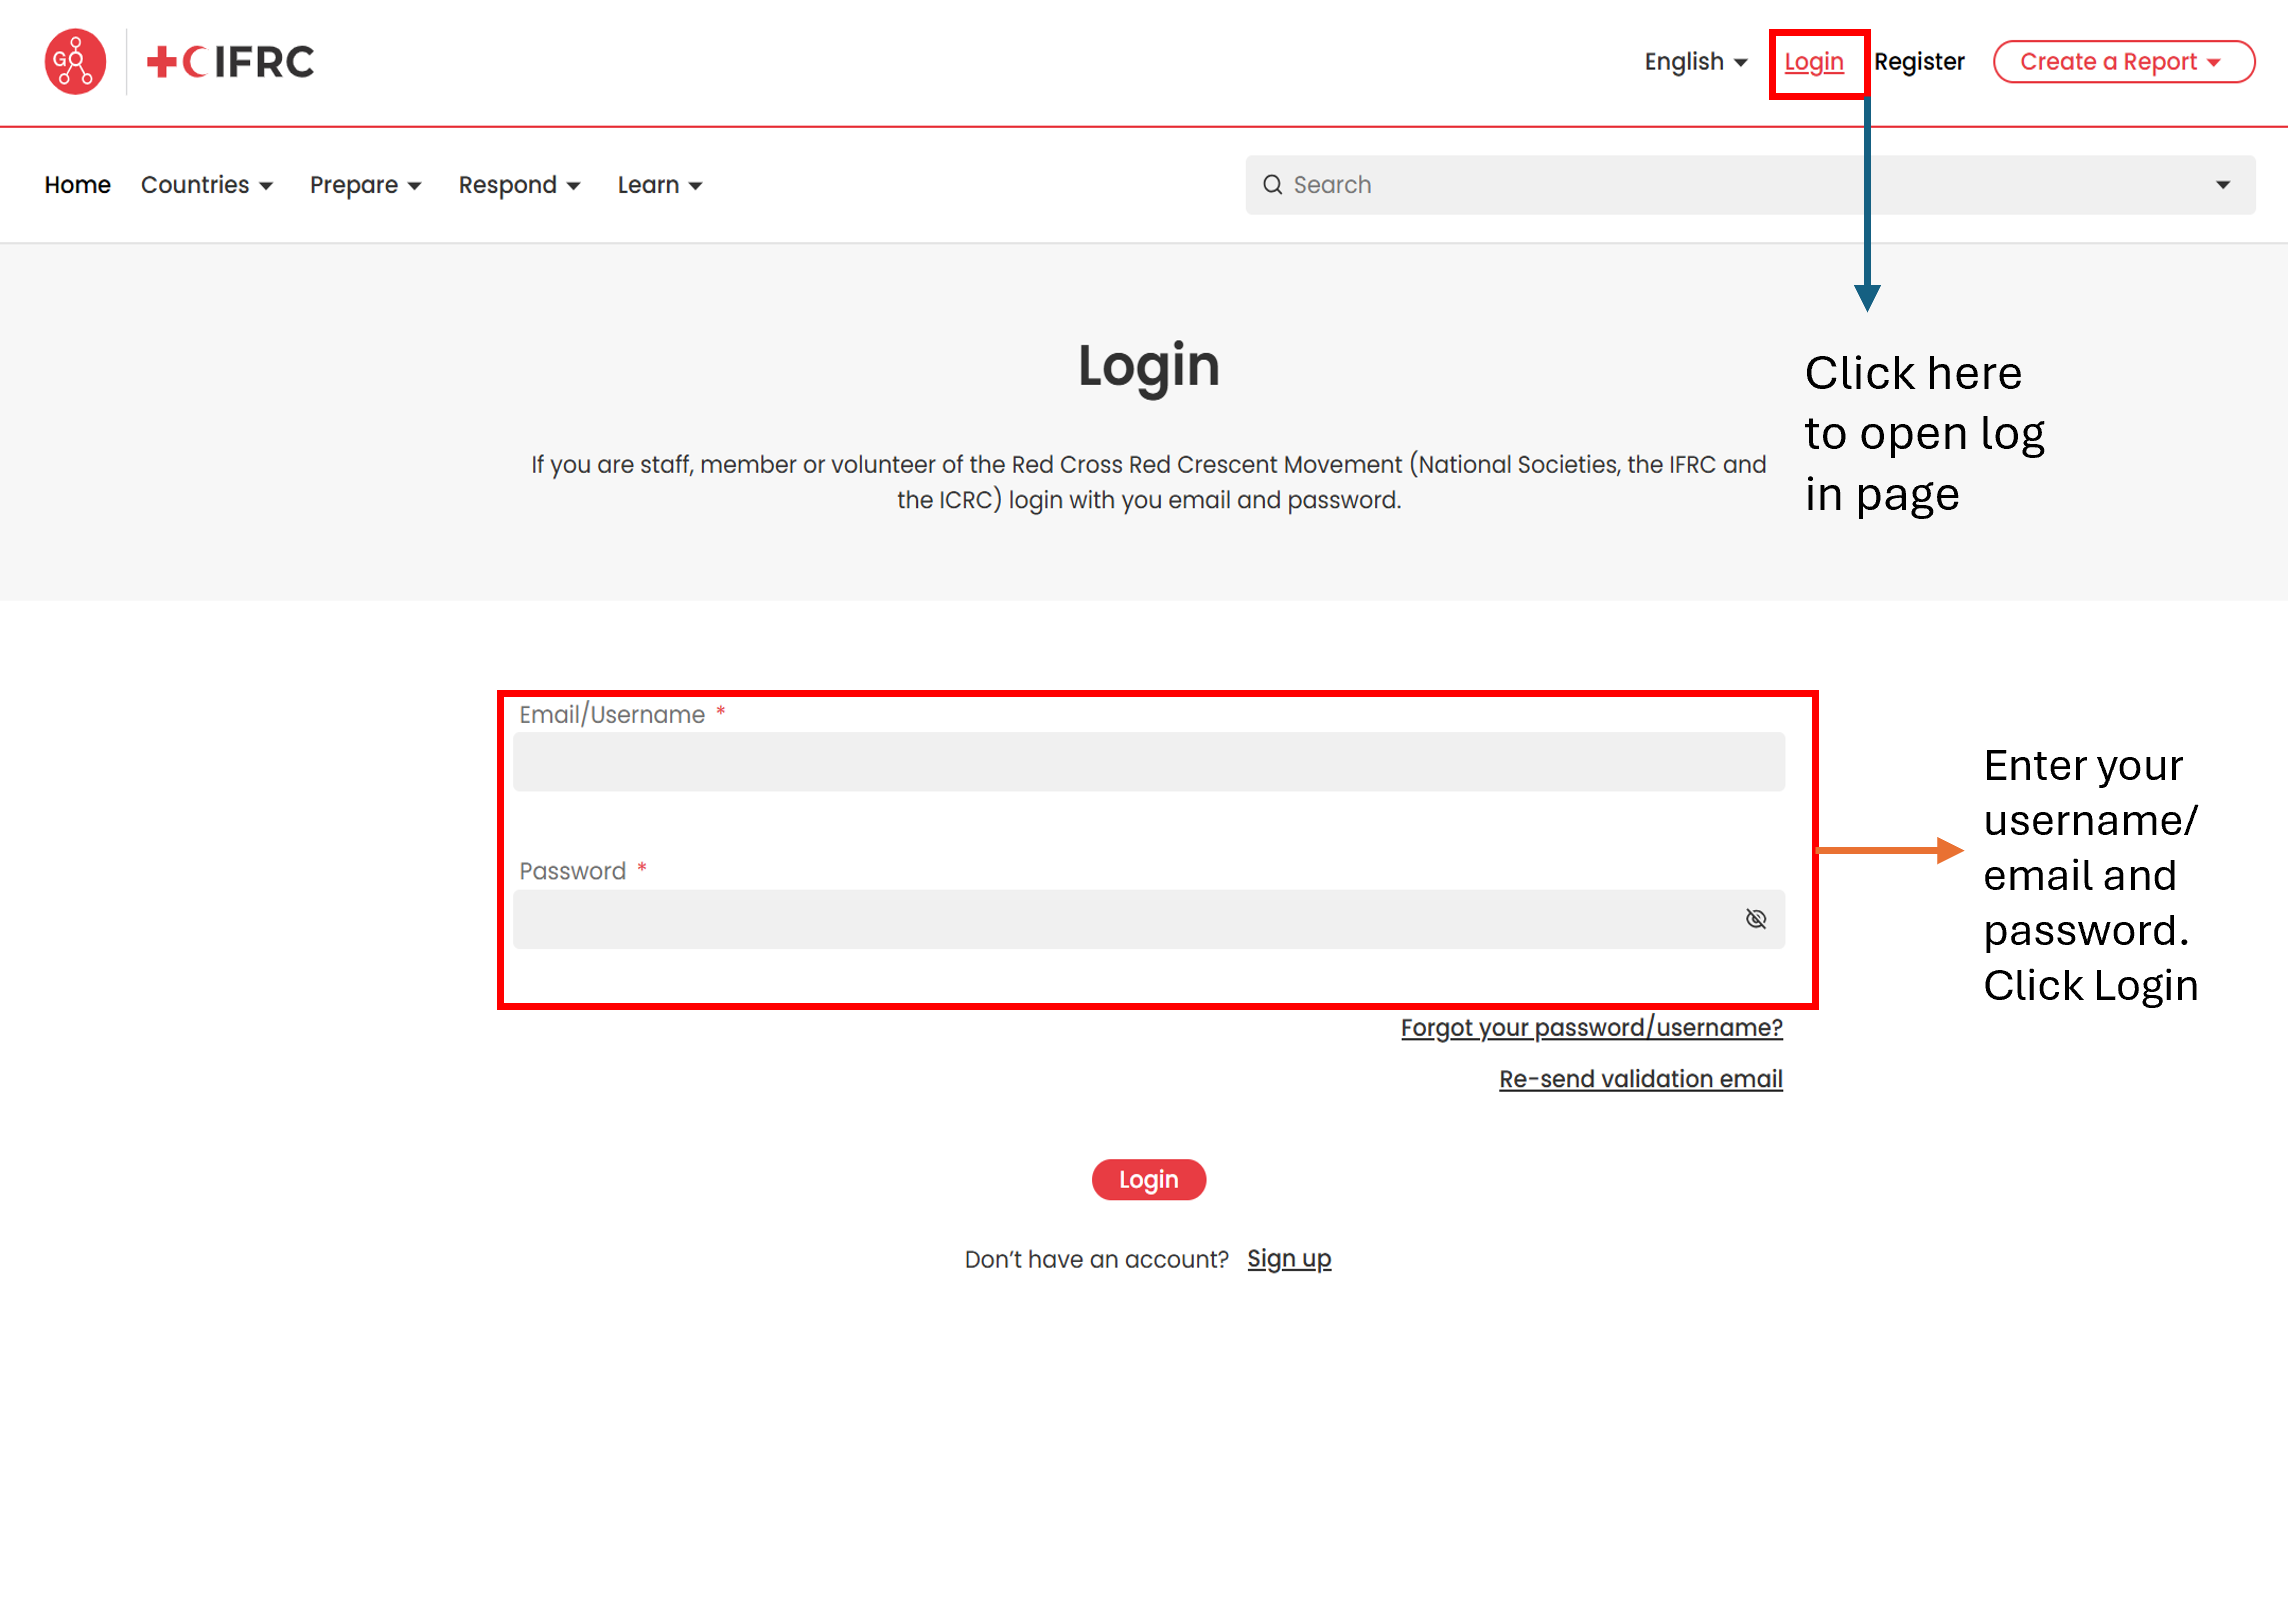
- Go to https://go.ifrc.org and log in with your GO username or email and password.
- After logging in, navigate to the country page where you want to add the new local unit.
- For example, to add a new Local Unit for Romania, open Romania’s country page and proceed.
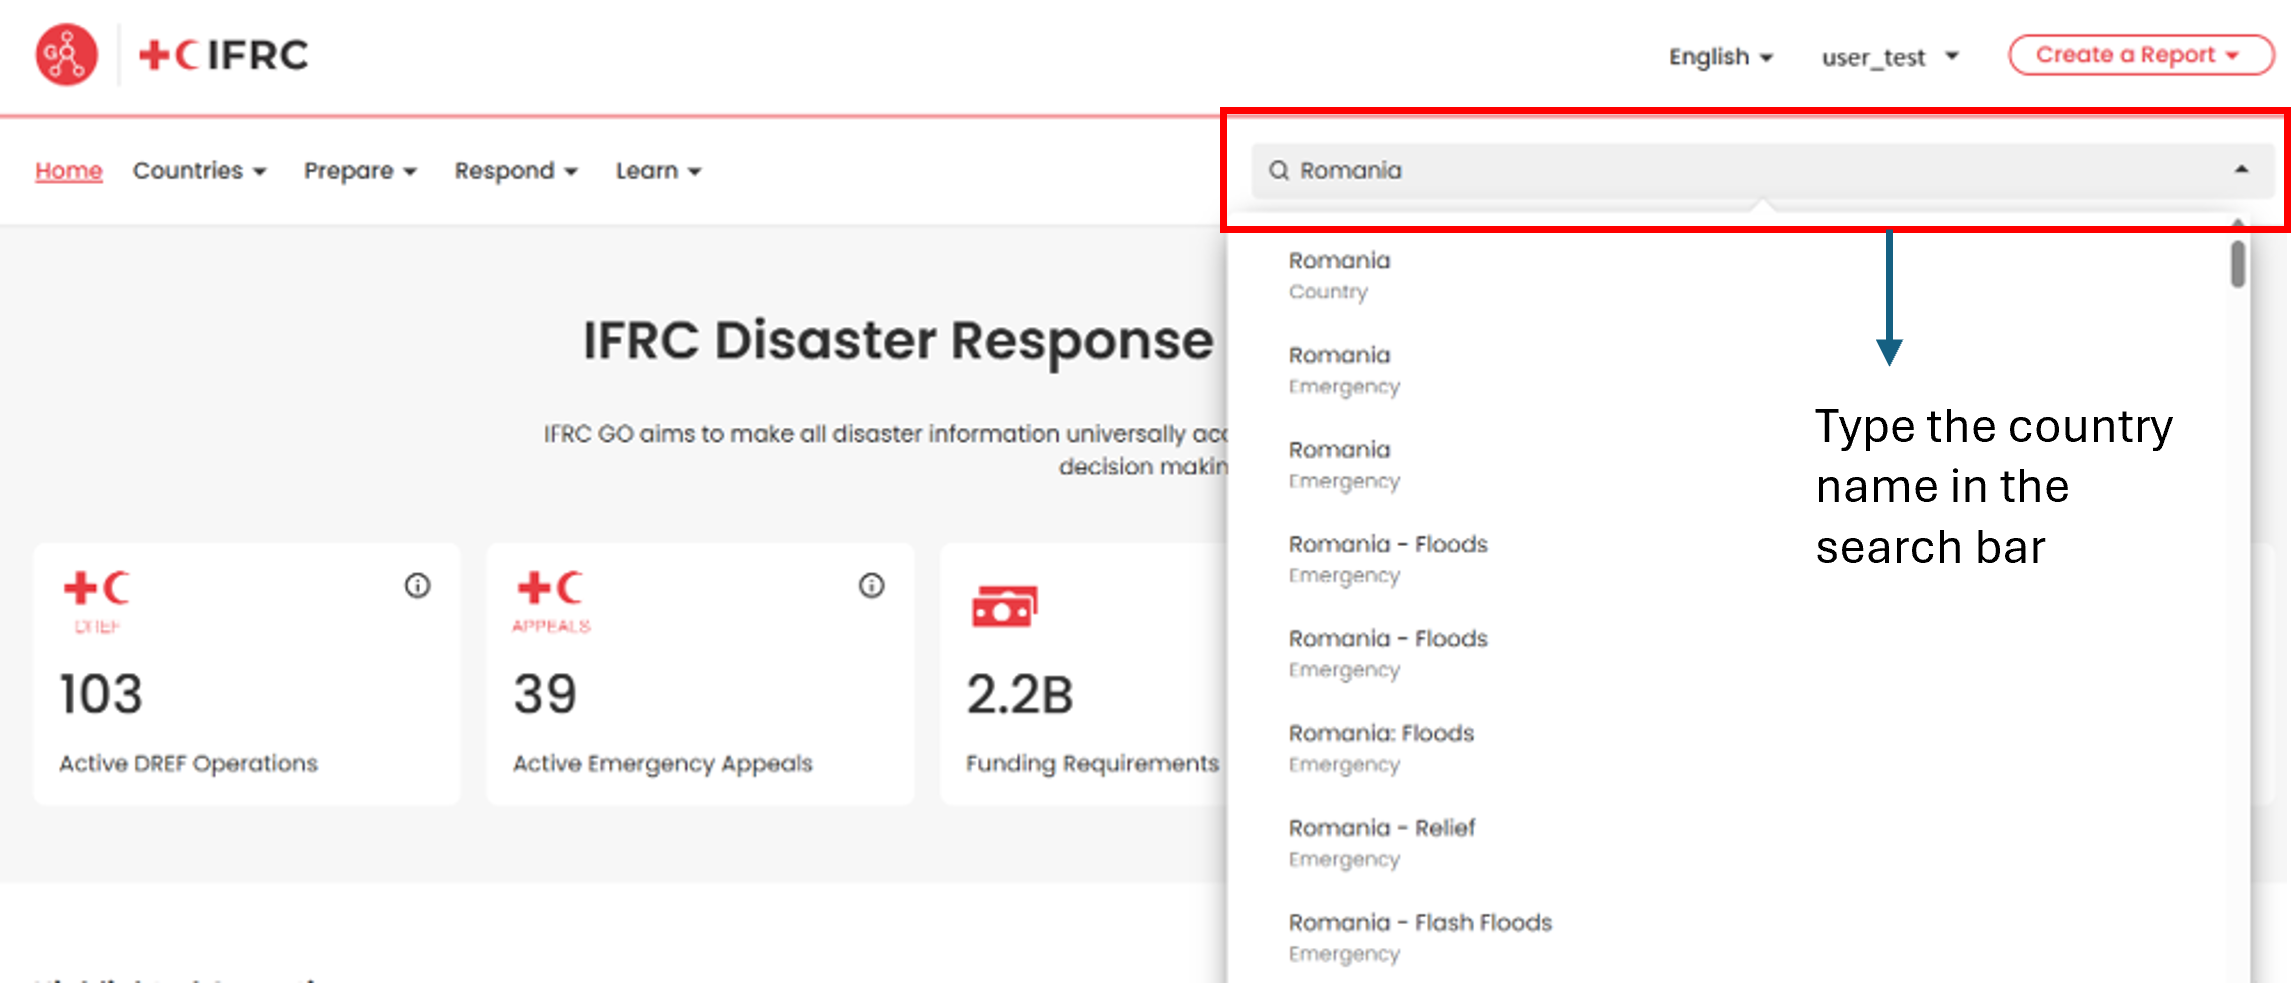
To access a country’s page:
- Search for the country name using the search bar in the top right corner, or
- Click Countries in the top navigation bar, select the relevant region, and then choose the country from the list.
- Once the country page opens up you will see navigation tab as shown below:
- Click on National Society Overview and then click on Context and structure.
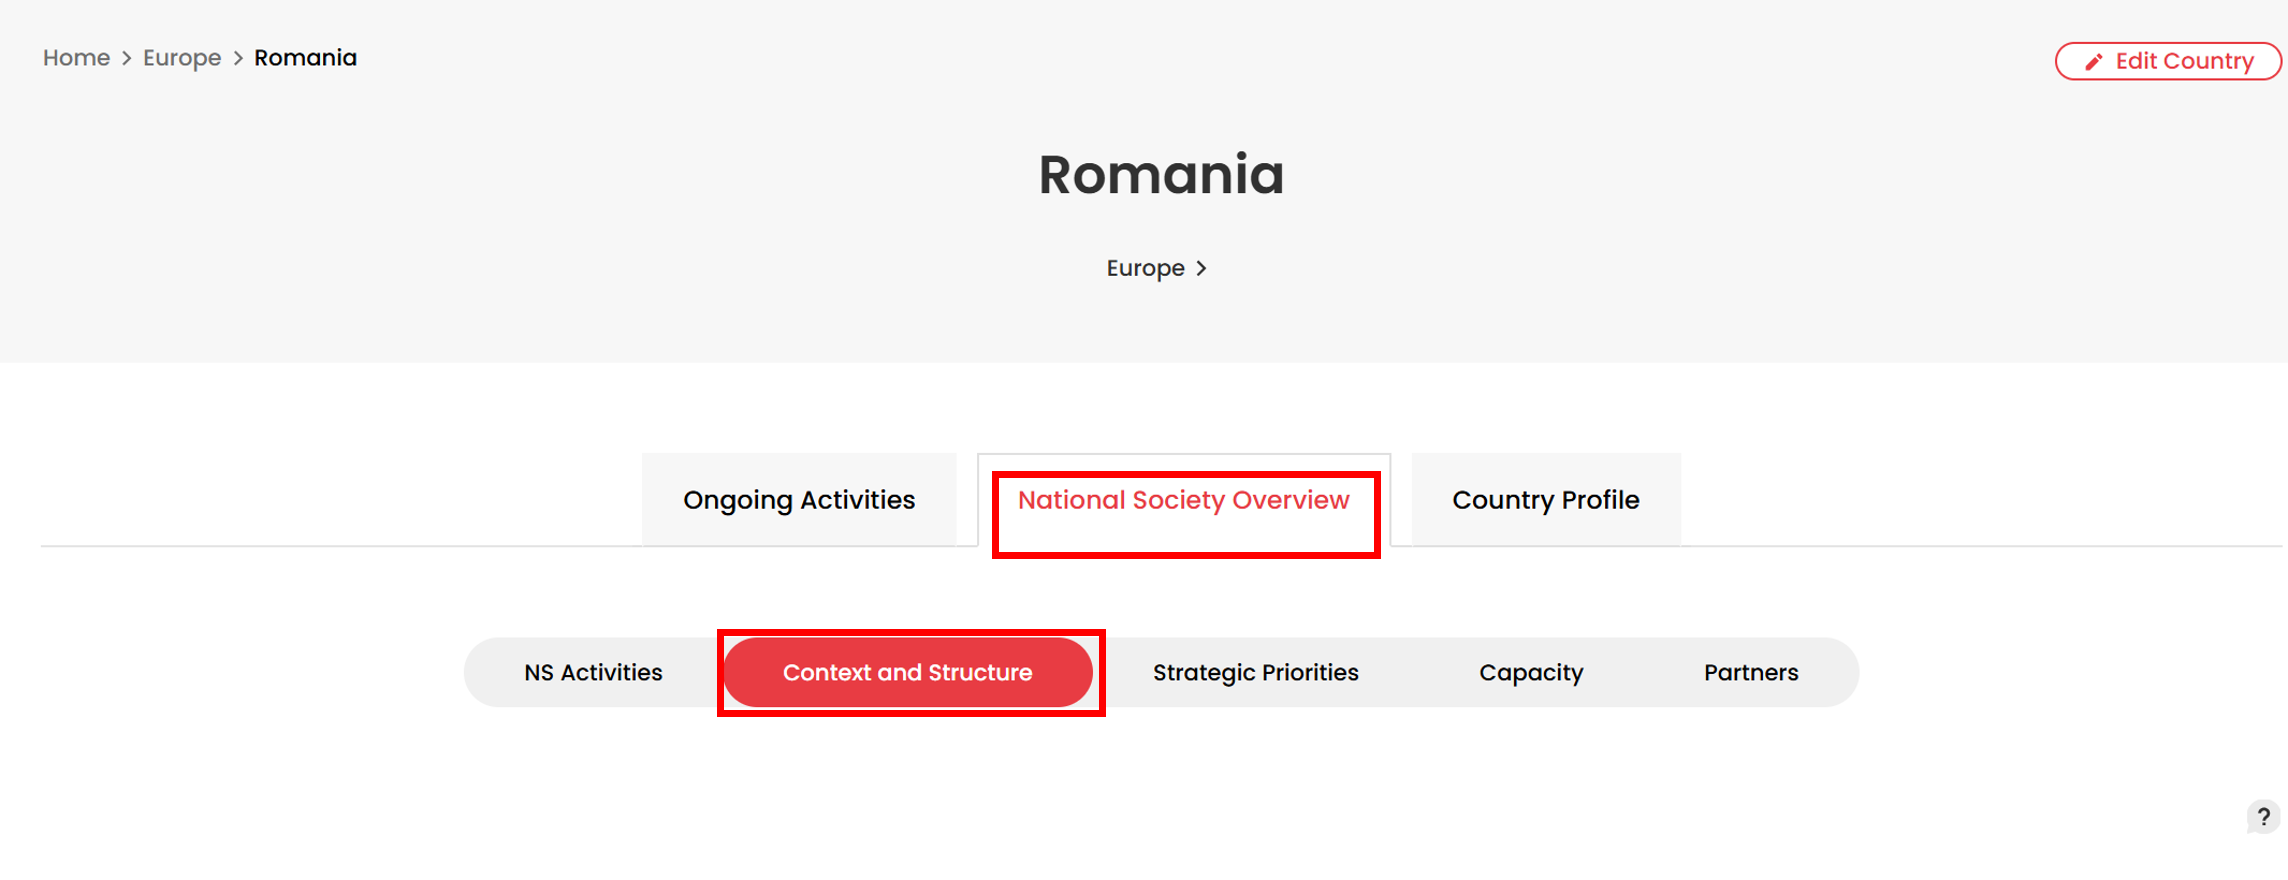
- Click Context and Structure to display the country map.
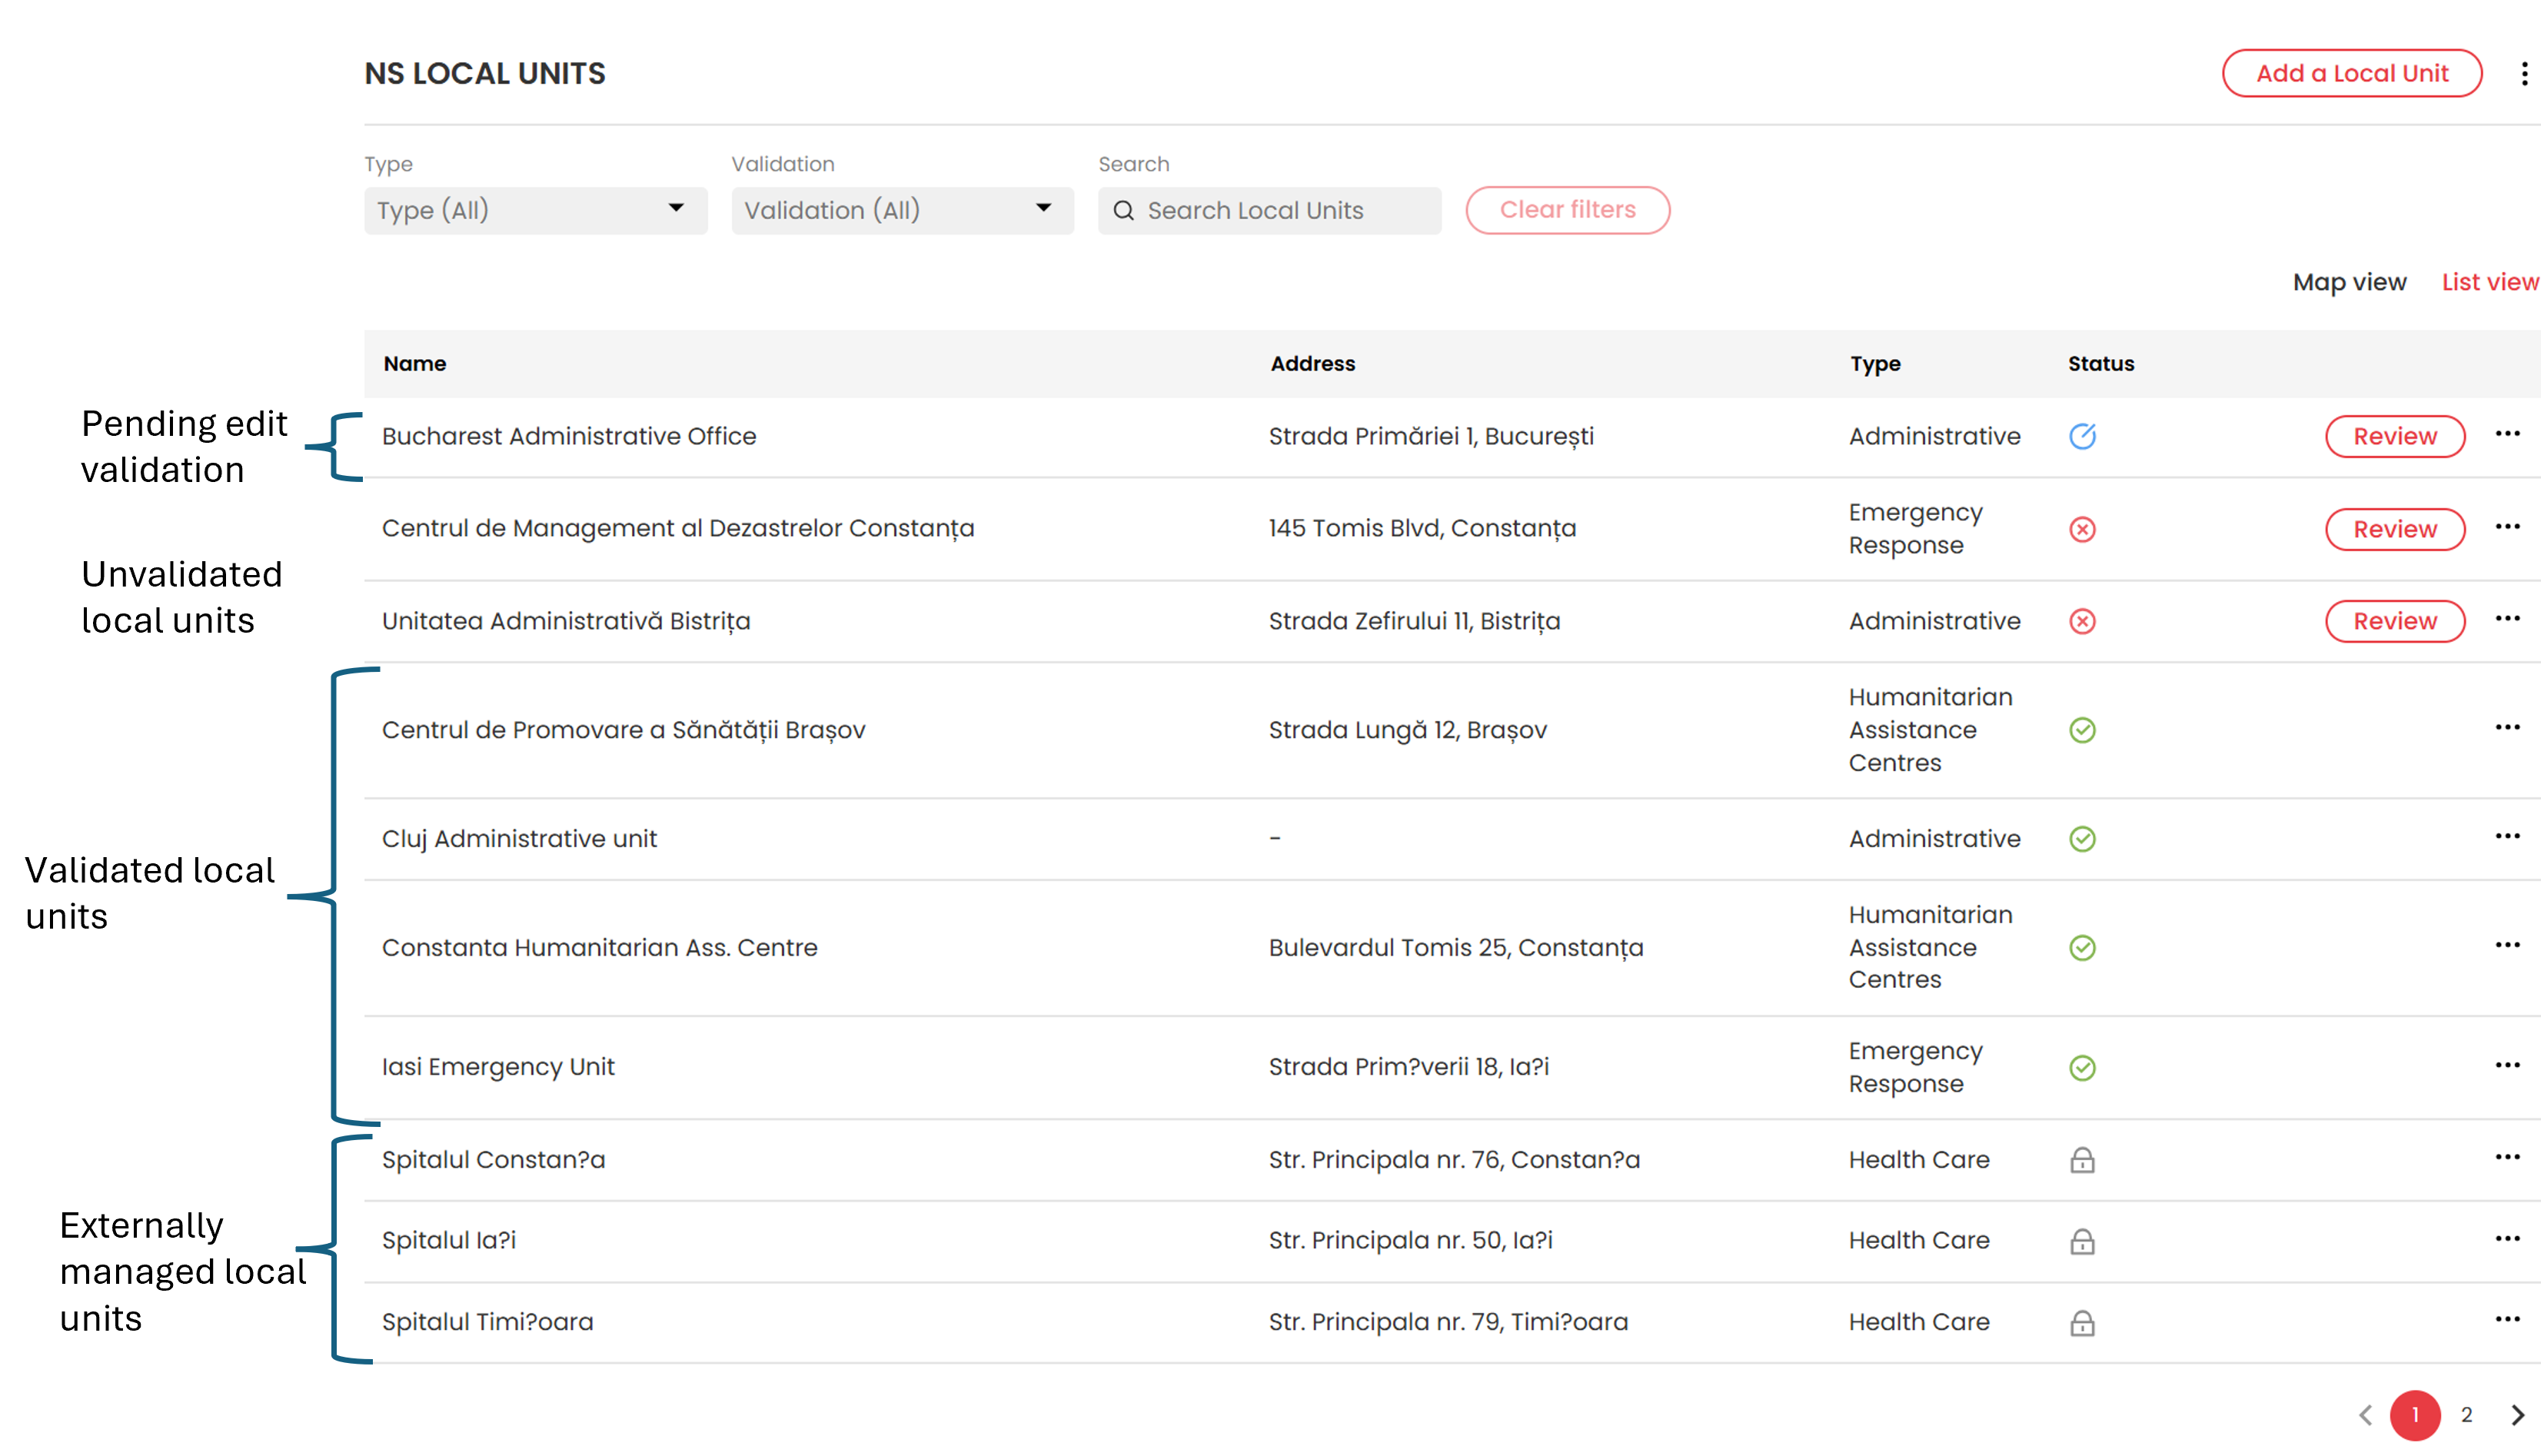
- If you have permission, the Add a Local Unit button appears above the map.
- View local units as a list (click List view button) or on the map (click "Map view").
- Filter local units by type or validation status using the Type or Validation dropdown menus.
- In List view, users can see both validated and unvalidated local units as well as those for which there is a pending edits validation. All other local units are shown as Externally Managed.
- Validated units show a green tick under the status column. It means these units were validated by the respective validator.
- Unvalidated units show a red cross under the status column. It means these units have not yet been validated by the respective validator.
- Pending Edits validation shows a blue icon under the status column meaning that they have pending edits which needs to be validated by the respective validator.
- Externally Managed local units shows a lock sign under the status column meaning that they cannot be edited on GO platform.
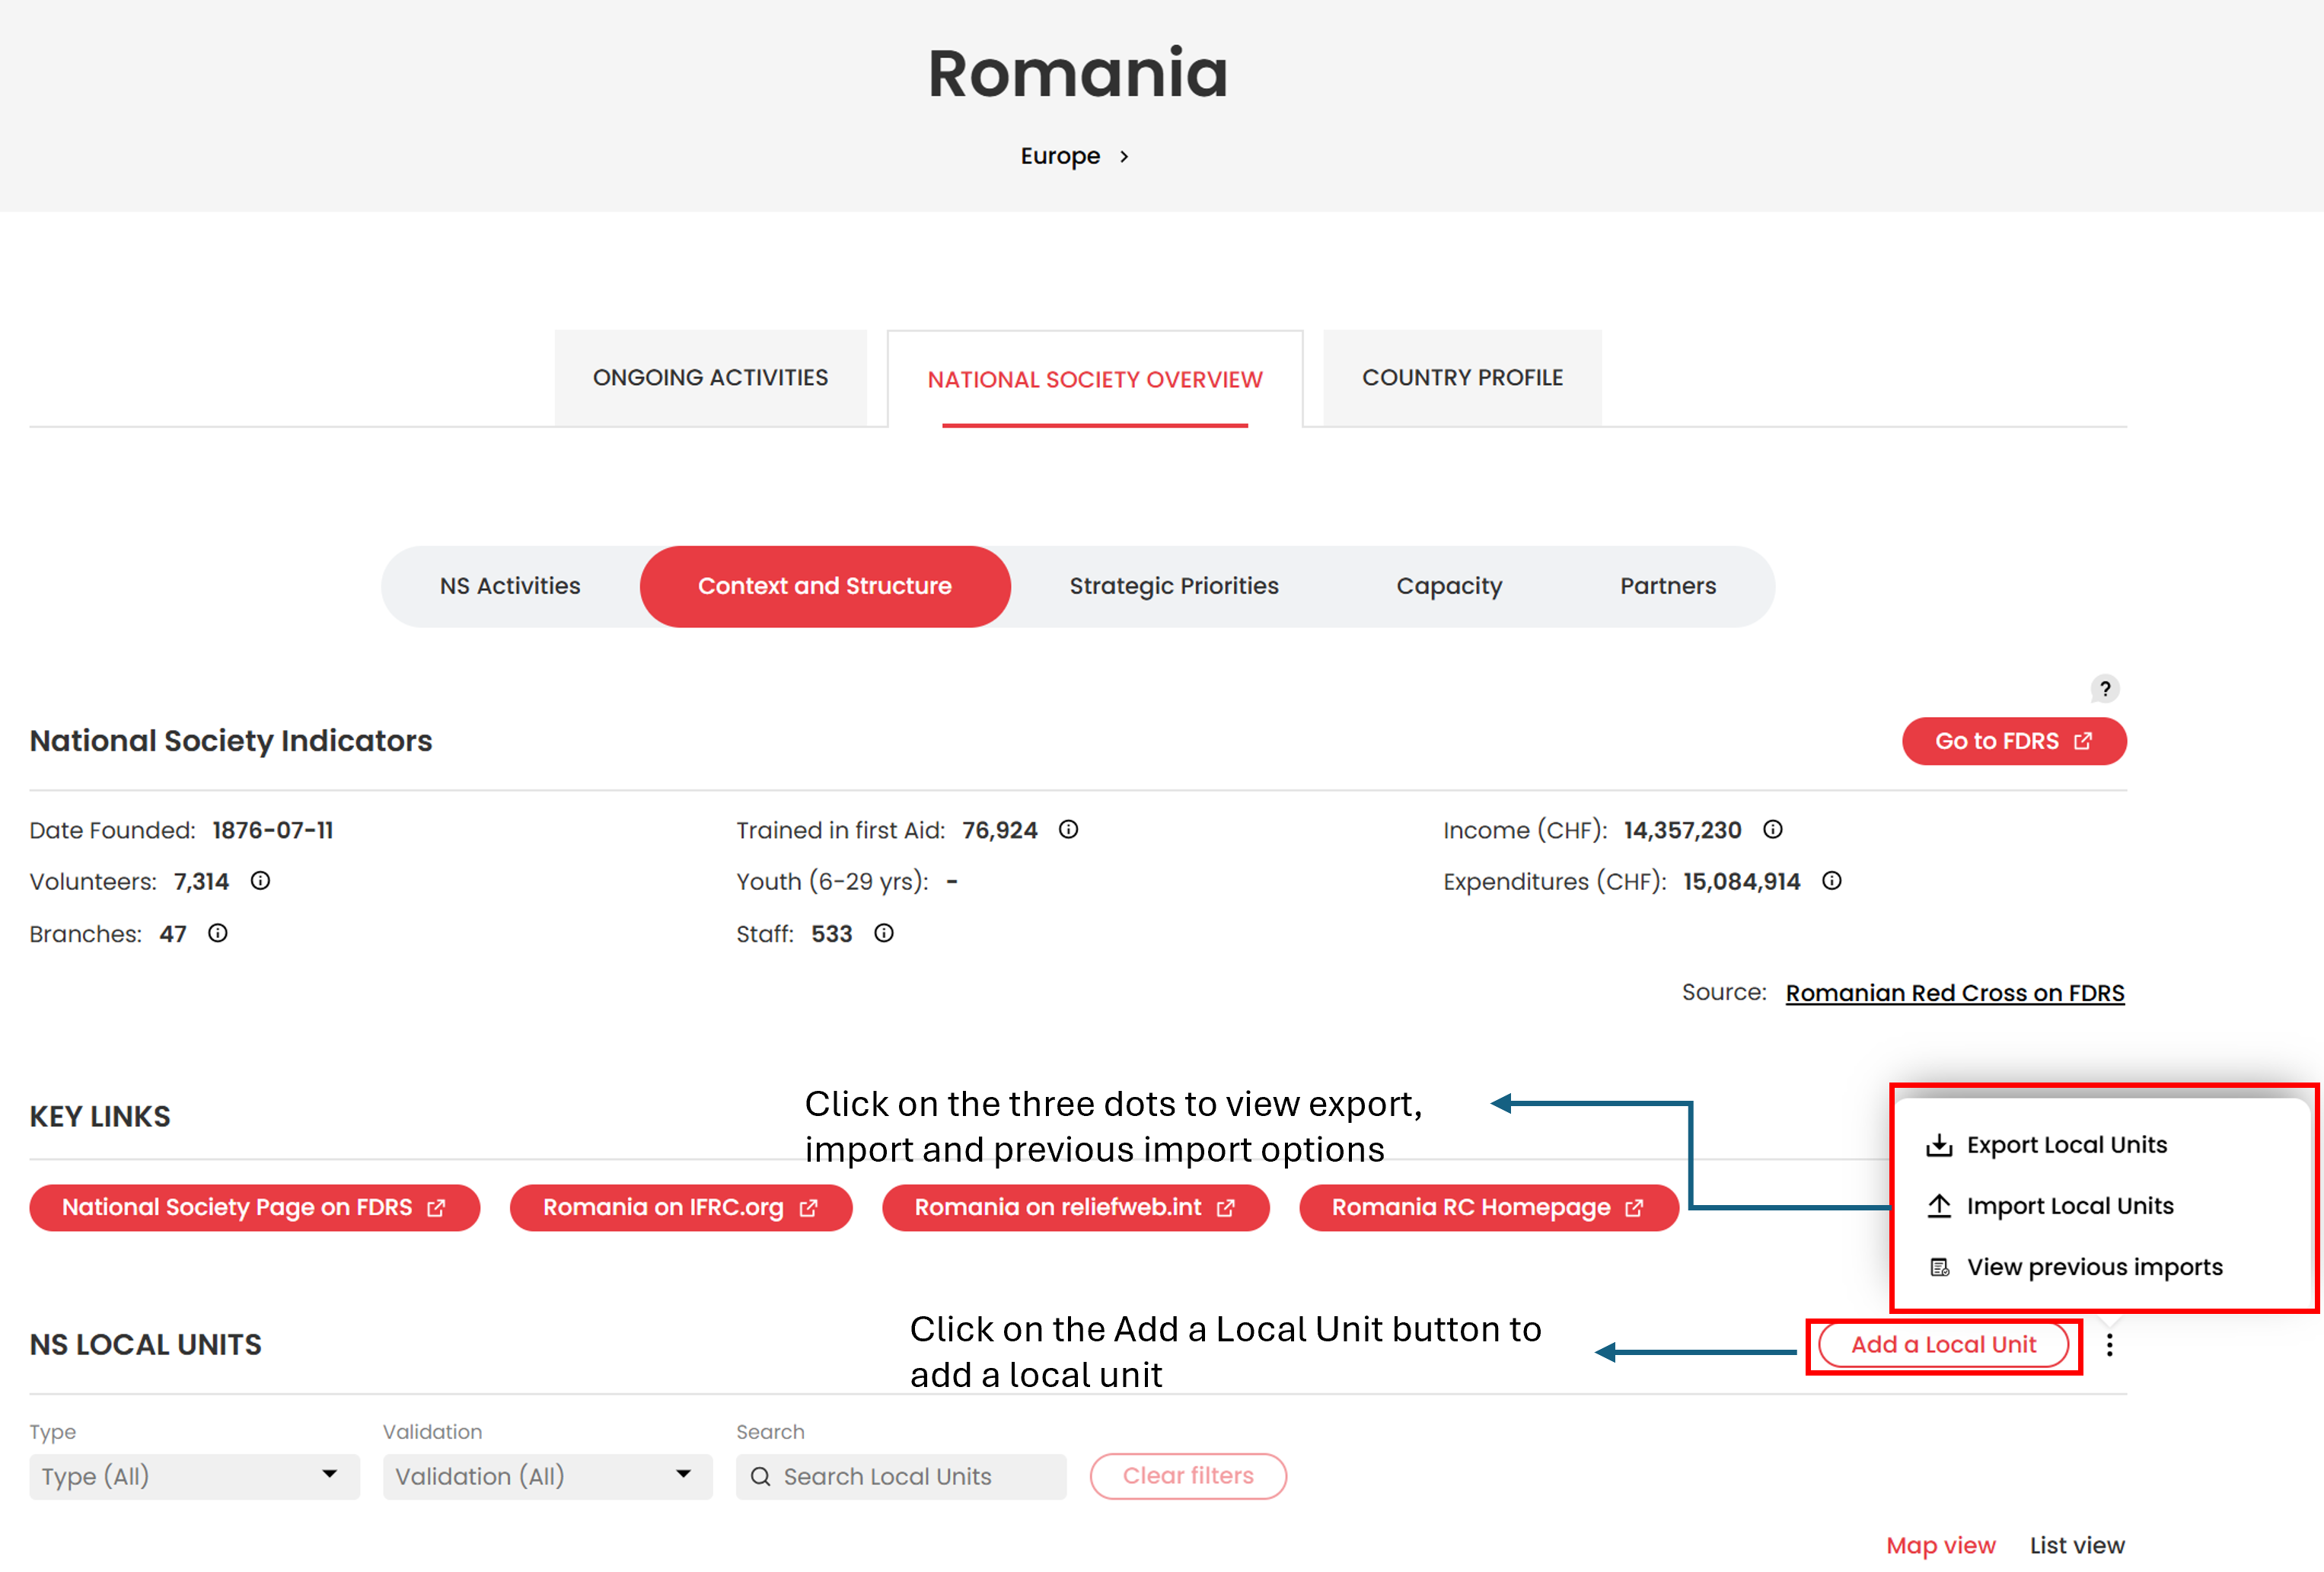
If you are a validator, click the three vertical dots next to this button to access Export Local Units, Import Local Units and View previous imports.
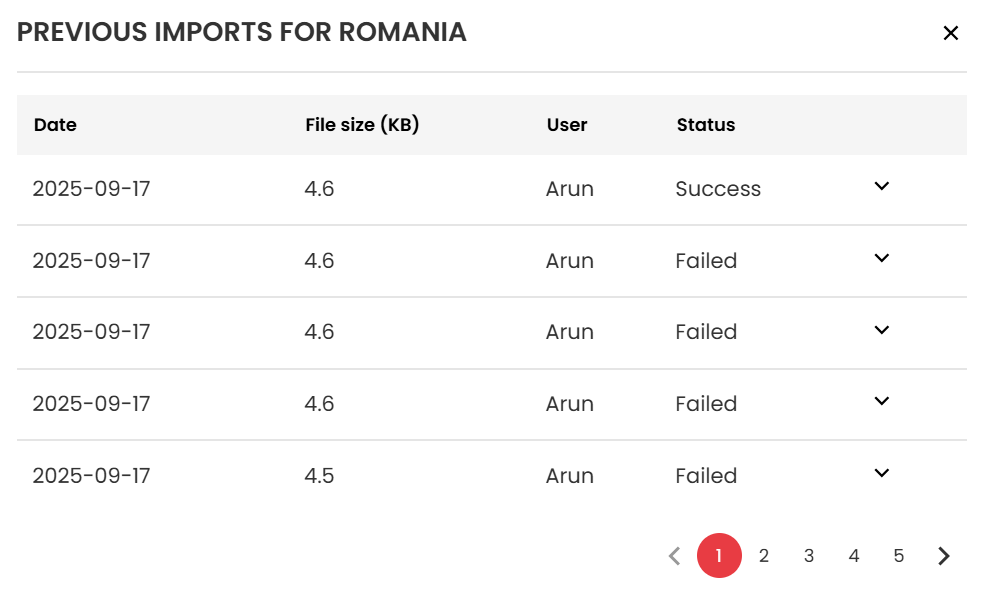
The View previous imports button displays the history of local units that were bulk uploaded. It shows the status of each upload (success or failure). You can download the data as a CSV file by clicking the down arrow next to the status.
The Import Local Units button is used to bulk upload data of local units that are externally managed.
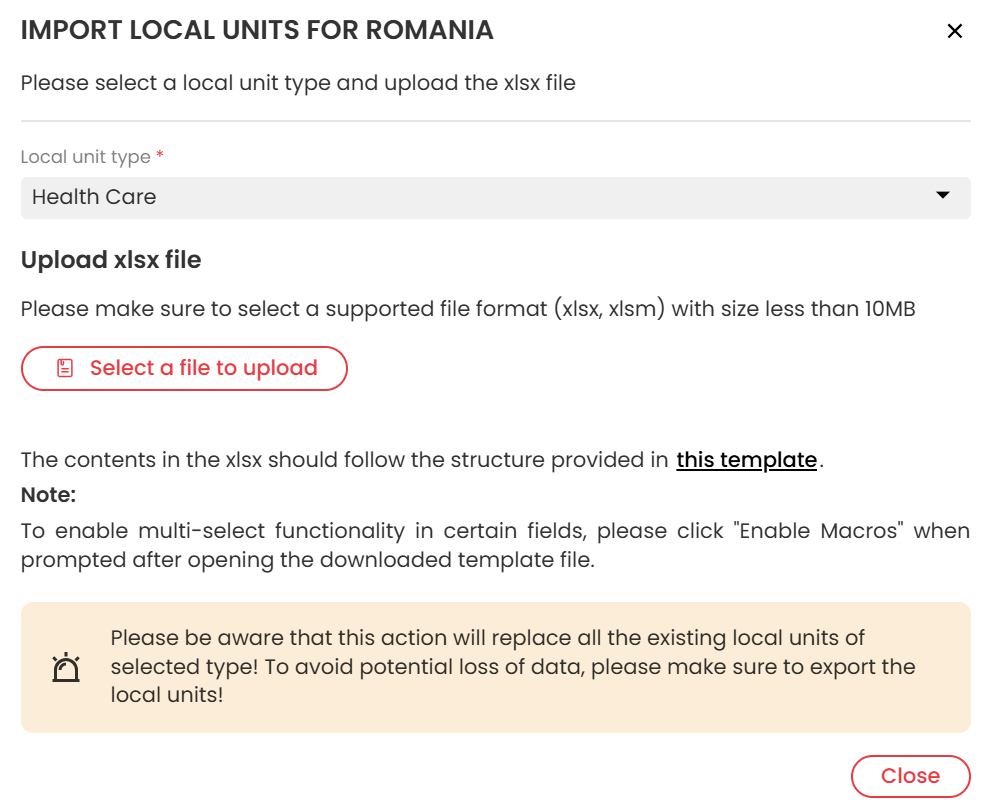
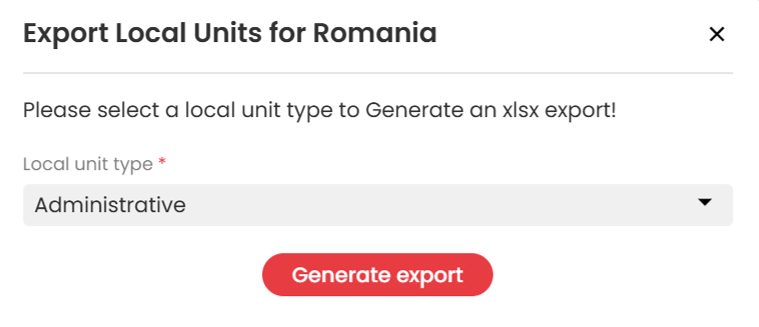
The Export Local Units button allows the validator to download the data of local unit type as a Microsoft excel file export as shown below.
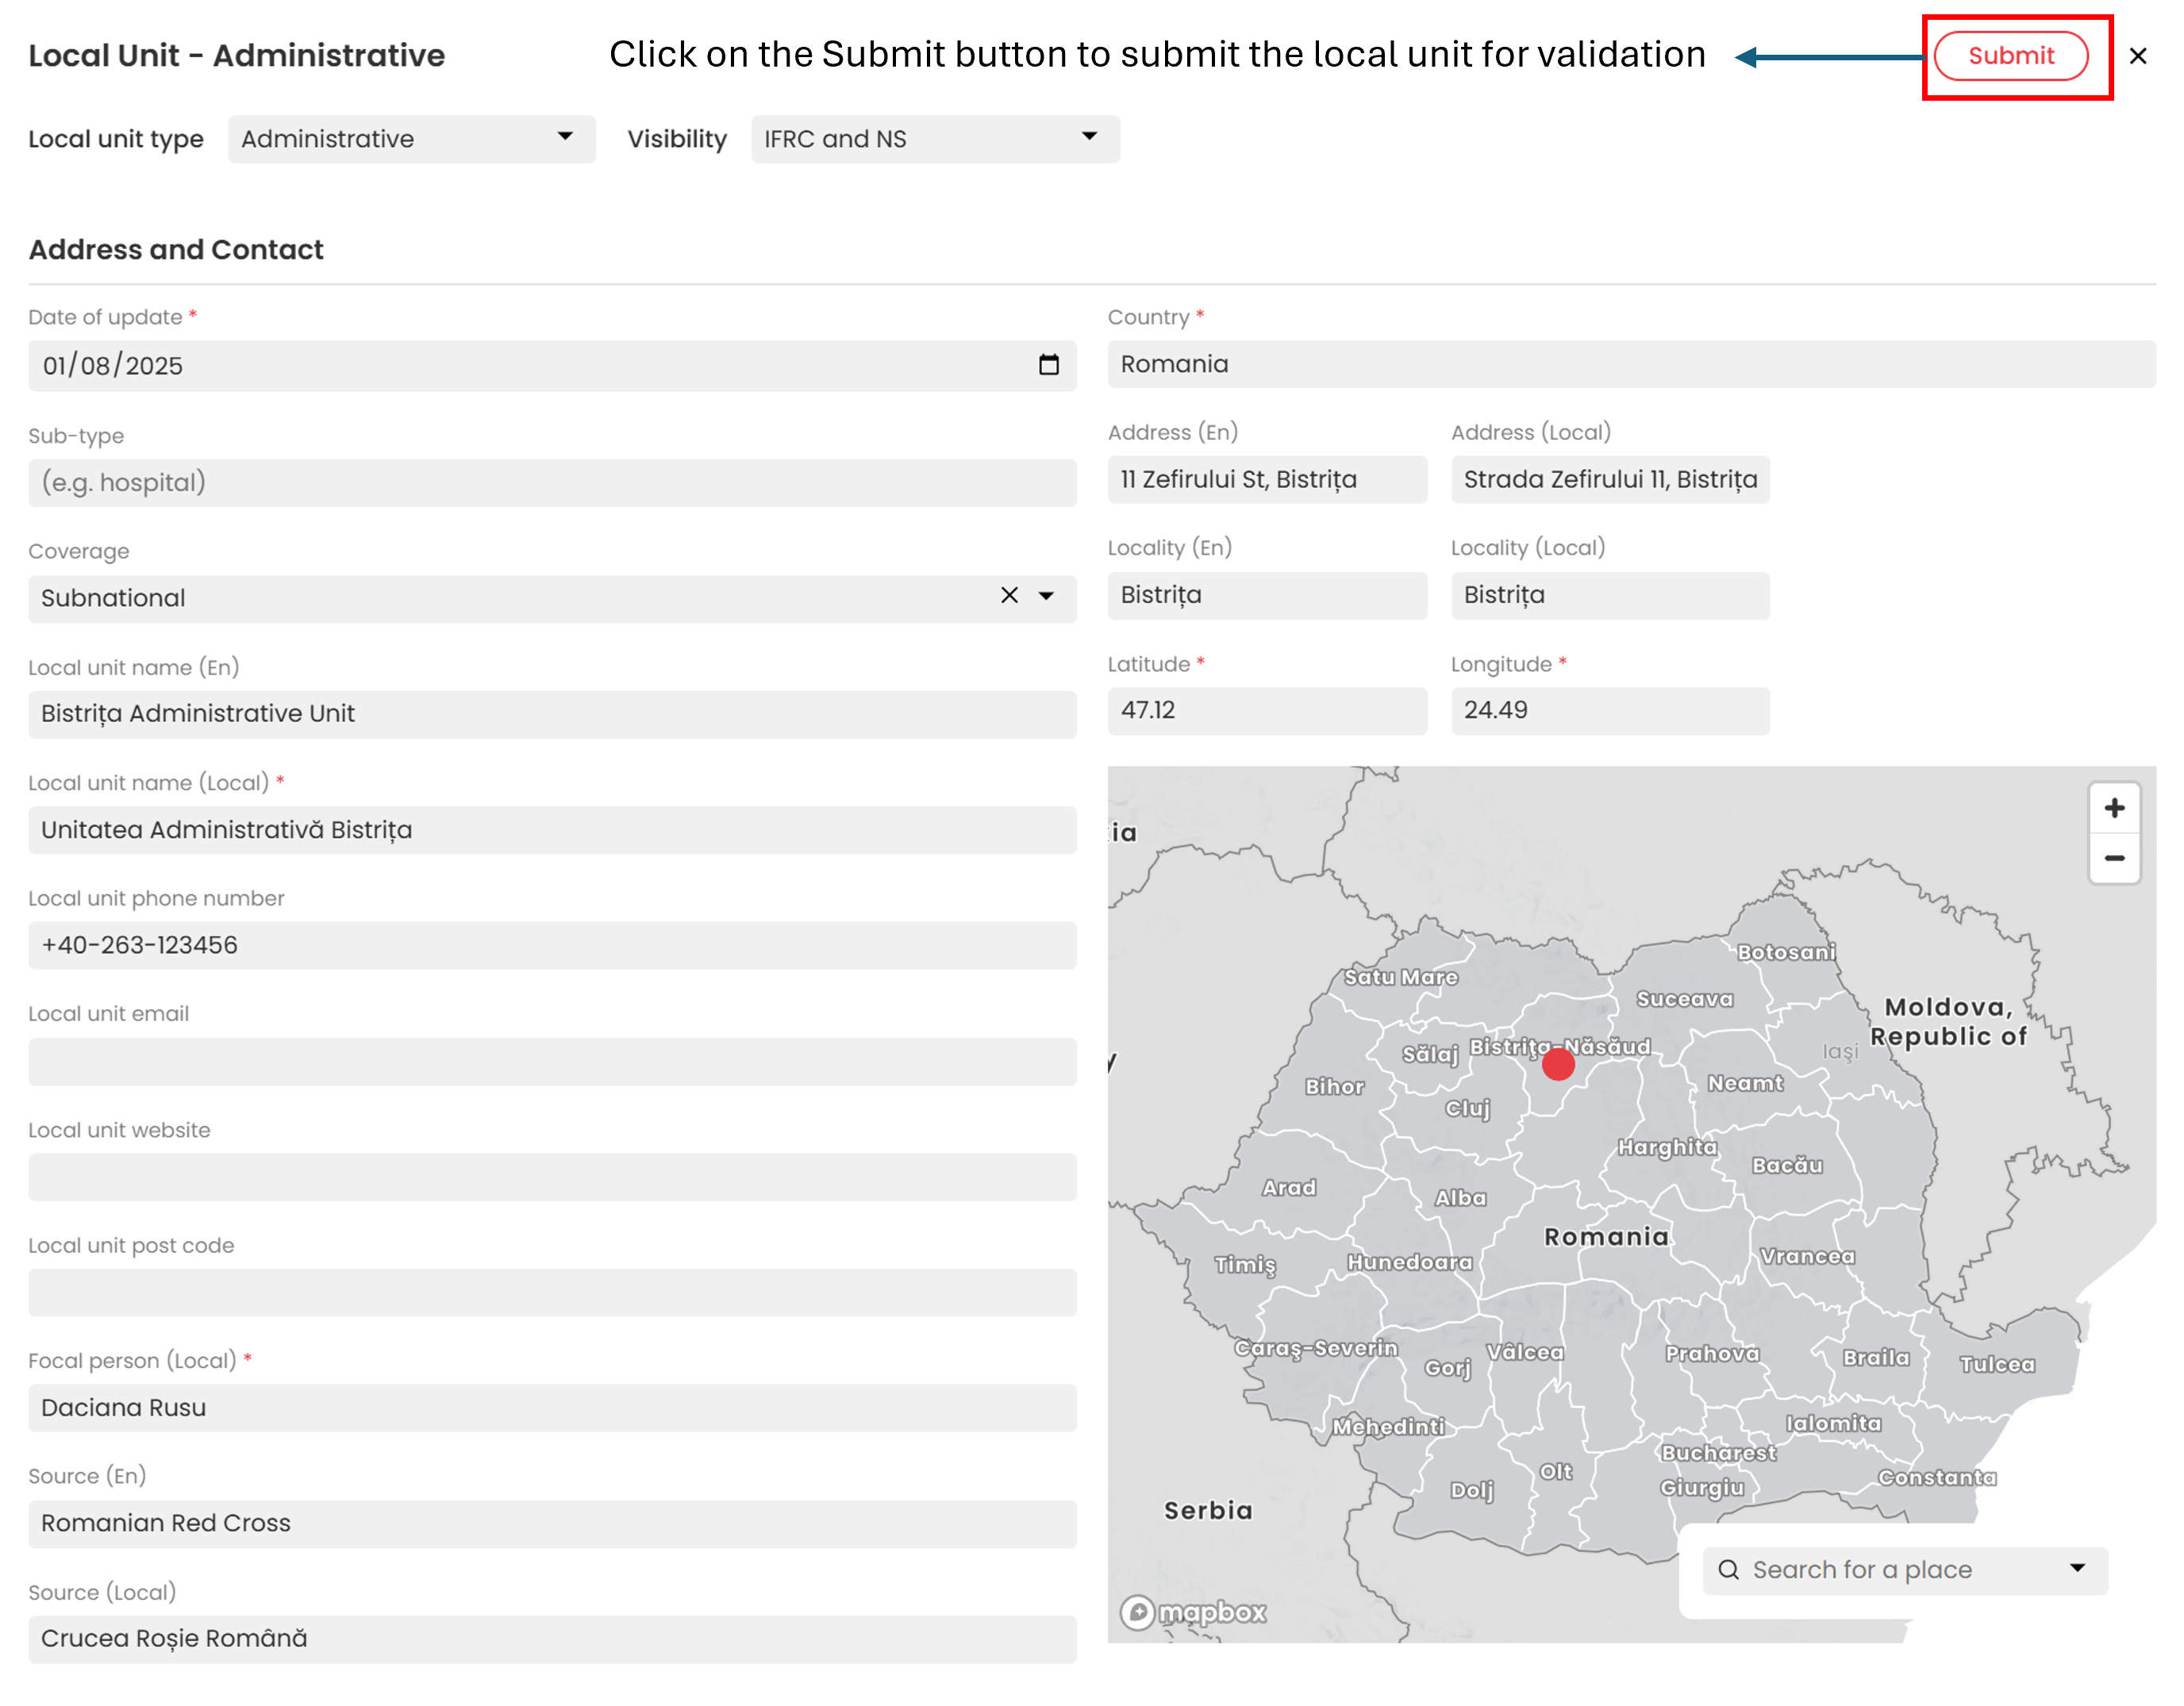
The Add a Local Unit button allows you to add information for a single local unit that is not externally managed. Clicking this button opens a new window where you select the local unit type. You must fill in the following required fields:
- Local Unit Type: Choose the type of local unit (not available for externally managed units).
- Date of Update: Date the local unit is added.
- Subtype: Specify the subtype (e.g., hospital, primary health care center).
- Coverage: Select from National, Subnational, District/Regional, or Local.
- Local Unit Name (en): Enter the name of Local unit in English.
- Local Unit Name (Local): Enter the name of the Local unit in the local language.
- Source (en): Enter the English name of the information source (e.g., Red Cross or Red Crescent Society).
- Source (Local): Enter the local language name of the information source.
- Address (en): Provide the address of the local unit in English.
- Address (Local): Provide the address of the local unit in the local language.
- Locality (en): Enter the locality (city, town) of the local unit in English.
- Locality (Local): Enter the locality (city, town) of the local unit in the local language.
- Local Unit Post Code: Enter the post code of the local unit.
- Local Unit Website: Enter the website of the local unit, if available.
- Latitude and Longitude: Provide the unit’s coordinates.
- Focal Person (English): Name of the focal person in English.
- Focal Person (Local): Name of the focal person in the local language.
If the selected local unit type is Health Care, additional fields must be completed:
- Affiliation: Select from the dropdown options such as Red Cross or Red Crescent facility, Public Government facility, Government facility, Private facility, Organizational facility, or Other.
- Functionality: Choose from options: Fully functional, Partially functional, Not functional, or No information.
- Hospital Type: Select the type of hospital from the given options, namely: General Hospital, Mental Health Hospital and Specialized Hospital Non Mh.
- Teaching Hospital: Yes/No radio button.
- In-patient Capacity: Yes/No radio button.
- Isolation Rooms/Wards: Yes/No radio button.
Further, provide details on the health care unit’s specialty and capacity:
- Health Facility Type: Select from options like Hospital, Ambulance, Blood Center, etc.
- Other Facility Type: If “Other” is selected, specify the facility type.
- Primary Health Care Center: Choose from Medical Practices, Dental Practices, or Other Health Care Practitioner.
- Specialties: List the specialties available in the health care unit.
- General Medical Services: Select multiple services from the dropdown.
- Specialized Medical Services Beyond Primary Level: Select from the listed specialties, allowing multiple selections. (e.g., Genecology, antitheology, internal medicine etc.)
- Other Services: Provide any additional services not listed previously.
- Blood Services: Select the type(s) of blood services provided (e.g., blood collection, blood testing).
- Professional Training Facilities: Add any available professional training facilities namely Nurses, paramedics and Others.
- Ambulance Information: Enter the number and types of ambulances (e.g., Type A, Type B, Type C).
- Human Resource Information: Include staff details such as total doctors, nurses, specialists, resident doctors, dentists, and nursing aides.
- Comments by the NS: Add any extra information about the local unit if needed.
Upon filling all the necessary fields which are indicated by the red asterisk, users have to click on the submit button to submit the information for validation.
Once submitted for validation, the entries are locked and cannot be edited. They can only be edited once the local unit has been validated by a validator. The validator will receive an email notification for validating the local unit as shown in the Local Units Validation section
The validators are present at the following levels, namely: country level (or National society level focal point), regional level and global levels based on different permissions.
These permissions can change by type of local unit, country and region. A validator at any level has 7 days to approve or reject the local unit information. If there is no response from the validator at any level the request escalates to the next level.
¶ Local Units Validation
Local Unit validation uses a multi-tier approval process to ensure information accuracy. New or edited records are locked and sent to validators by role, with escalation from country to regional to global level as needed, so only authorized records are approved.
There are three type of validators:
- Country (National Society) Validator: Reviews and approves new or edited local unit entries as the first level of validation within their National Society. Country validator has 7 days to approve or disapprove the Local unit.
- Regional Validator: Provides second-tier validation if the local validator does not respond, overseeing approvals across multiple countries in the region. Regional validator also has 7 days to respond if escalated from country level due to no action.
- Global Validator: Acts as the final authority, validating entries that were not processed at previous levels to ensure global data quality.
When a local unit is submitted by a user for validation, an email notification is received by the concerned validator. The email notification contains the name of of the Local unit, country along with the link to the Context and Structure tab under the National Society Overview on the Country Page. It is important that the validator is logged into Go Platform to validate the Local unit.
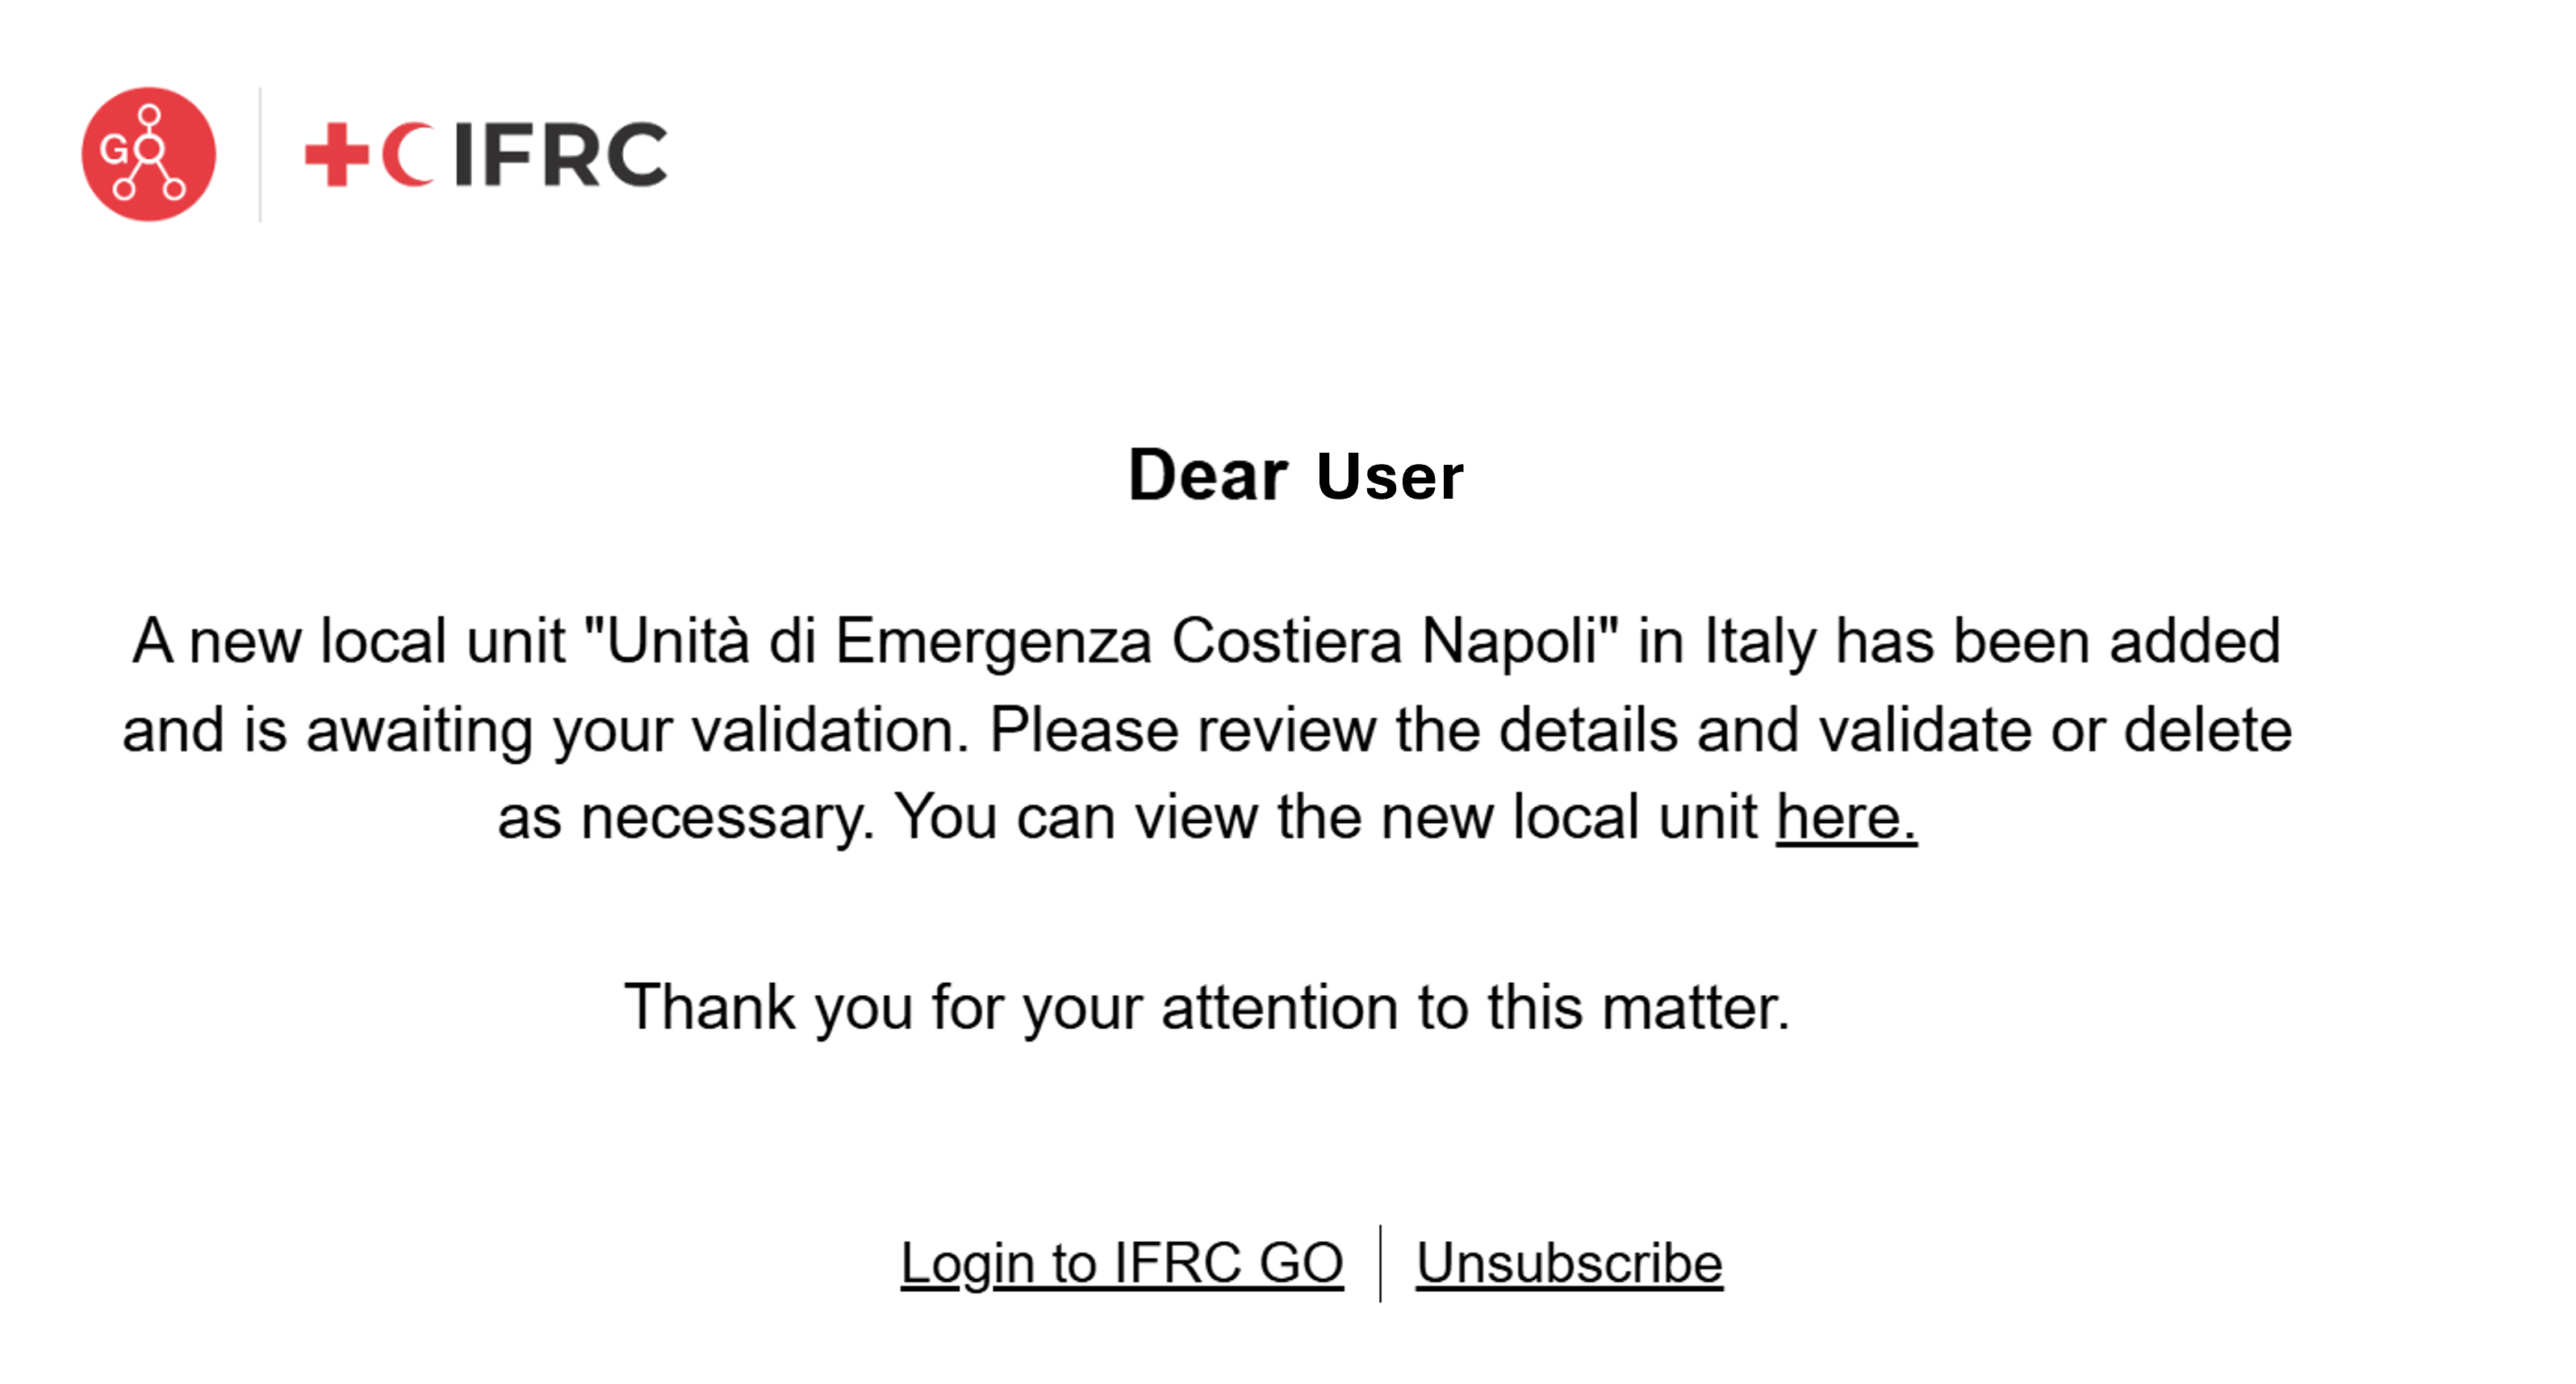
The Process of Validating a Local unit is as follows:
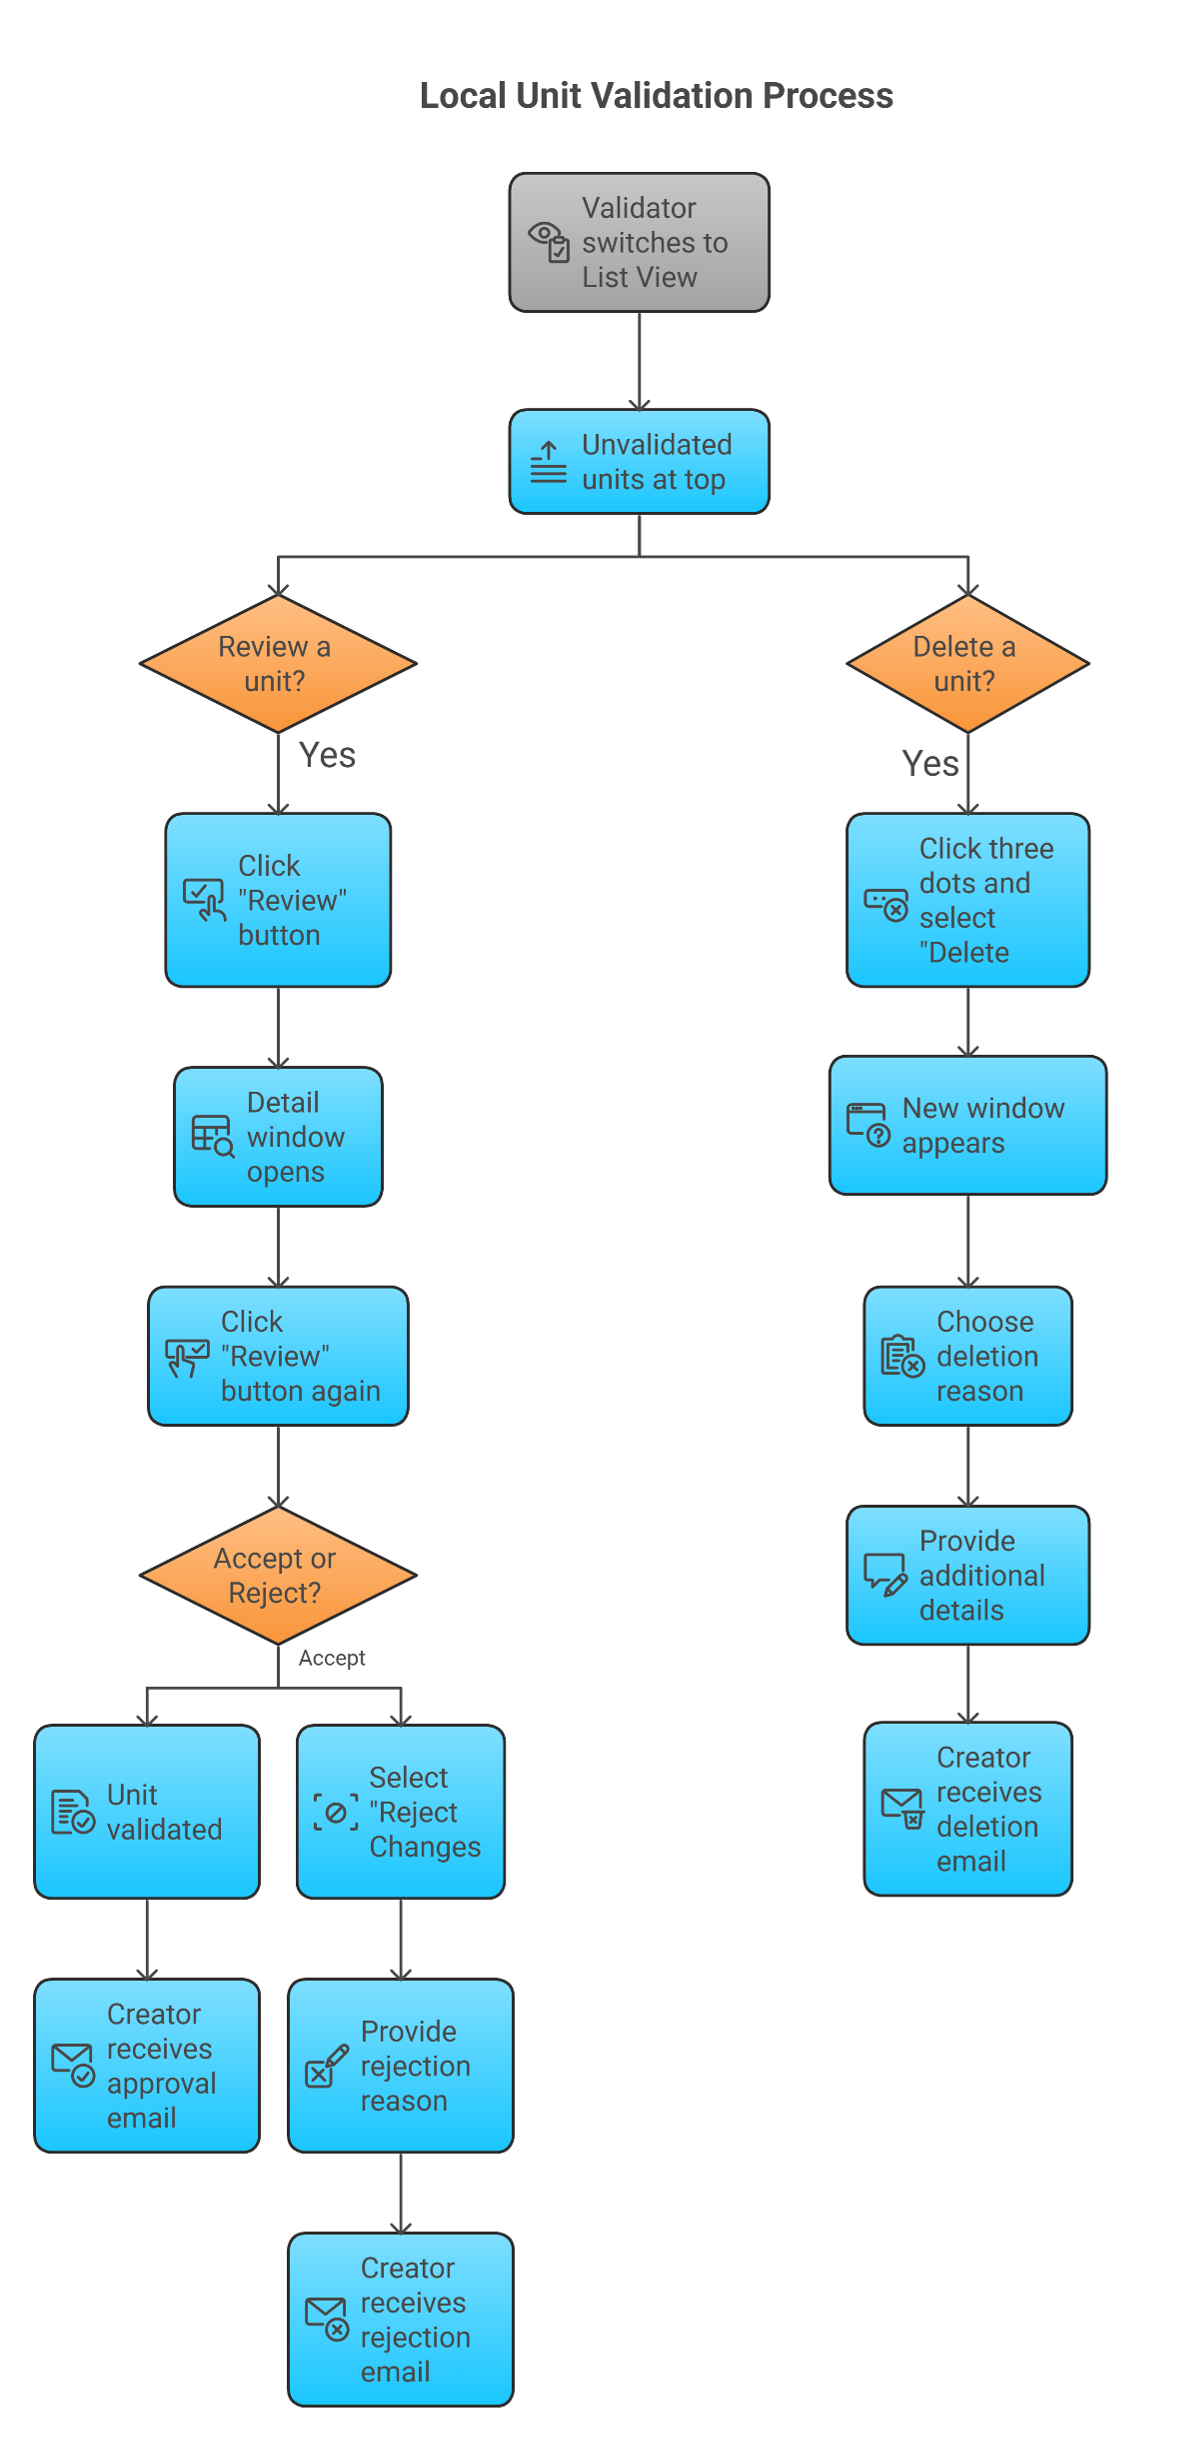
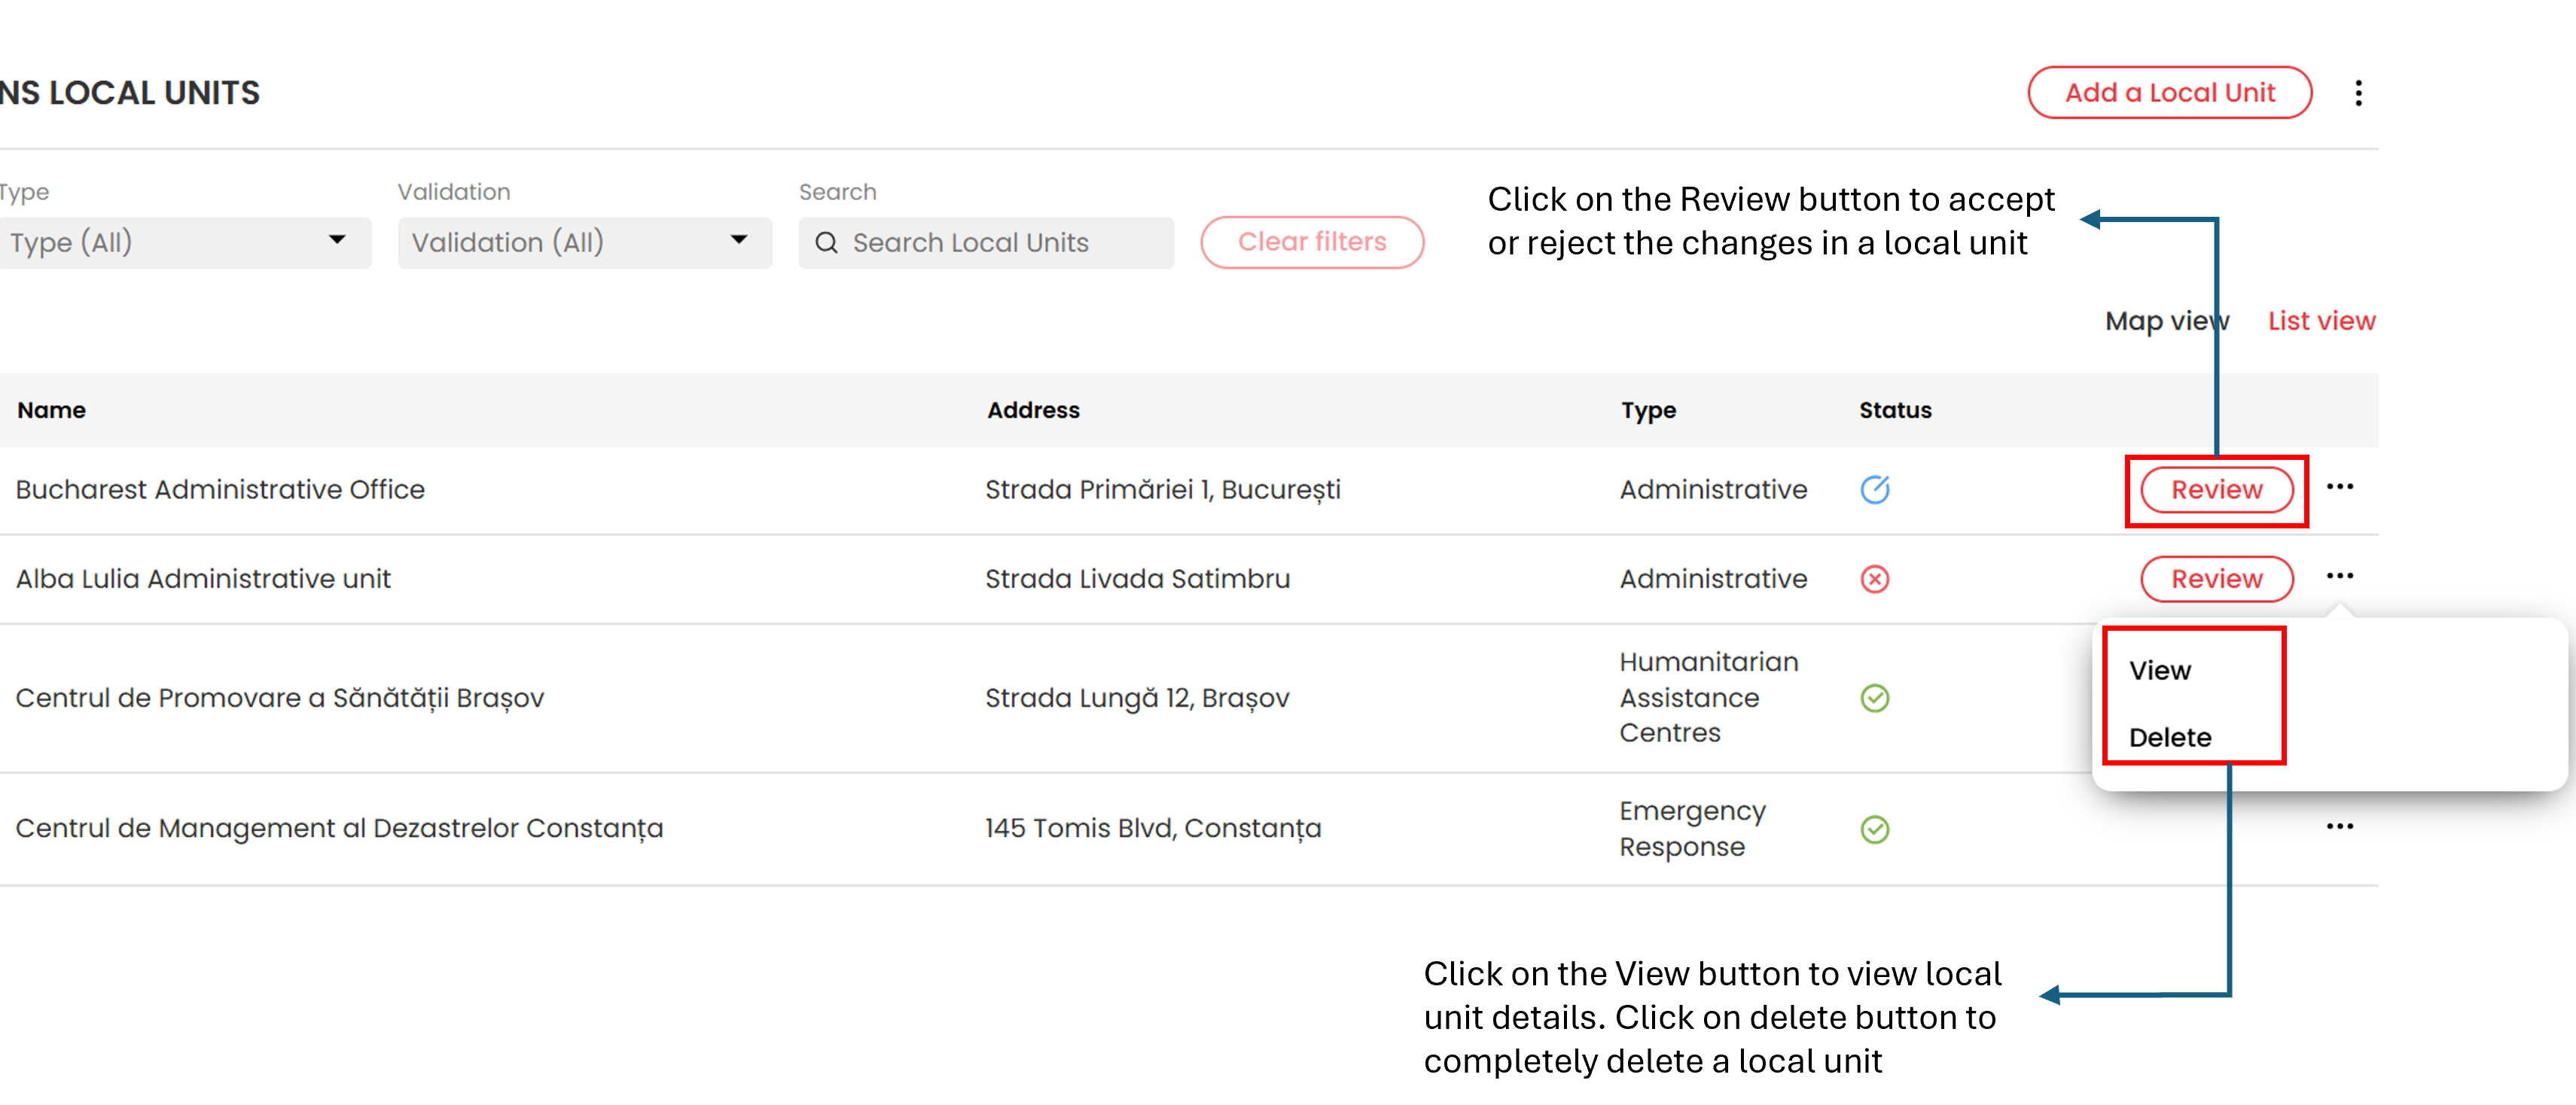
- Clicking on the link will redirect the validator to the concerned local unit, the validator needs to click on the List view to view the unvalidated local units. Unvalidated local units will appear at the top of the list.
- Validators can use the Validation dropdown menu to filter and display only unvalidated local units or can use the other drop downs like Type or Search to search/ locate the local unit of their choice.
- To review a unit, Validators can either:
- Click the Review button to examine the details directly, or
- Click the three dots next to the Review button and select View to open a window with the unit’s details.
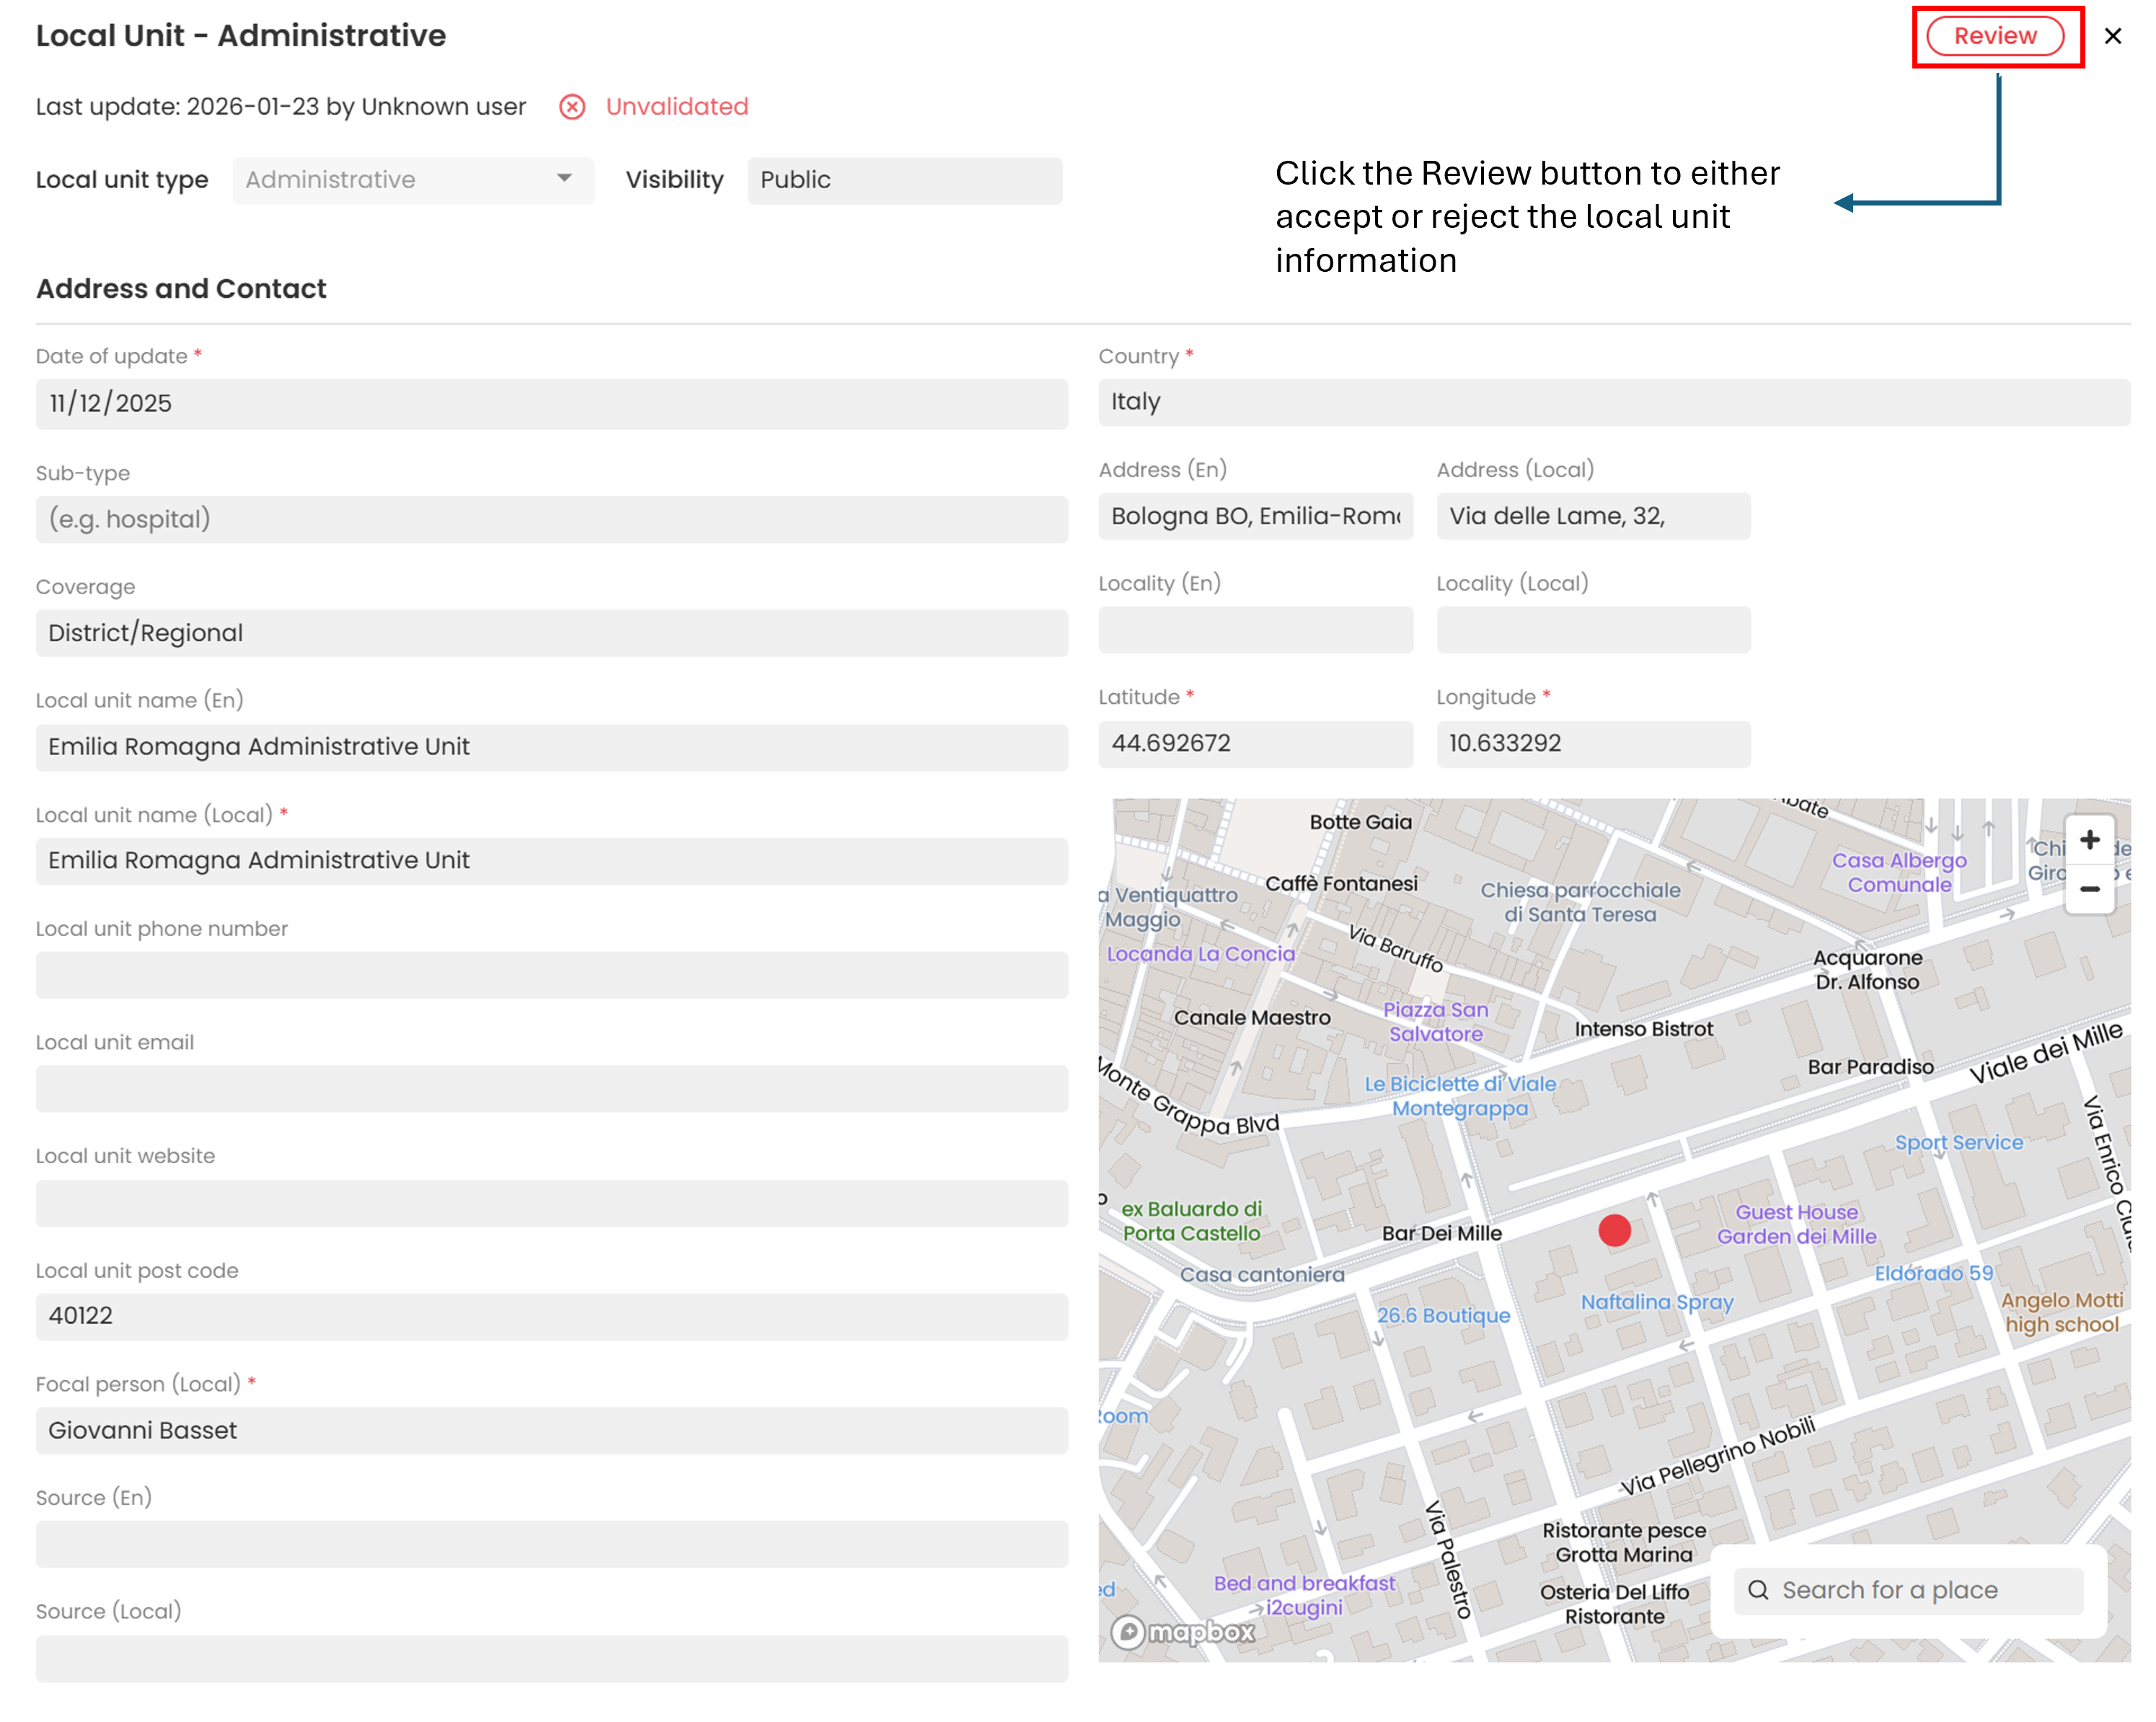
- In the detail window, local unit form appears with the data of the fields that were filled by the creator of the local unit. Validators can once again click the Review button to either accept or reject the local unit information.
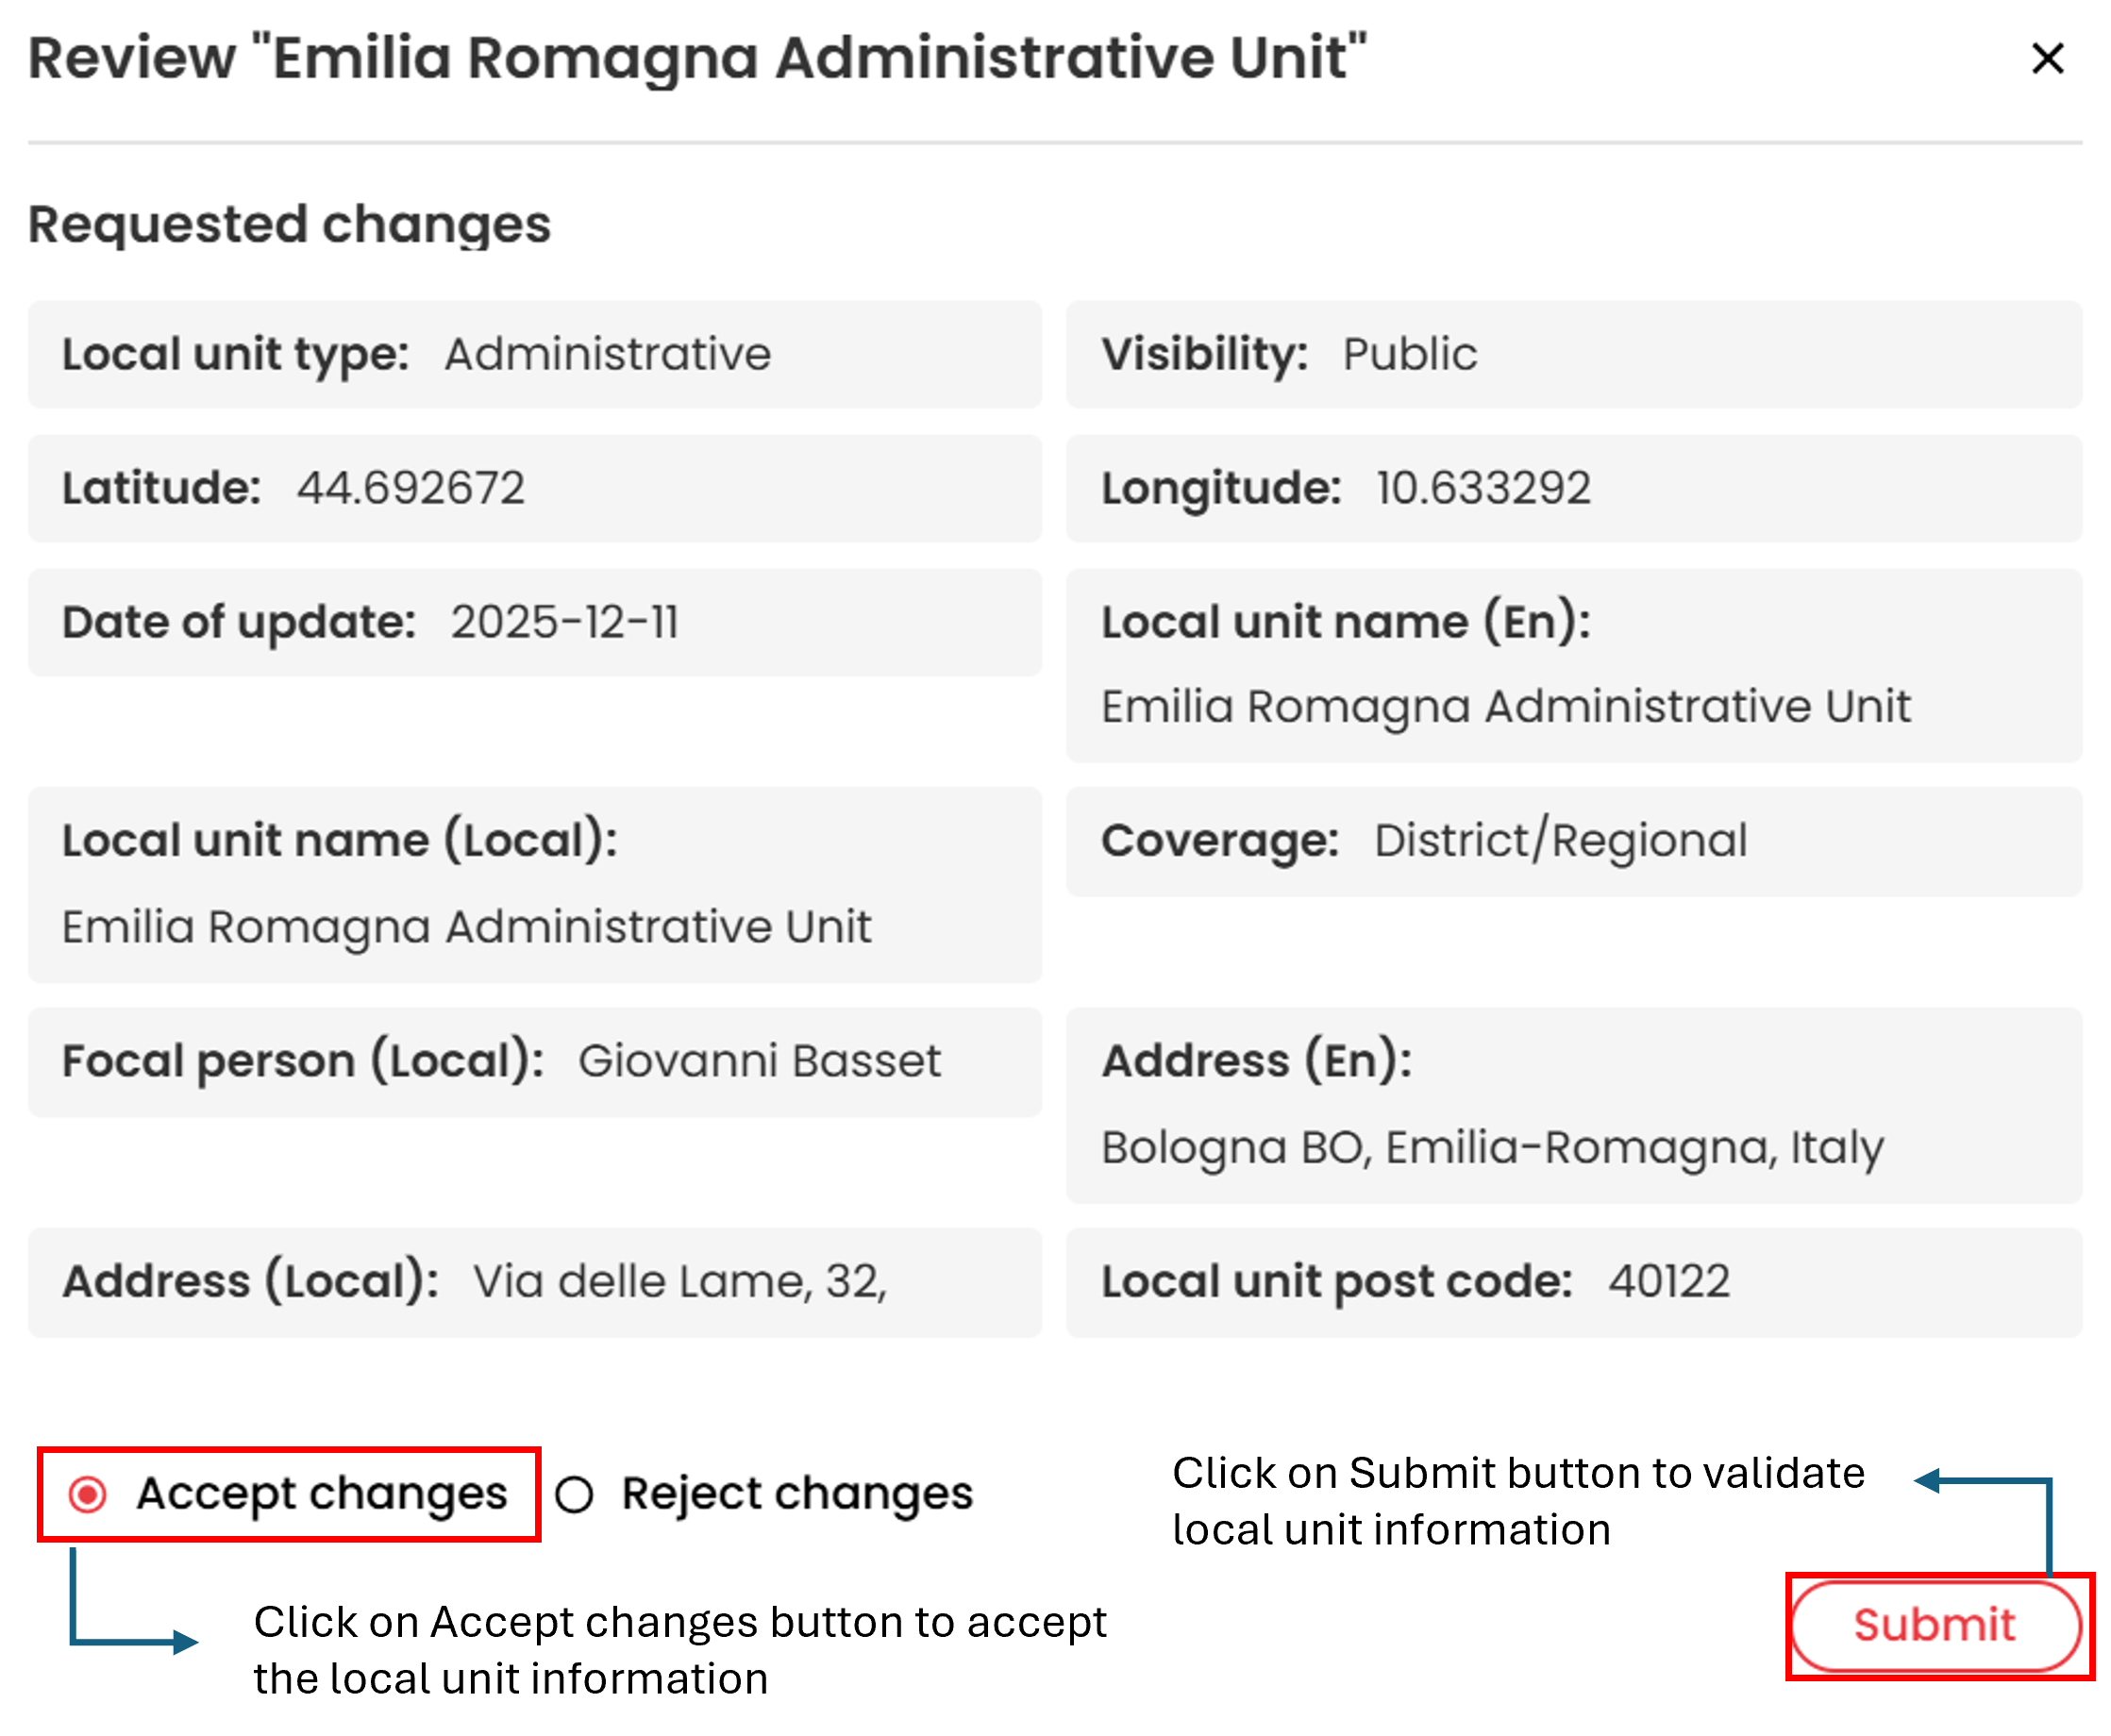
- When the Validator clicks the Review button, a new window opens where they can choose to Accept or Reject the changes.
- If the Validator accepts the changes, they click on the Accept changes radio button and then click on Submit:
- The local unit is validated.
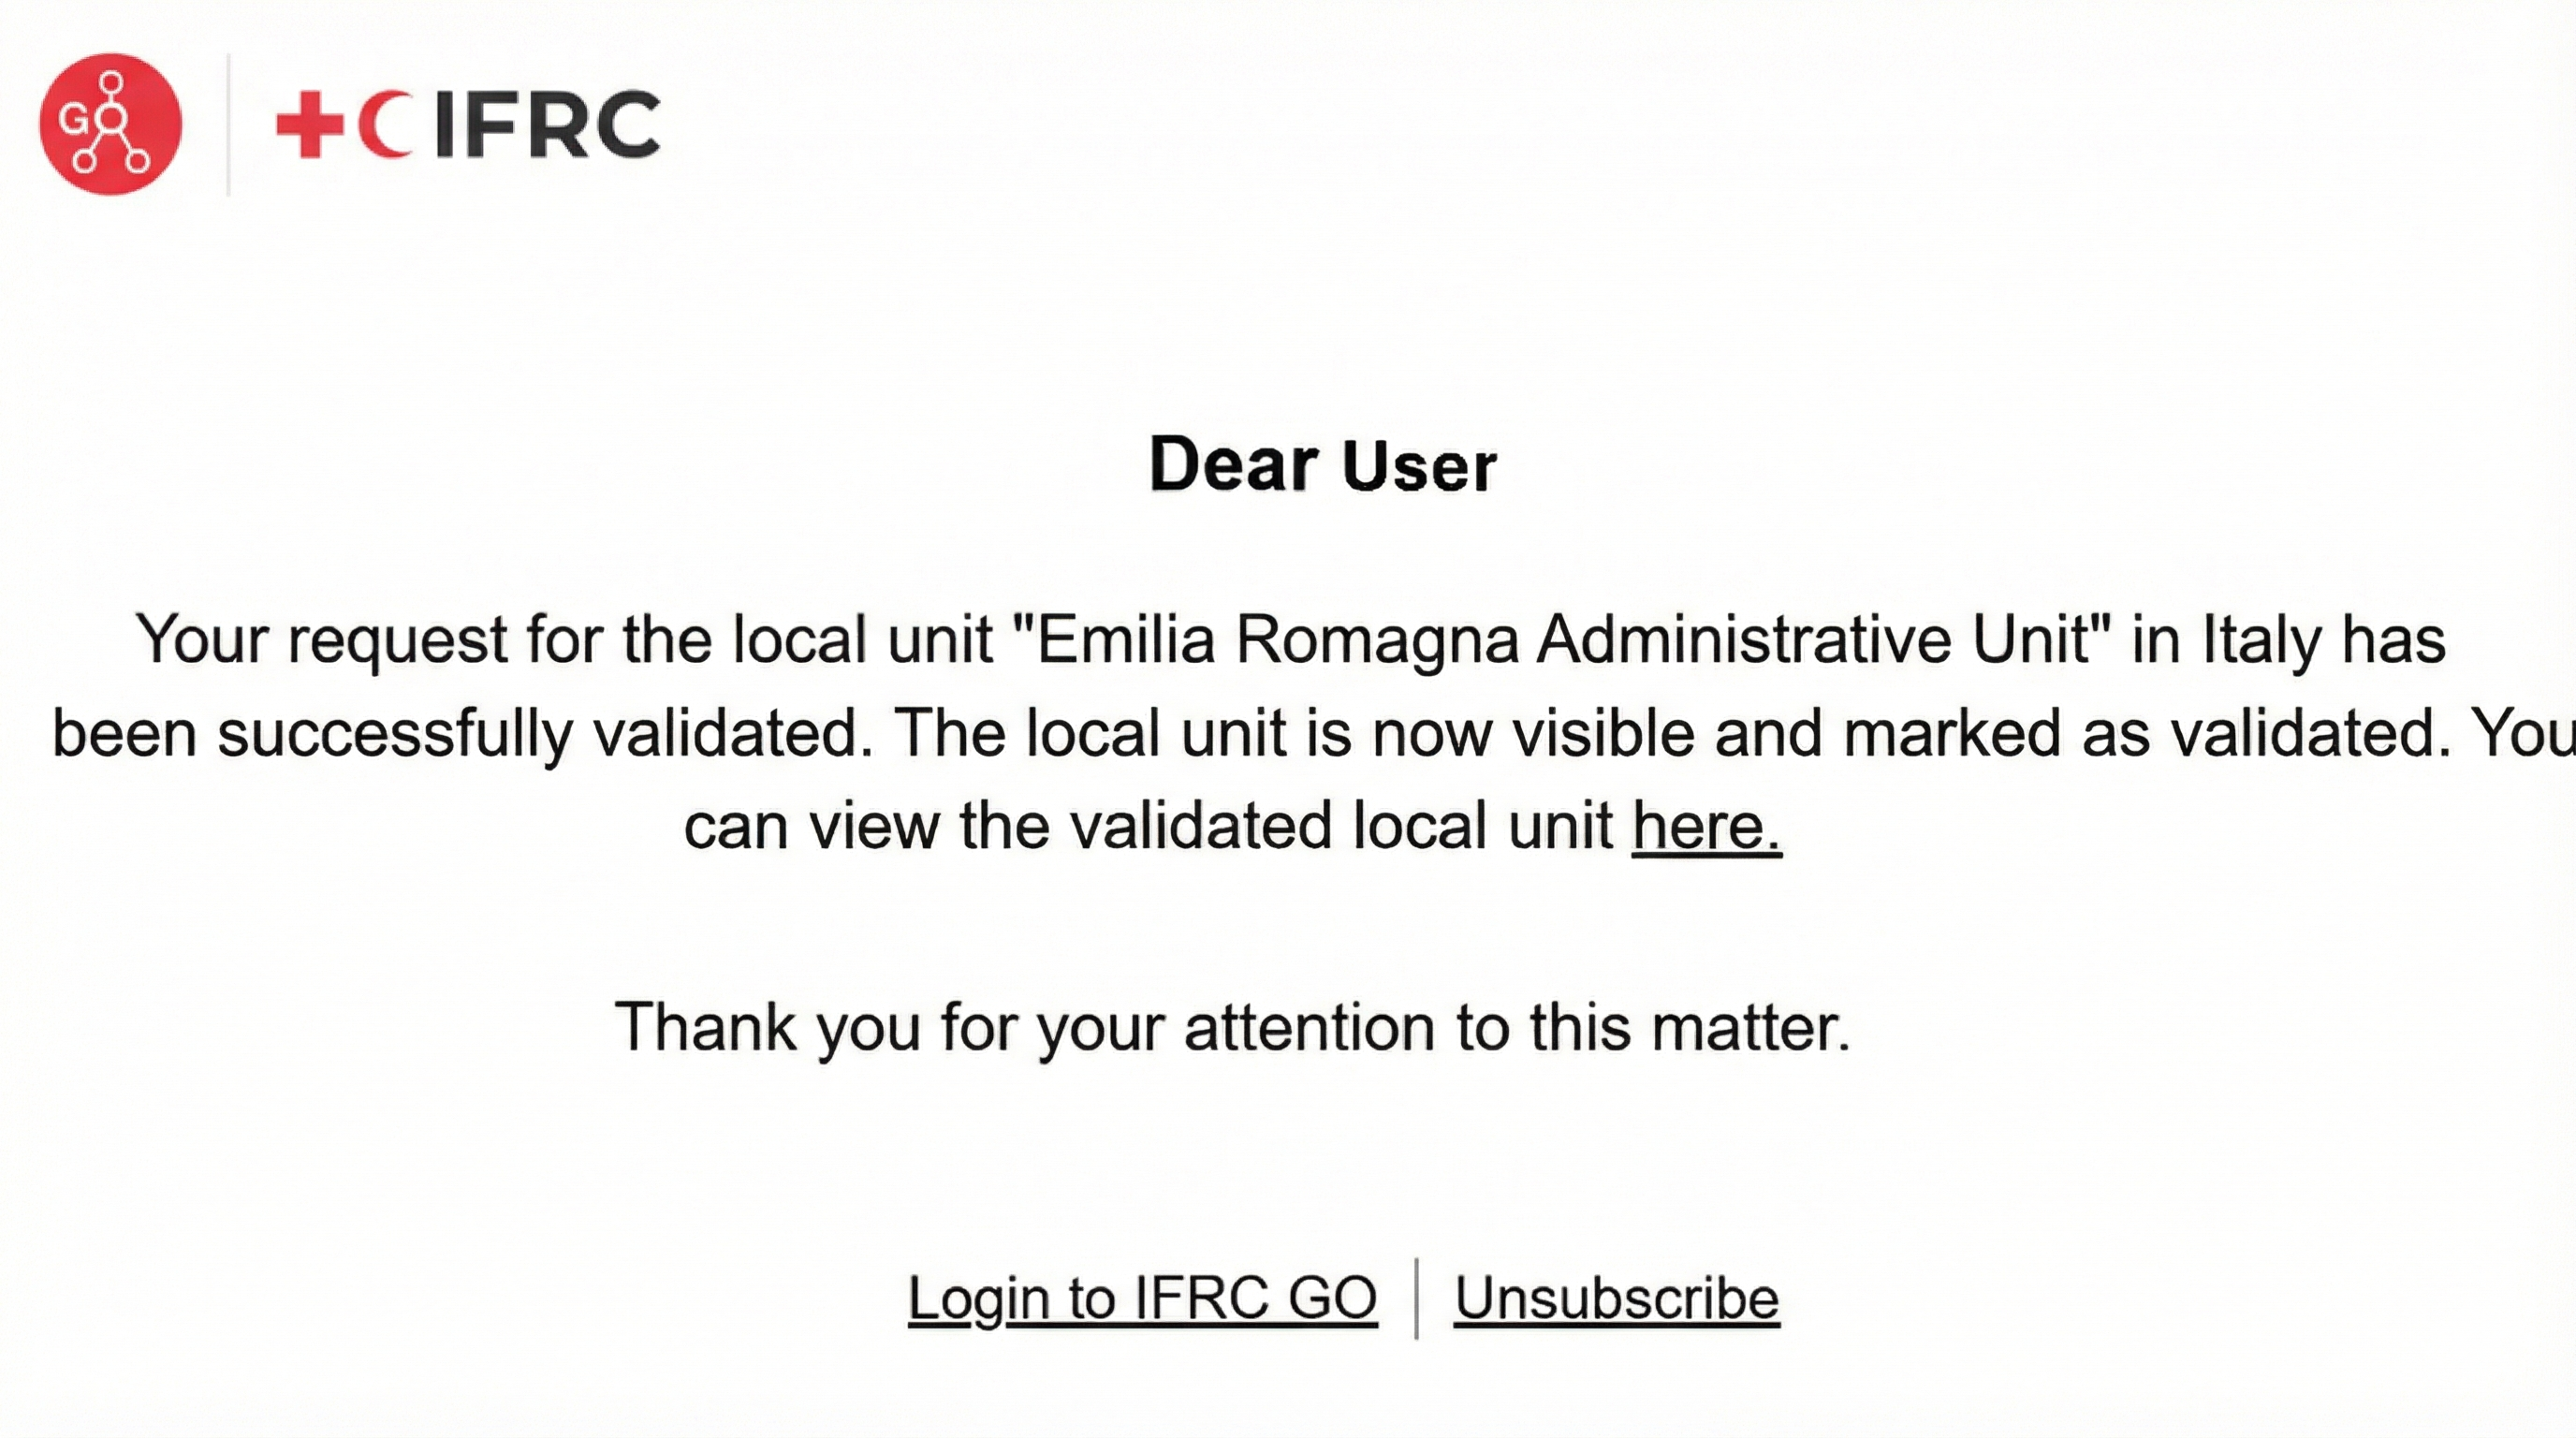
- The creator of the local unit receives an email notification confirming the approval of their addition request.
Once the validator accepts the changes, the user who created the local unit will receive an email as shown below that the local unit was validated
- If the Validator finds the information incomplete or incorrect:
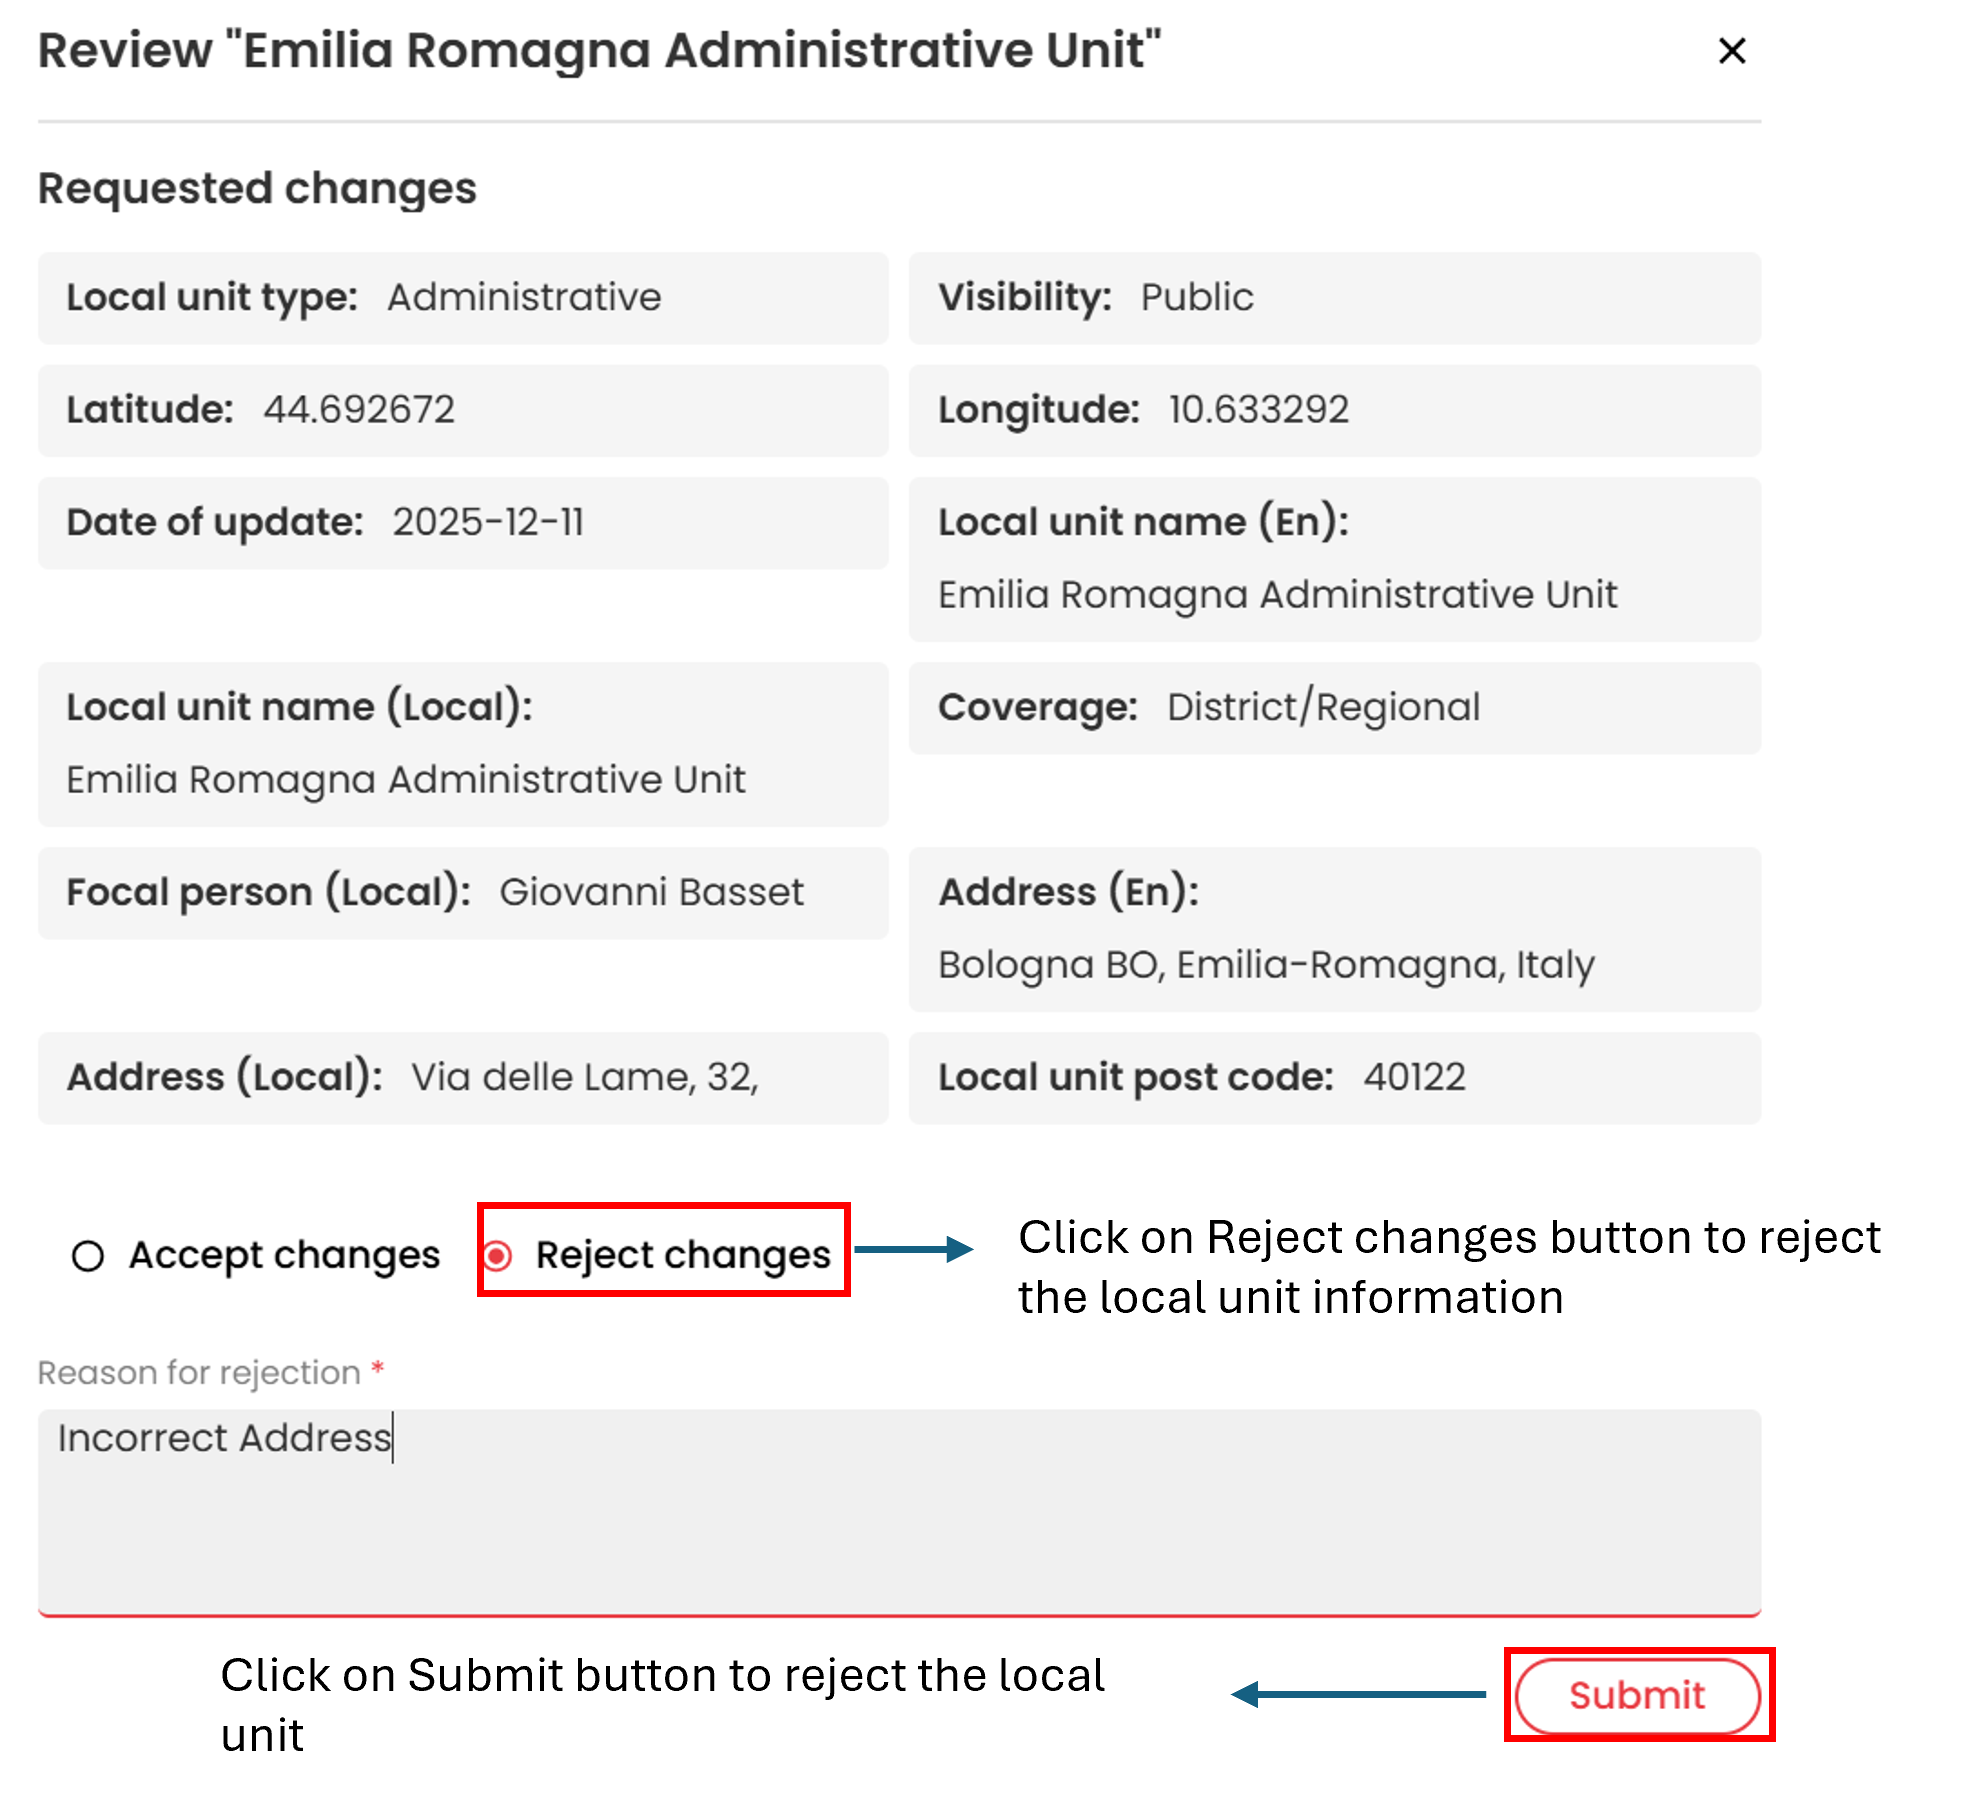
- They can select the Reject Changes radio button.
- A textbox will appear where the validator can provide a reason for rejection. After entering the reason, the validator can click on the Submit button and the Local unit change would be rejected
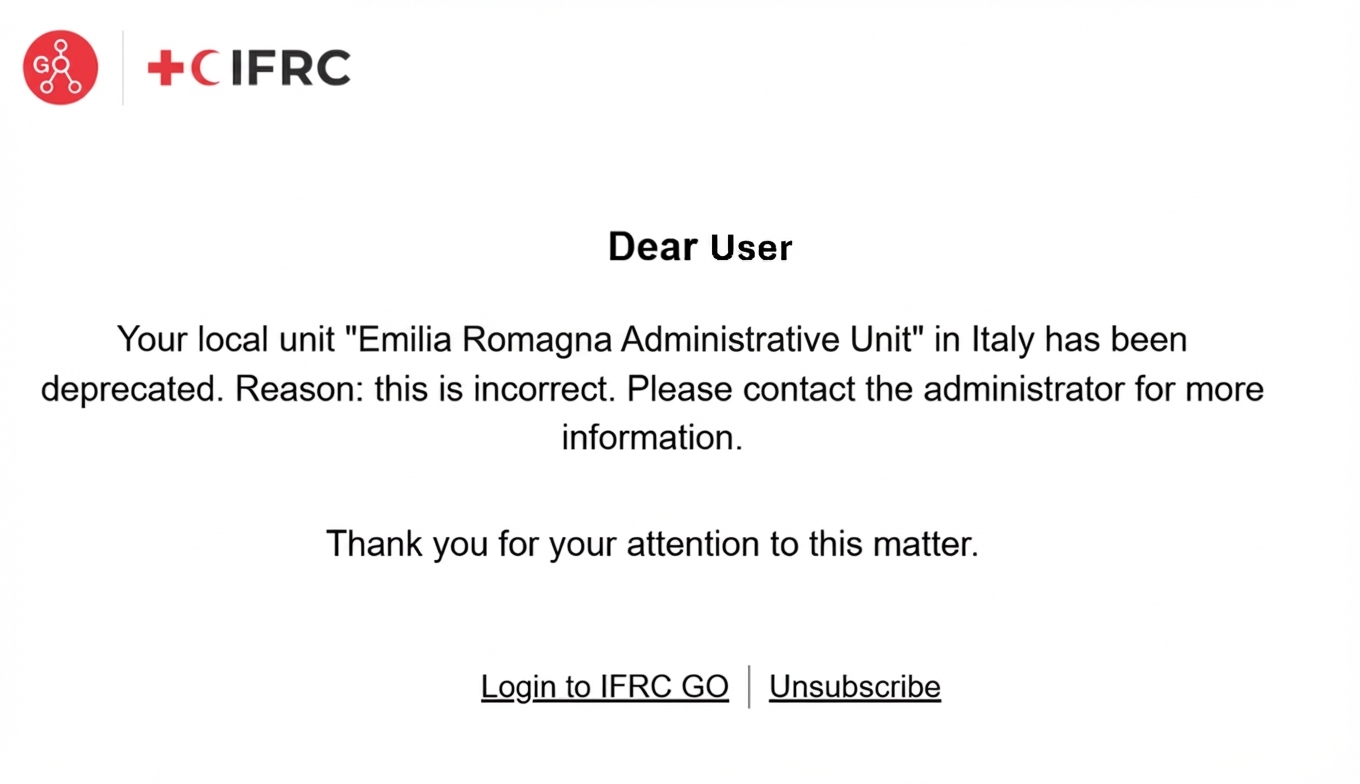
- The creator of the local unit will receive an email notification that their Local unit Addition request has been depreciated along with the reason for the depreciation.
When the validator rejects the changes/ local unit information, the user who created the local unit will receive an information saying that the local unit created has been deprecated as shown below.
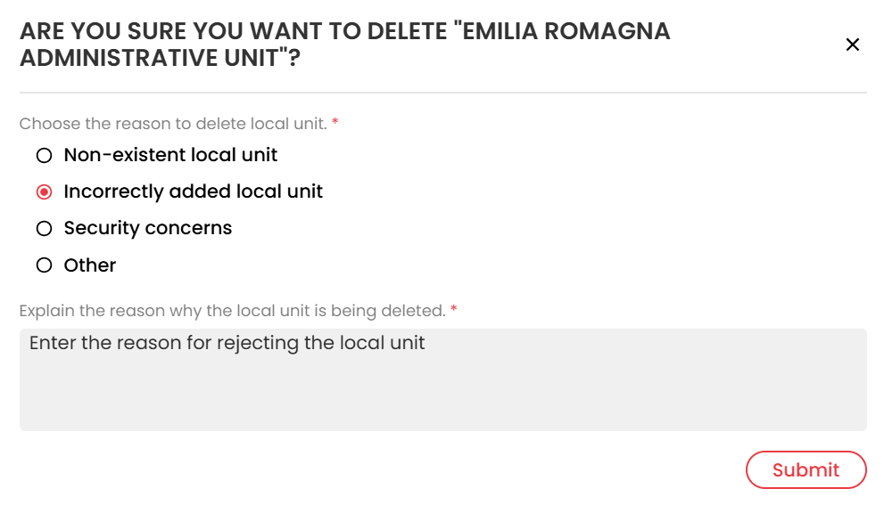
Local Unit Validators can also completely delete a local unit by clicking on the three dots button and then clicking the Delete button.

- A new window will appear where Validators can choose the reason for deleting the local unit.
- Validators can also provide additional details in the text box that appears below the reason selection. Click on the Submit button and the local unit will get deleted.
- In this case, the creator of the local unit will receive an email notification informing them that their local unit has been depreciated.
¶ Local Unit validation by Regional or Global Validators
If the country validator does not respond to validation request then the system automatically escalates the validation request to the assigned regional validator. The regional validator now has 7 days to respond (approve or disapprove) to the request of adding a local unit. The Regional validator will receive a email notification as shown below.
To validate or reject addition of a new local unit, a regional validator will follow the same procedure as outlined in the Local Units Validation section.
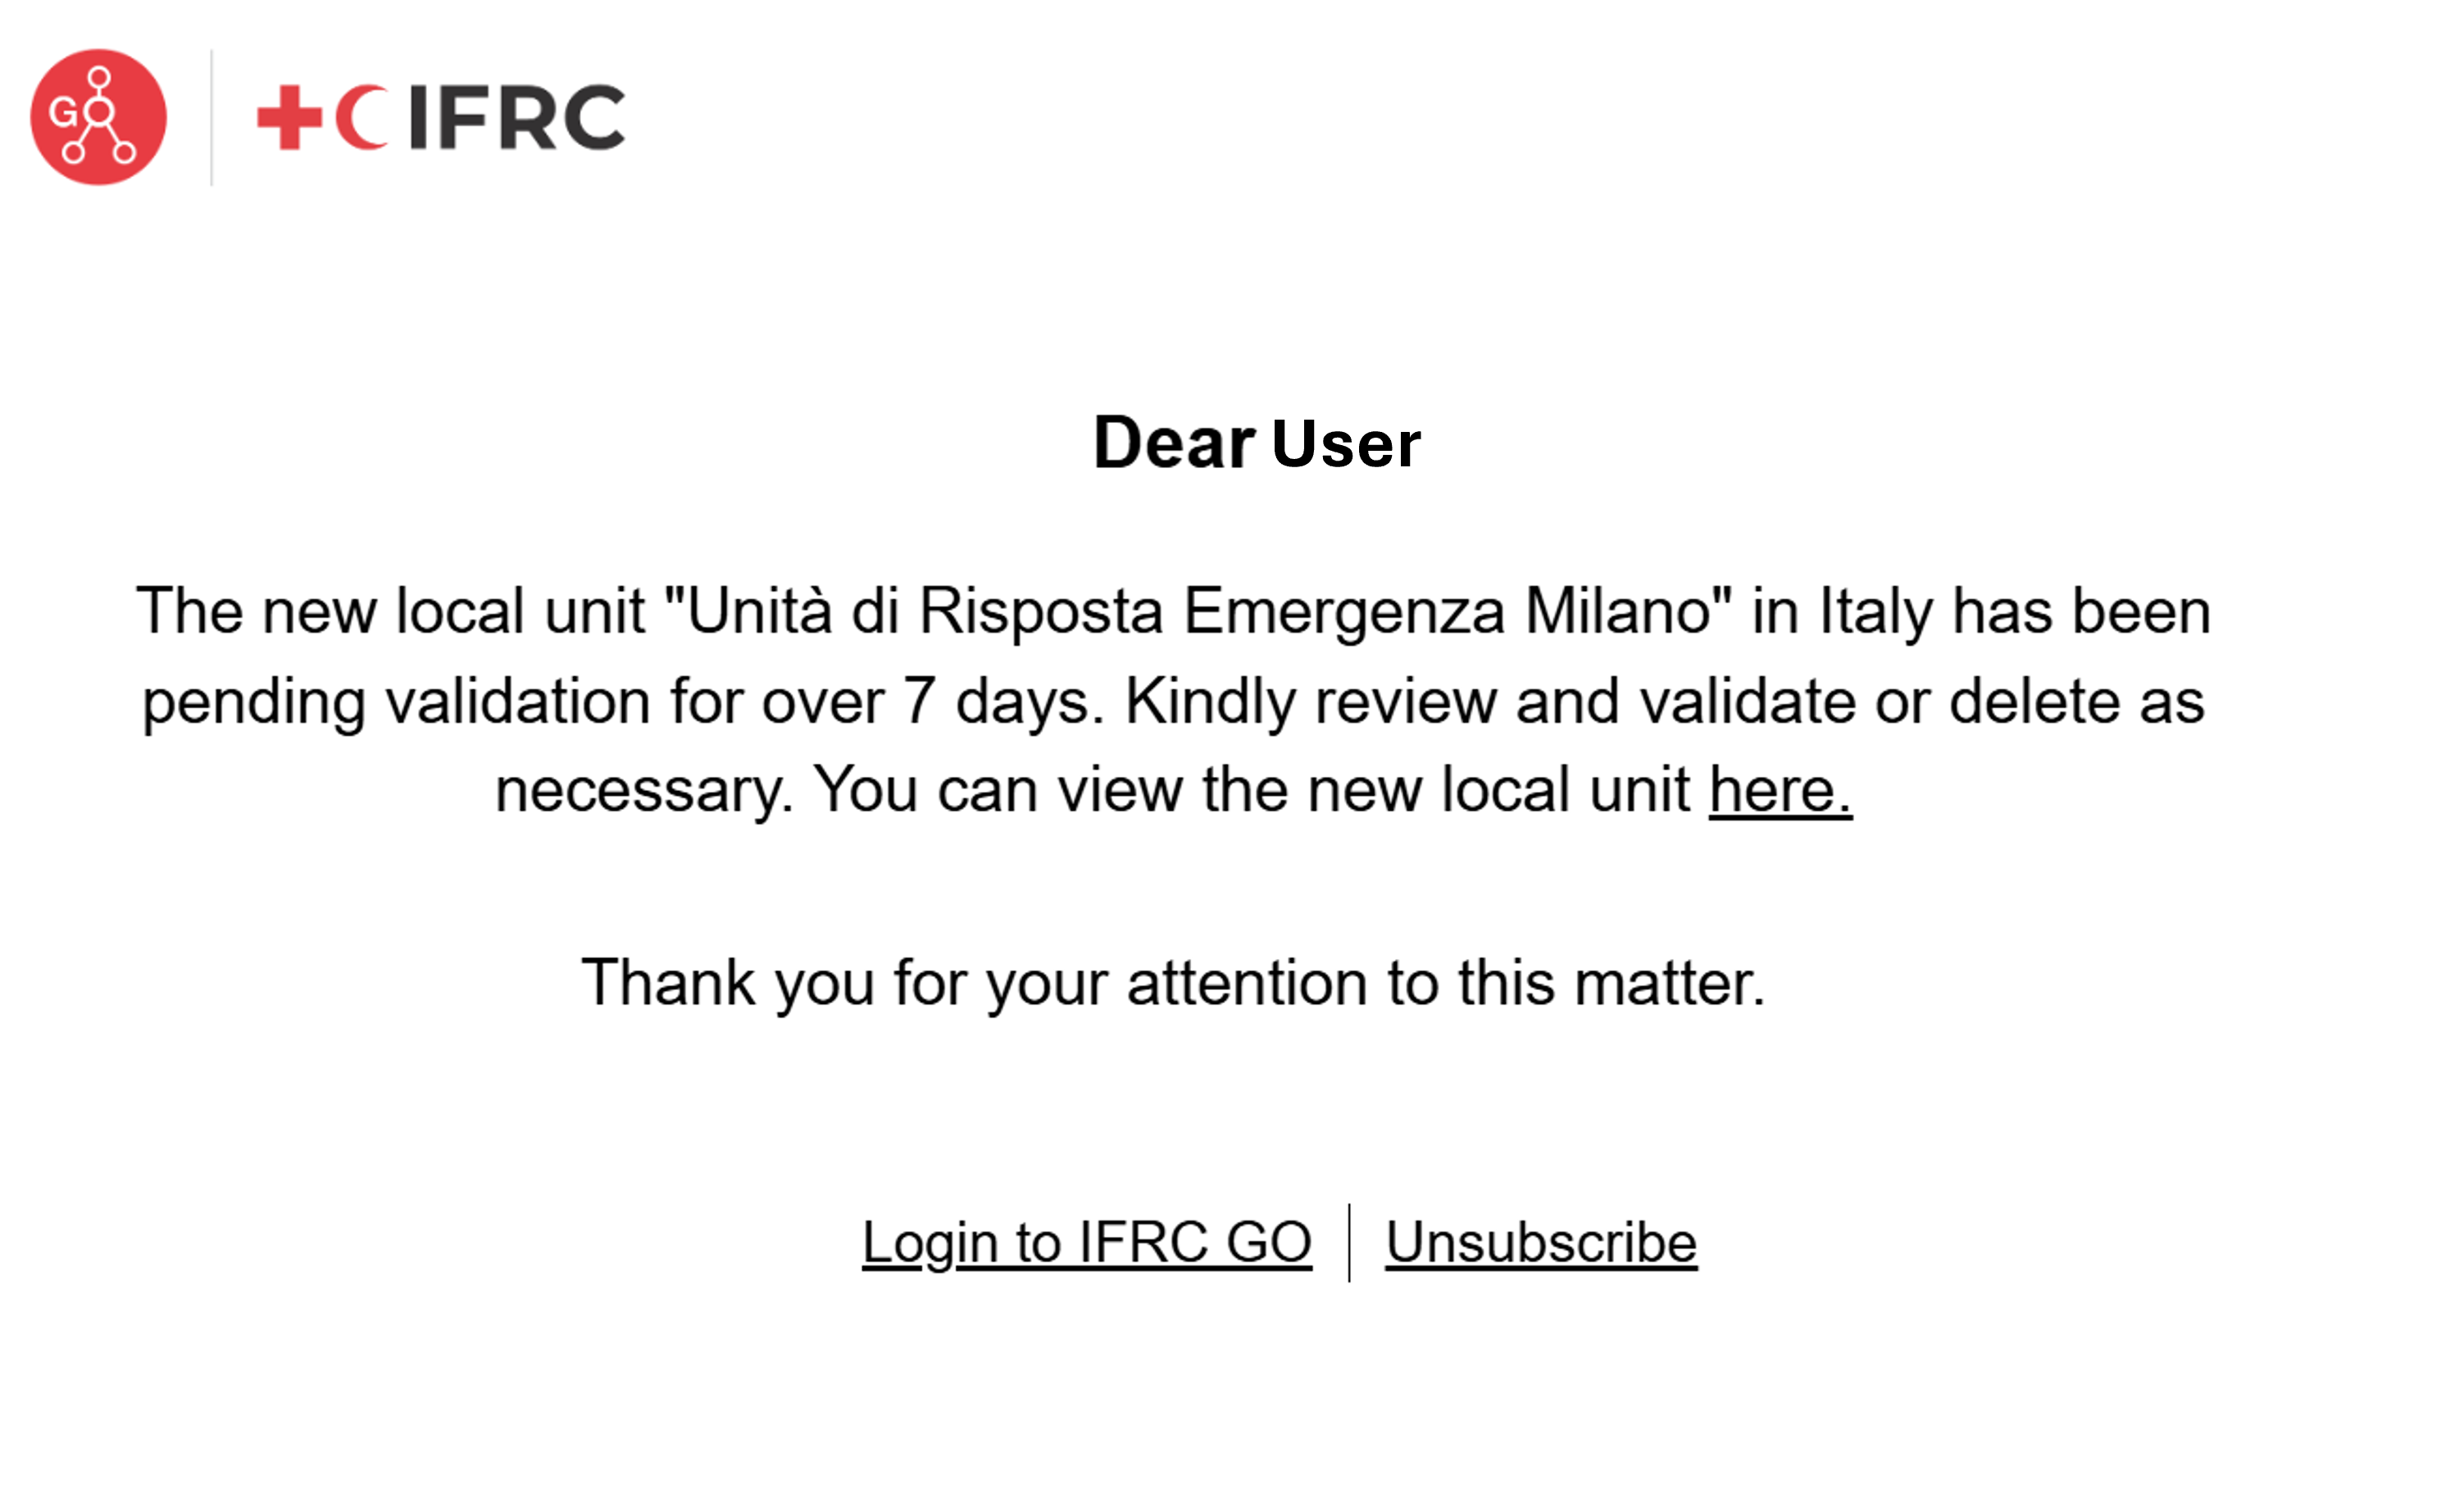
If the regional validator also doe not respond with in 7-day window, then the request is automatically moved to the global validators. They will receive an email notification as shown below and they will have to follow the same procedure as outlined in the Local Units Validation section.
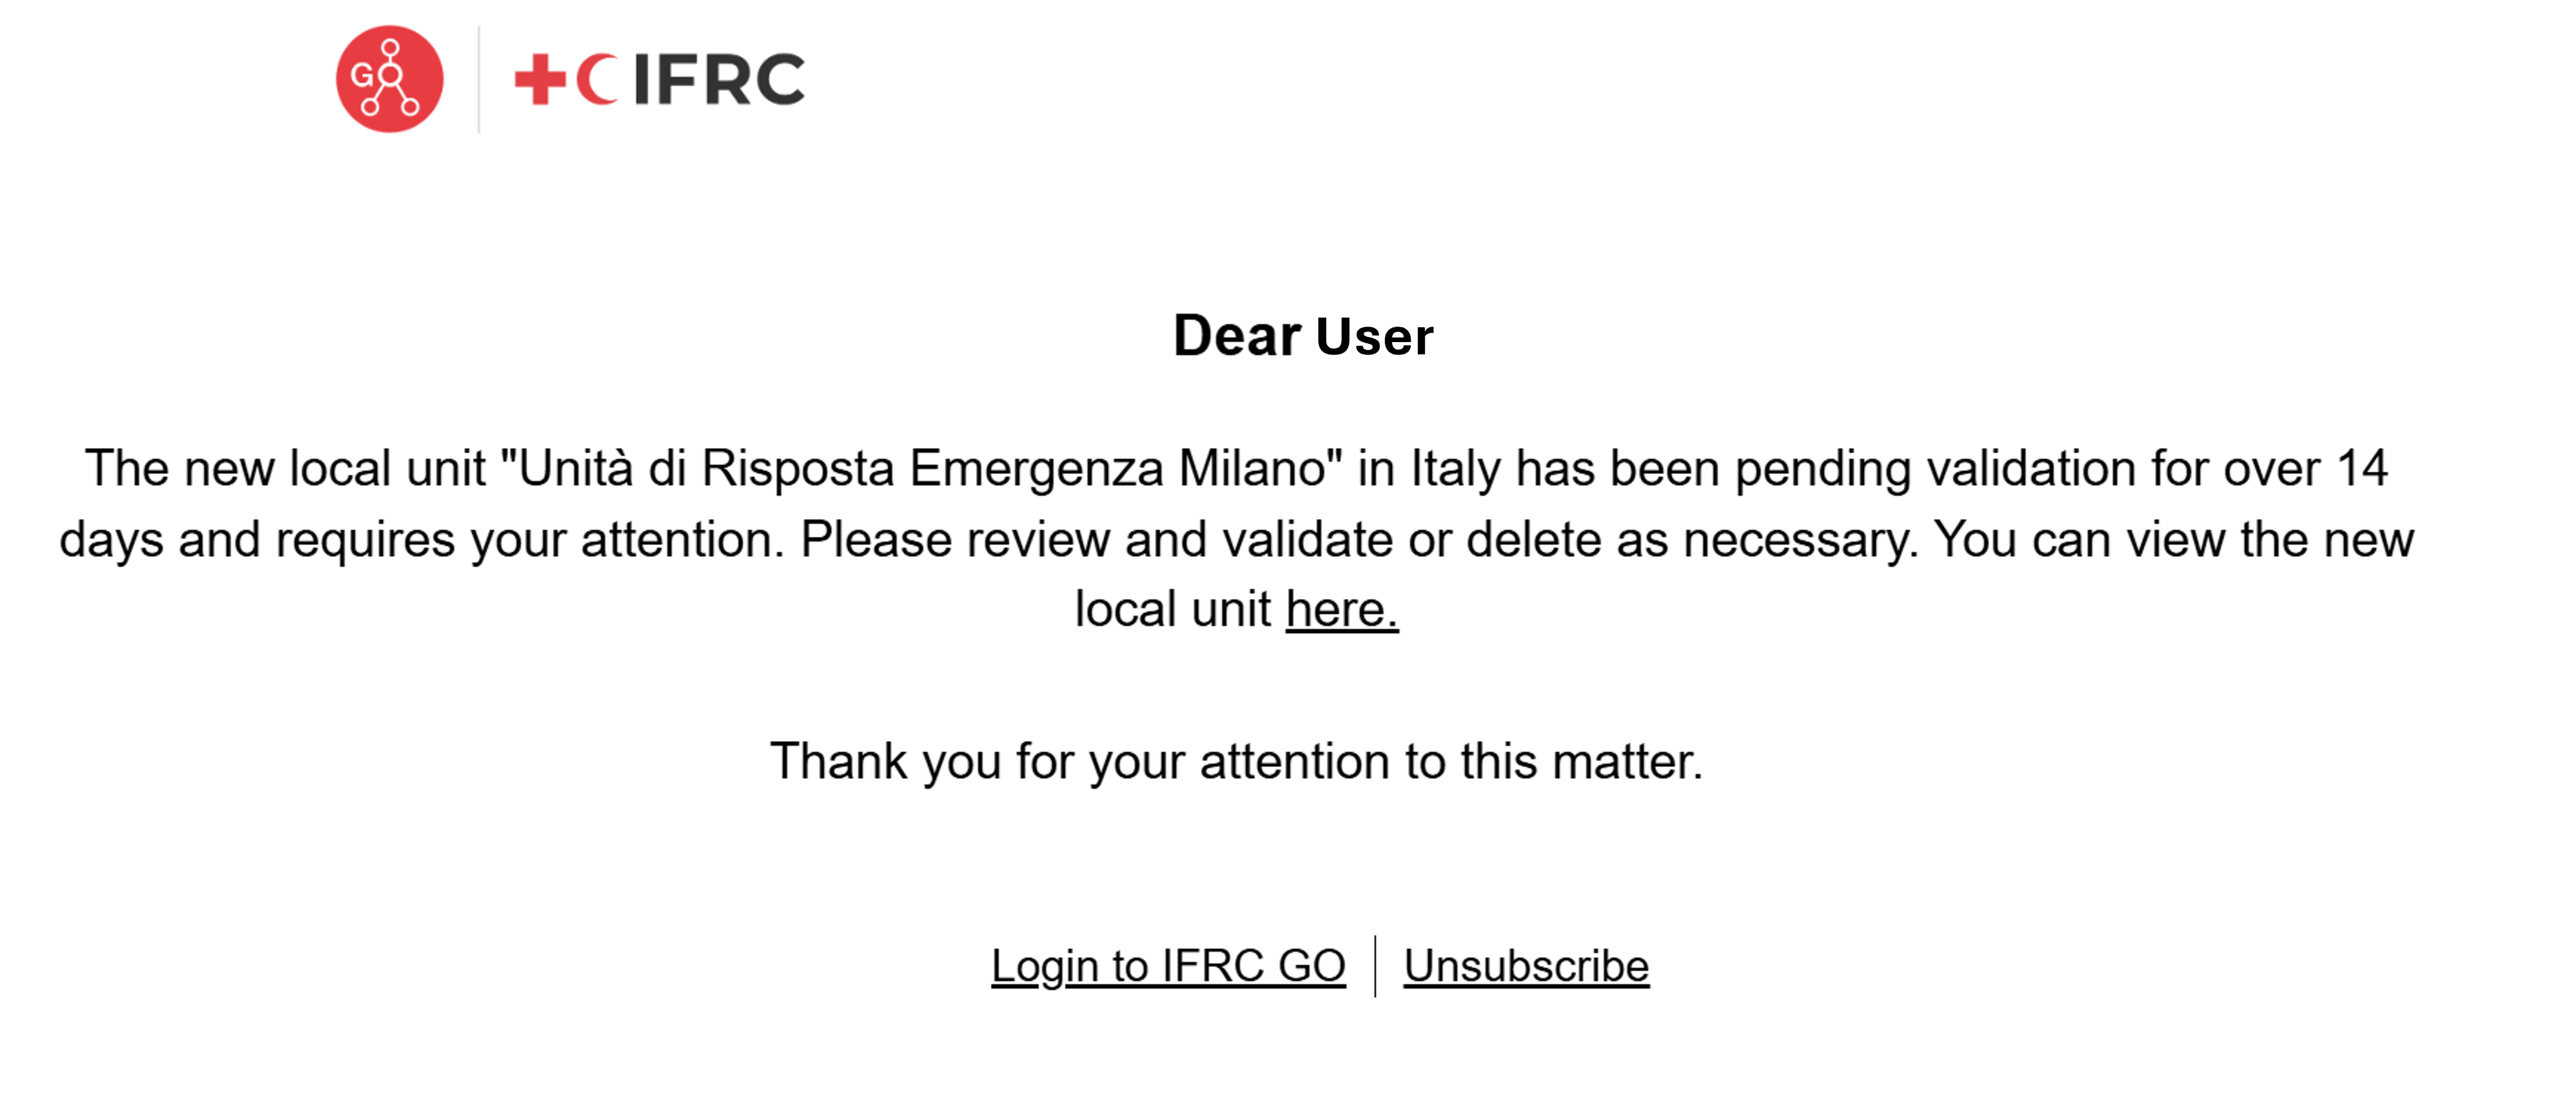
In situations where no validator can be assigned at any validation tier, the validation request is routed to super users (admins) who can review, approve, or reassign the request as necessary.
¶ Editable Local Units Vs Externally Managed Data
Editable Local Units
- By default all Local units are set to be Externally Managed, if a National Society requests and they have a person to validate the local units, they can request the super user (Information Management Team) to change the status of Local unit type by disabling externally managed option. After that they can start adding/editing local units.
- Editable local units are created individually via the user interface by users with permission (validators or super users).
- Once a local unit record is submitted, it enters a validation workflow: only after being validated by a country, regional, or global validator does it become editable.
- Who can edit? Only validators and super users (admins) with appropriate access rights (validation permissions for a country/ local unit type) can edit local unit information. Other users cannot edit once submitted for validation until the entry is validated.
- Editing is permitted only for local units that are not externally managed (i.e., not bulk-uploaded). These units can be updated via the web interface, and changes again follow validation workflows before being locked or approved.
Externally Managed Data (Bulk Upload Local Units)
- Local units whose data is externally managed cannot be edited through the regular web interface by validators at any level.
- Externally managed local units can be distinguished from other local units based on their status. They are displayed with a lock symbol under the status field.
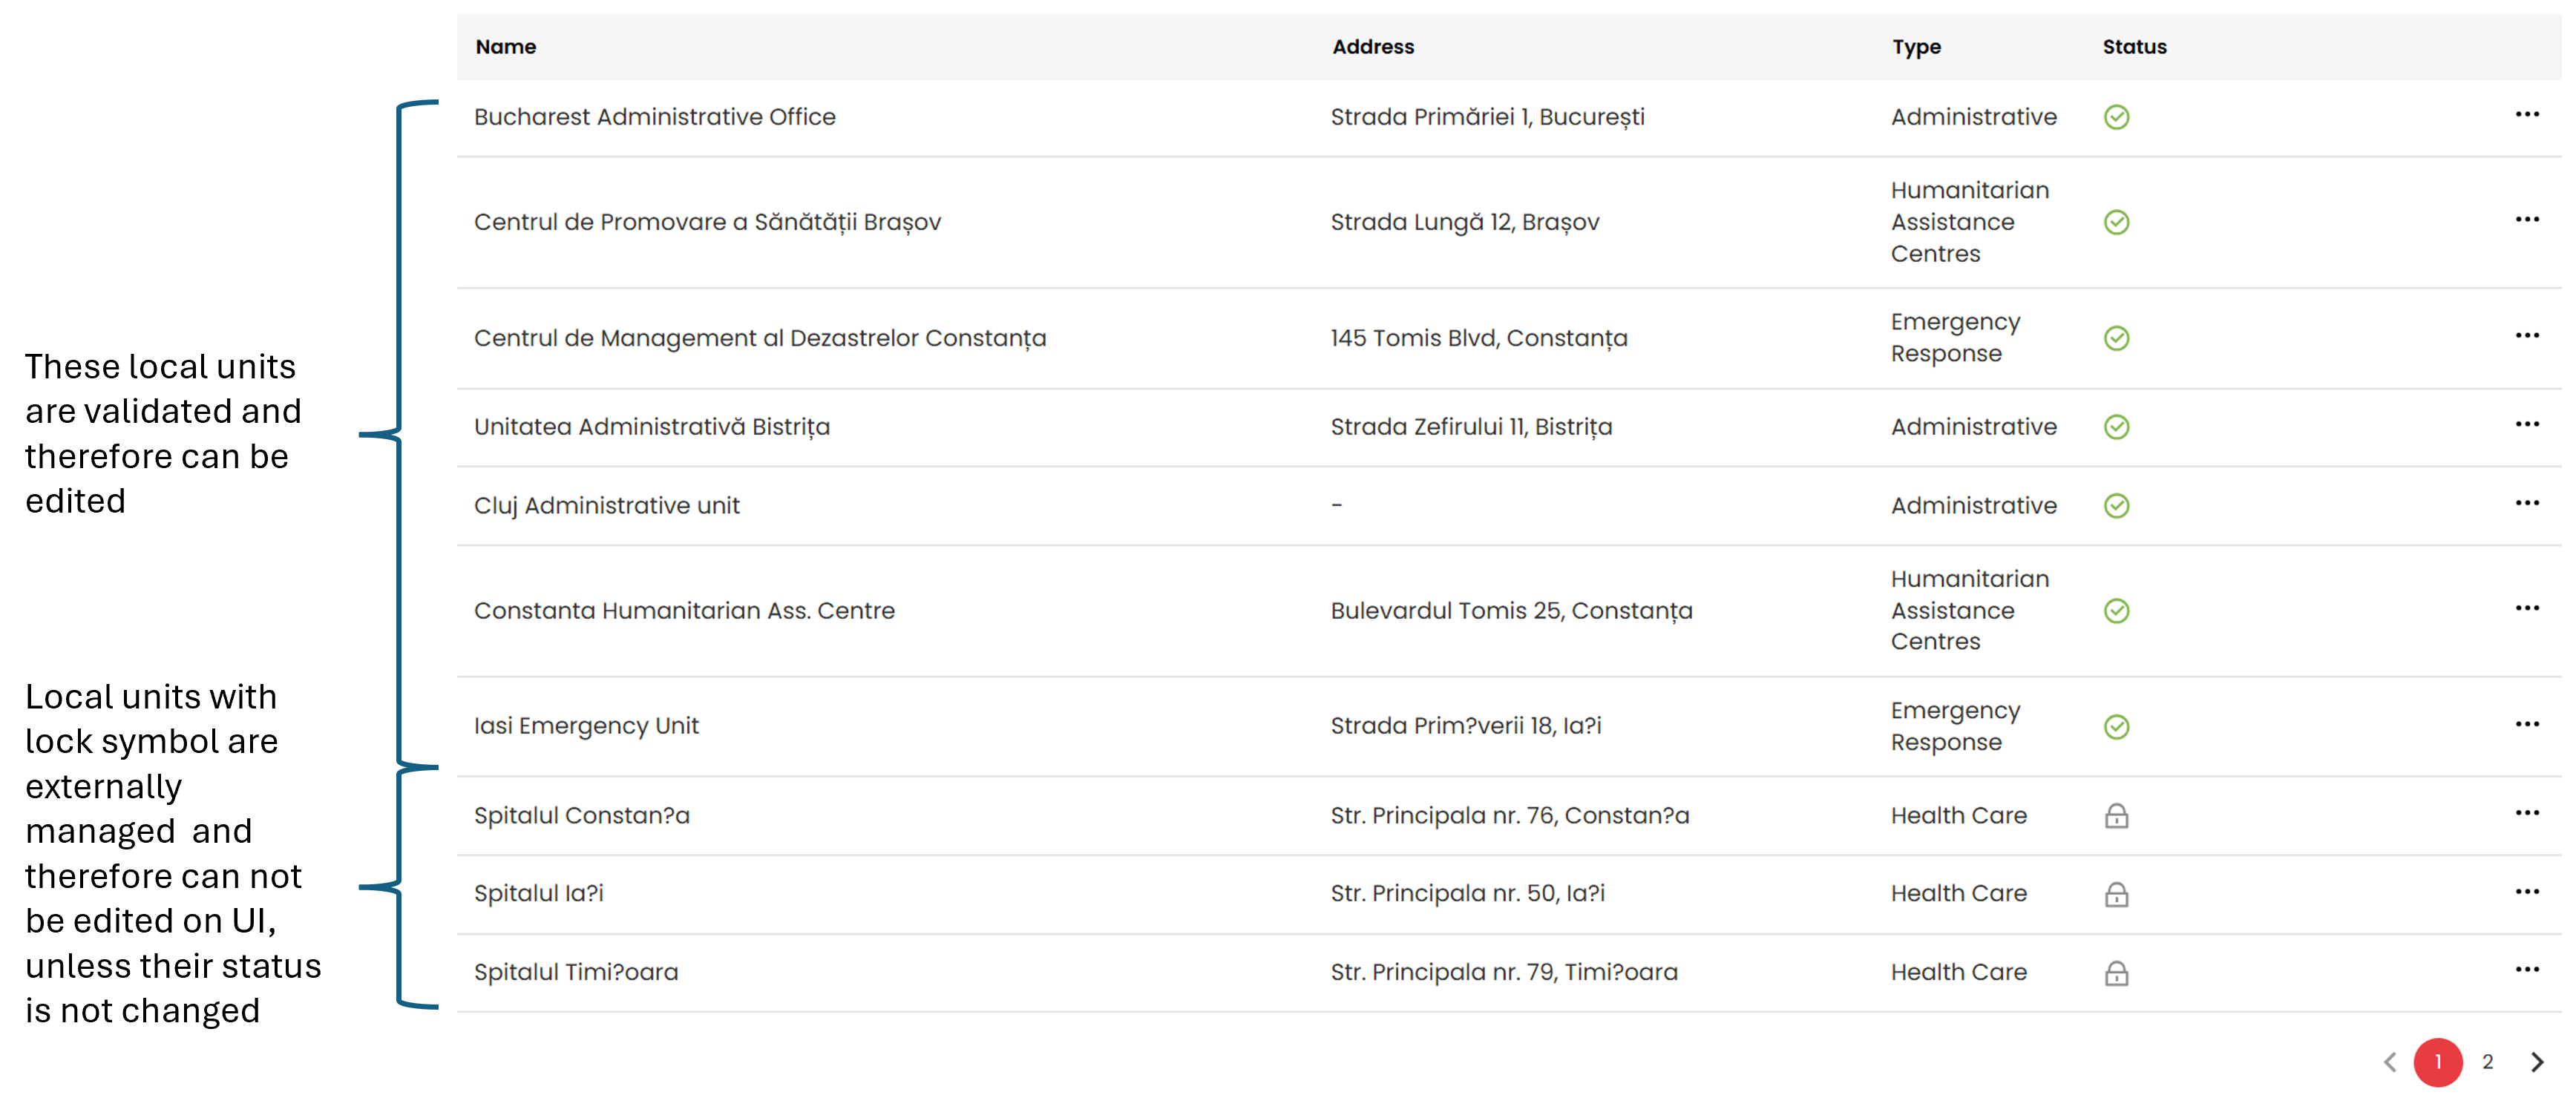
- They can be uploaded exclusively using the bulk upload feature, where data is compiled and uploaded in bulk via a CSV/ xlsx template available to download from the user interface. See Bulk Uploading Local Units section for more details.
- This externally managed type is configured by super users (admins) per country and unit type—all permissions for configuring, bulk uploading, and deleting units set as “externally managed” are restricted to super users only.
- Why can’t externally managed/bulk uploaded data be validated on the UI? Since these records are uploaded in bulk and managed externally (outside the web interface), the validation logic and edit permissions built into the UI do not apply. Regular validators cannot validate or change these entries via the UI—they only appear for reference and administrative tracking.
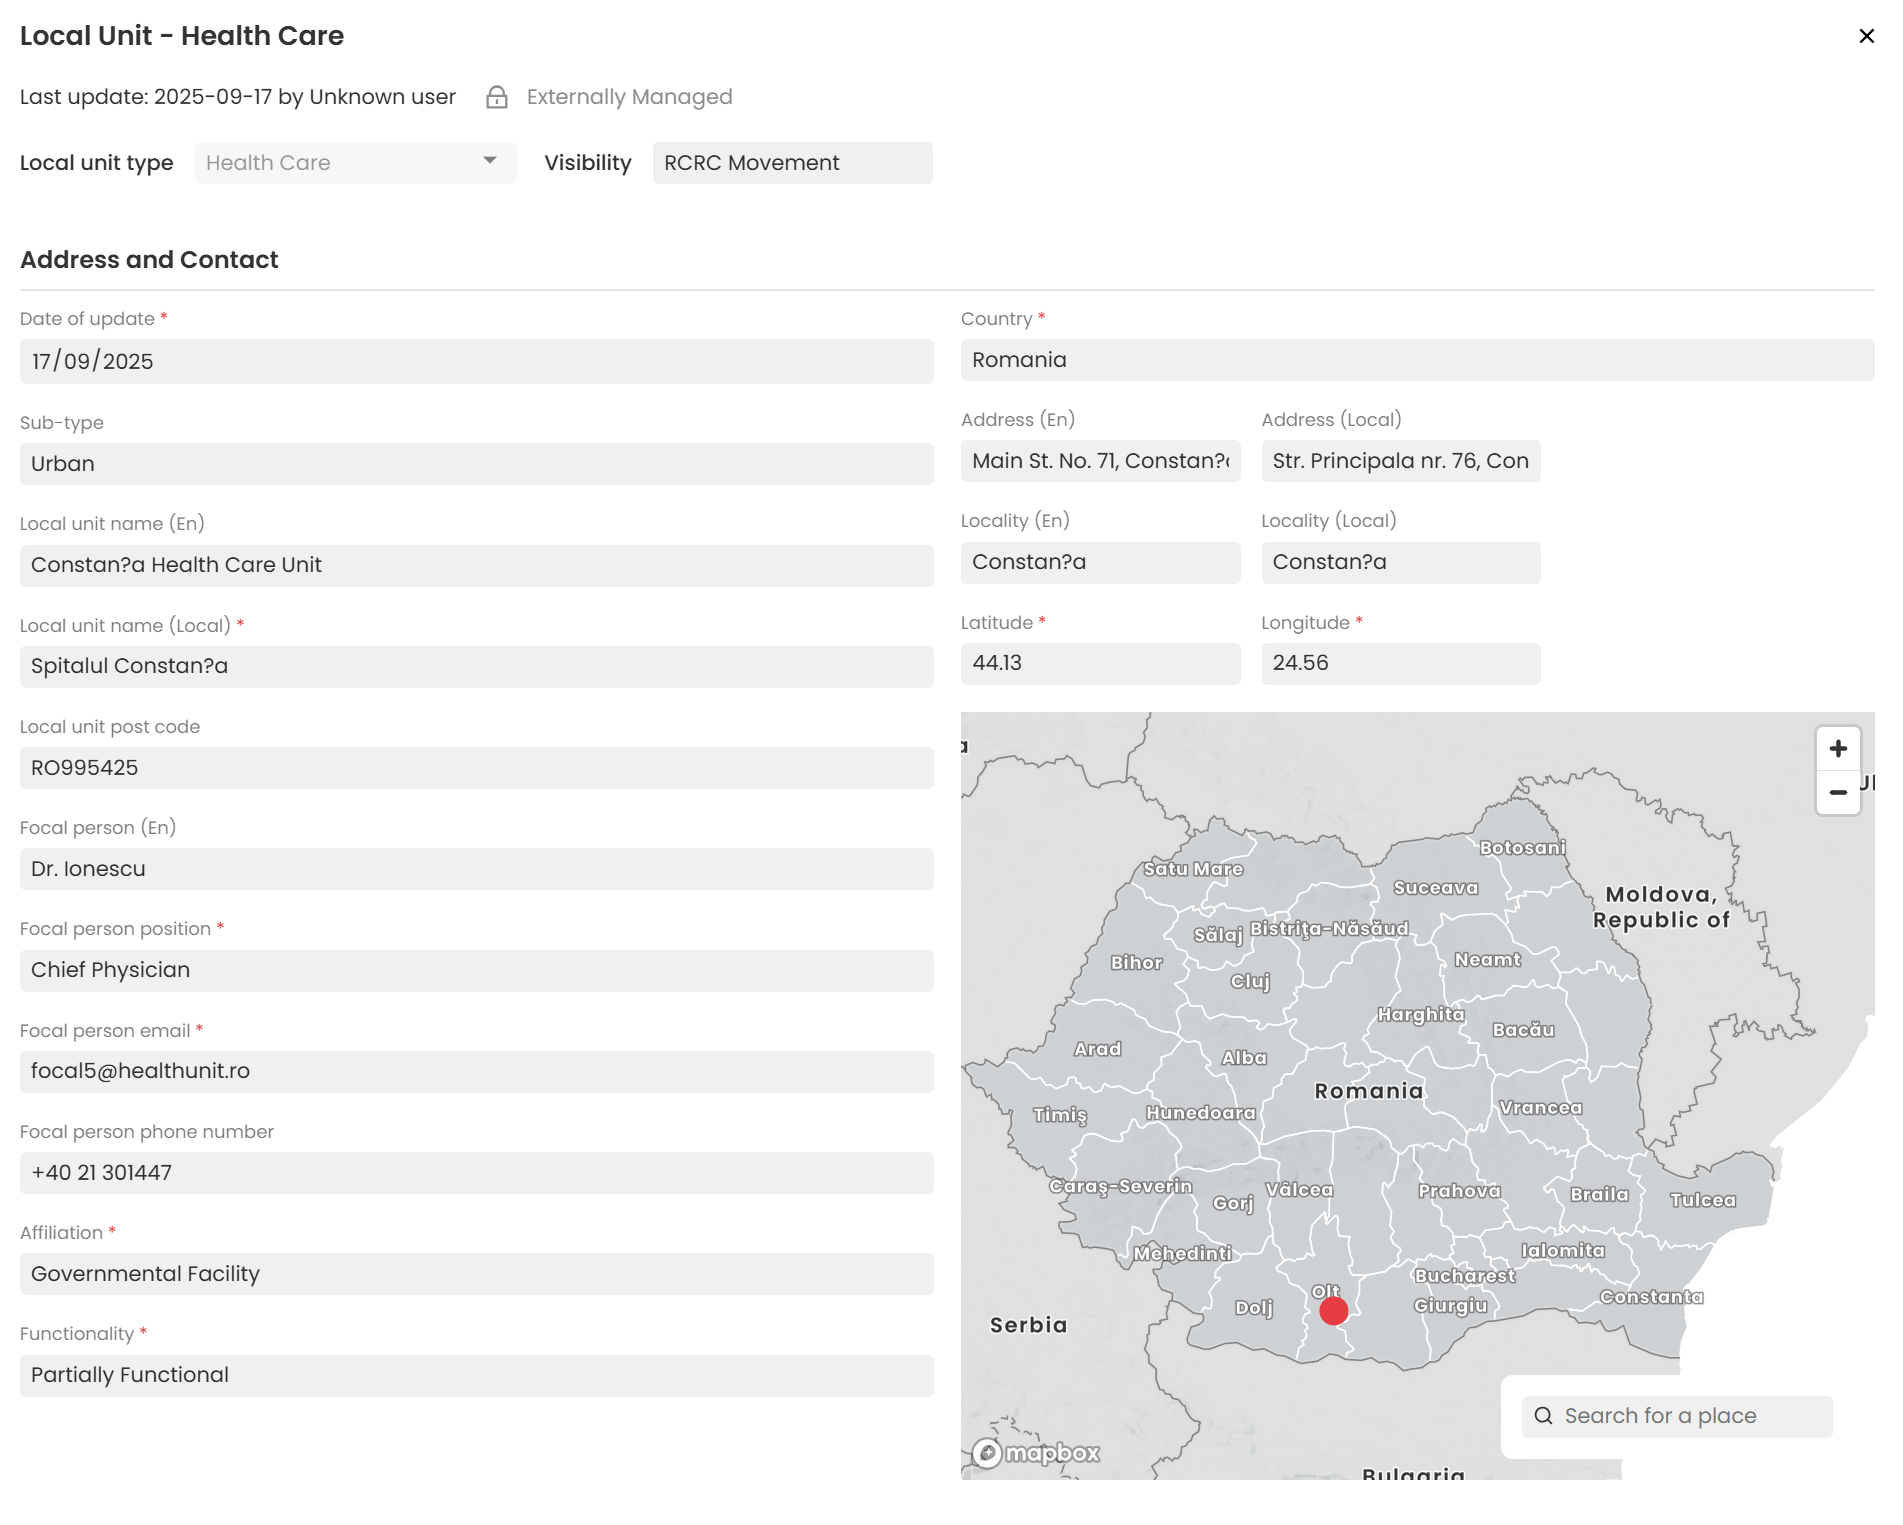
- Any changes required to externally managed local units must be made externally and then re-uploaded using the Import local unit option.
¶ Editing a Local Unit
- Once a Local Unit entry has been submitted for validation, it is locked and cannot be edited until it is approved by a validator.
- Editing is only allowed for those Local Units that have been validated by a country, regional or a global validator.
- Who can edit Local Units:
- Only Validators and Super Users (Admins) have permission to edit Local Unit information.
- Validators must have the appropriate access rights for the relevant country, region, and local unit type in order to add, edit, validate, or delete local units.
- Validators cannot edit bulk-uploaded Local Units:
- Local Units that have been created through a bulk upload are considered externally managed.
- Country, regional, and global-level validators cannot edit these externally managed local units. They can only bulk upload local unit information for the local units that are externally managed. Editing is not allowed through on the web interface.
- Only Super Users (Admins) can change the type of externally managed (bulk uploaded) local units. They can also delete a local unit that is externally managed.
- For more information about bulk uploading externally managed local units, please refer to the Bulk Uploading Local Units section.
To edit a local unit
- Go to the country page.
- Open the Context and Structure tab under National Society Overview.
- Switch to List view to see all local units.
- Click the three dots next to a validated unit’s name.
- Select Edit from the dropdown menu.
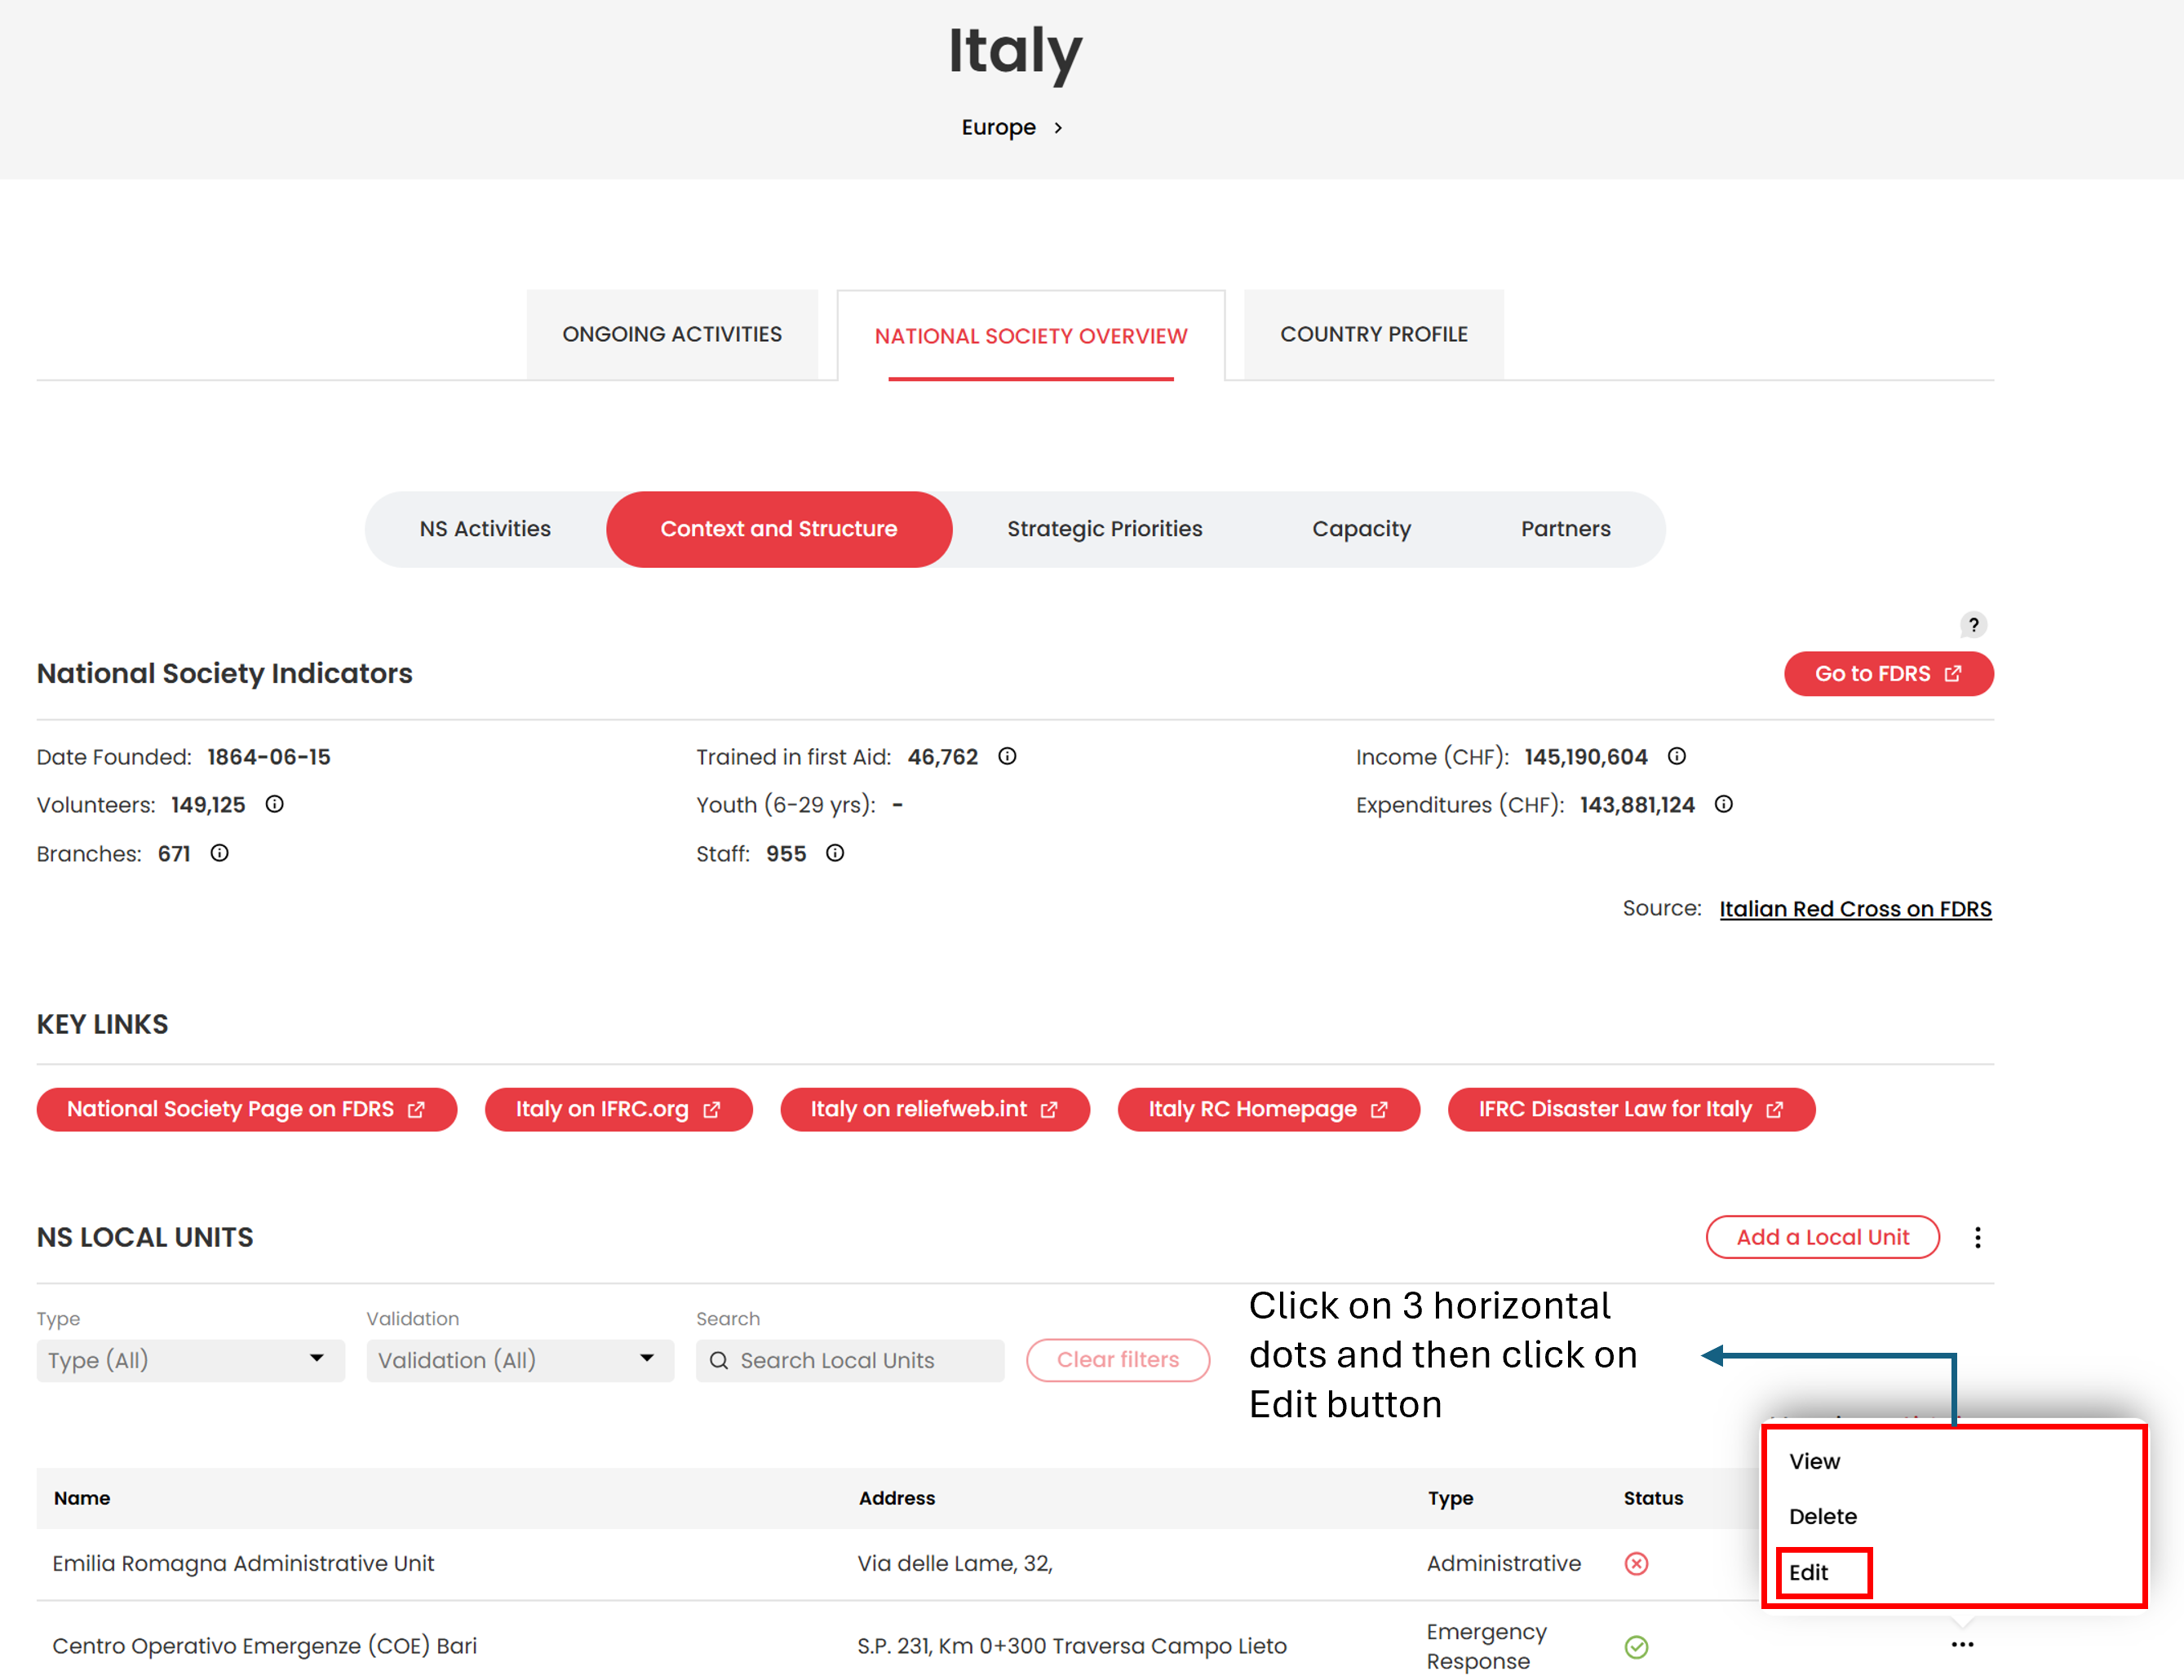
The Local unit form will appear and then the validator can edit the required fields. They can add new information or change existing information.
Example (Italy, Training and Education unit):
- Change visibility: Public → RCRC Movement
- Change coverage: National → Subnational
- Update Focal person (Local) name
- Update Address (Local)
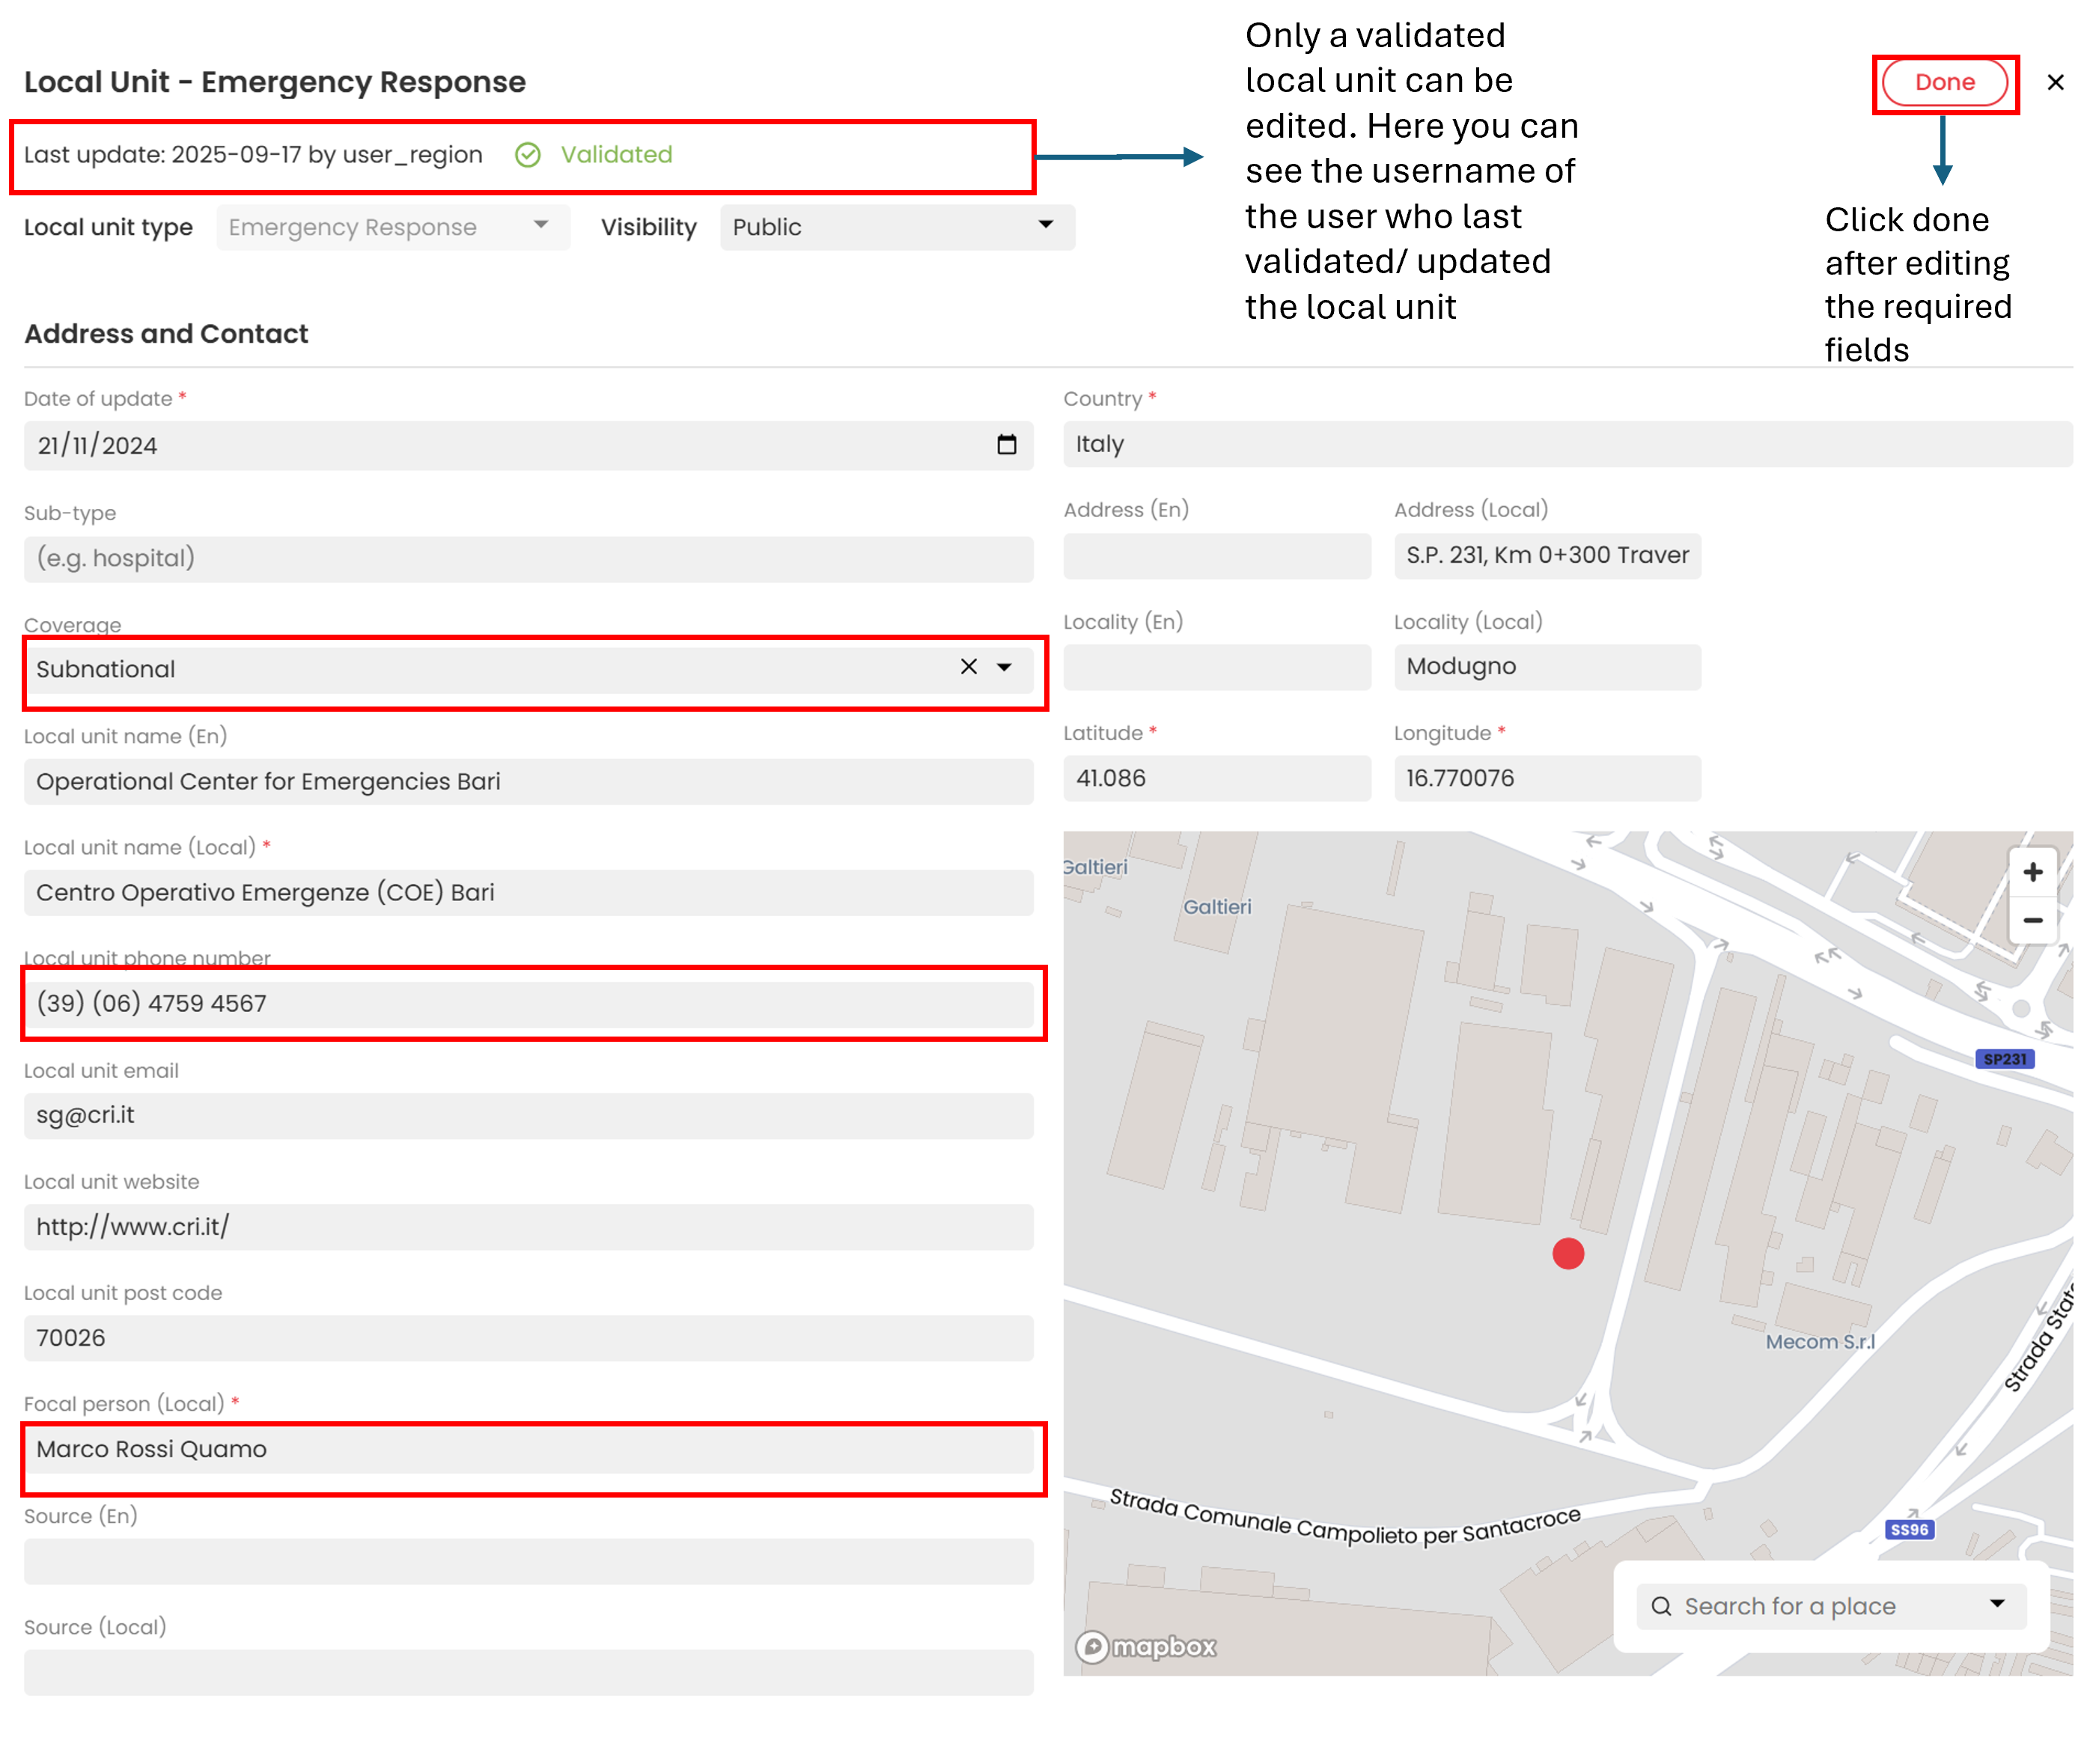
- Click Done after updating information.
- Enter the reason for the update in the dialog box.
- Click Submit.
- A success notification appears on the user screen.
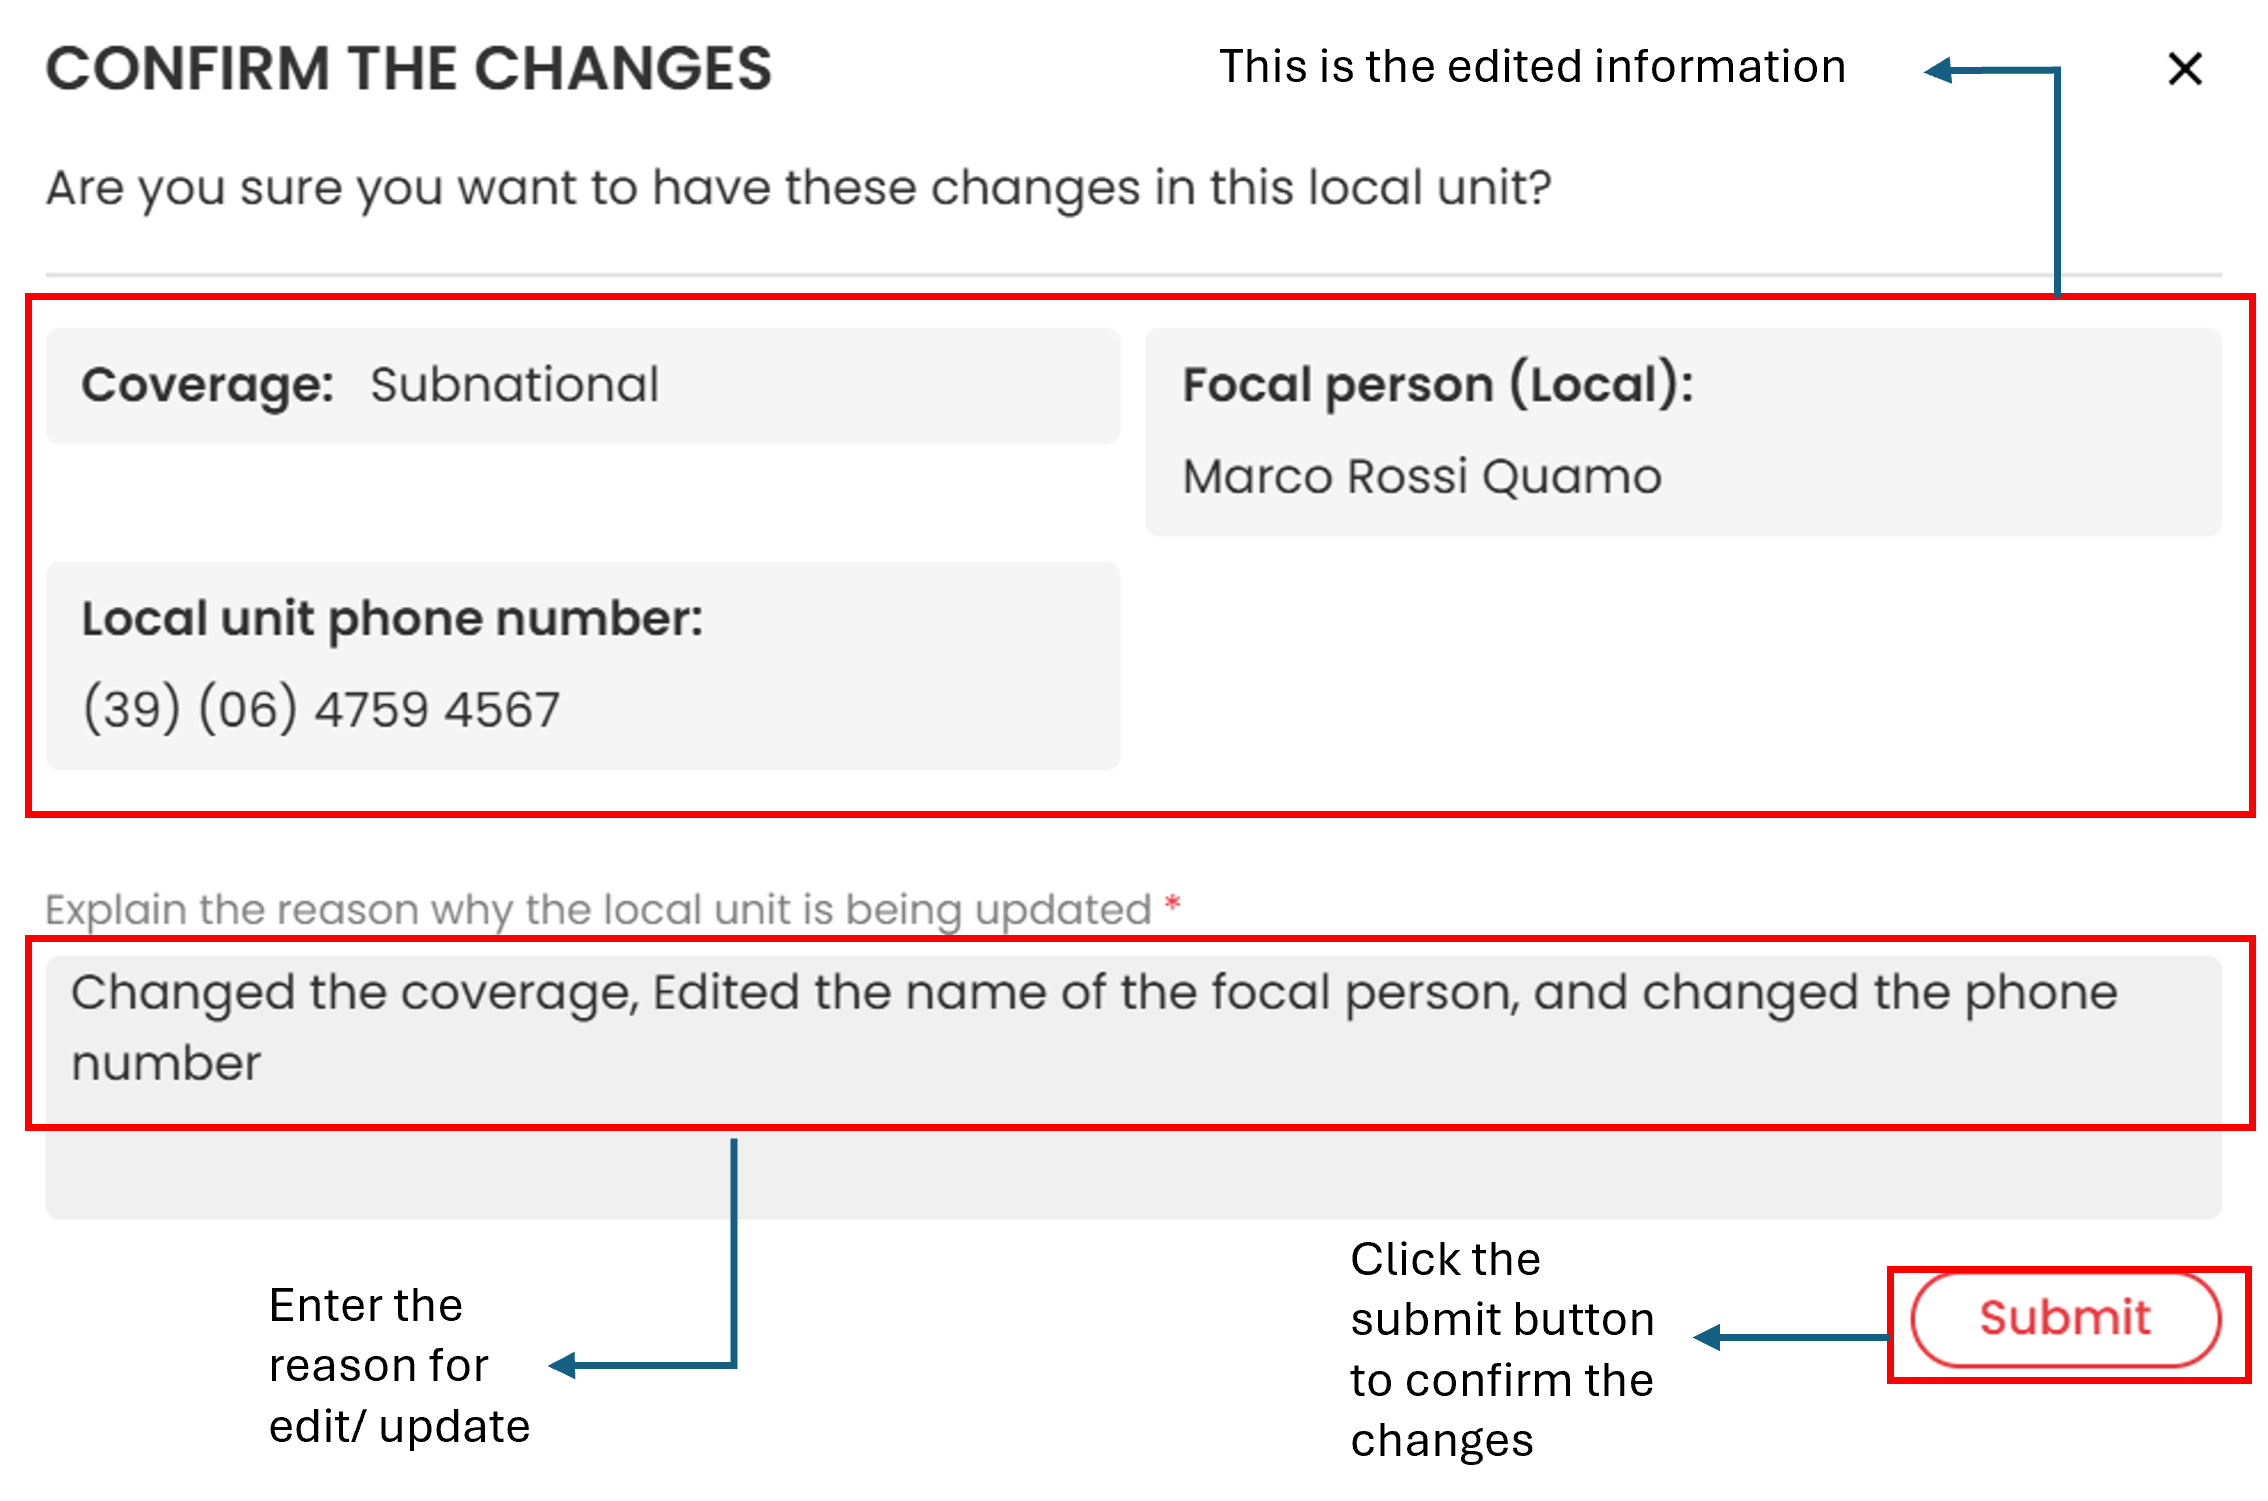
- After editing the information a "Pending edit validation" icon appears as shown below:

- Validators or super users can validate the edited local unit information.
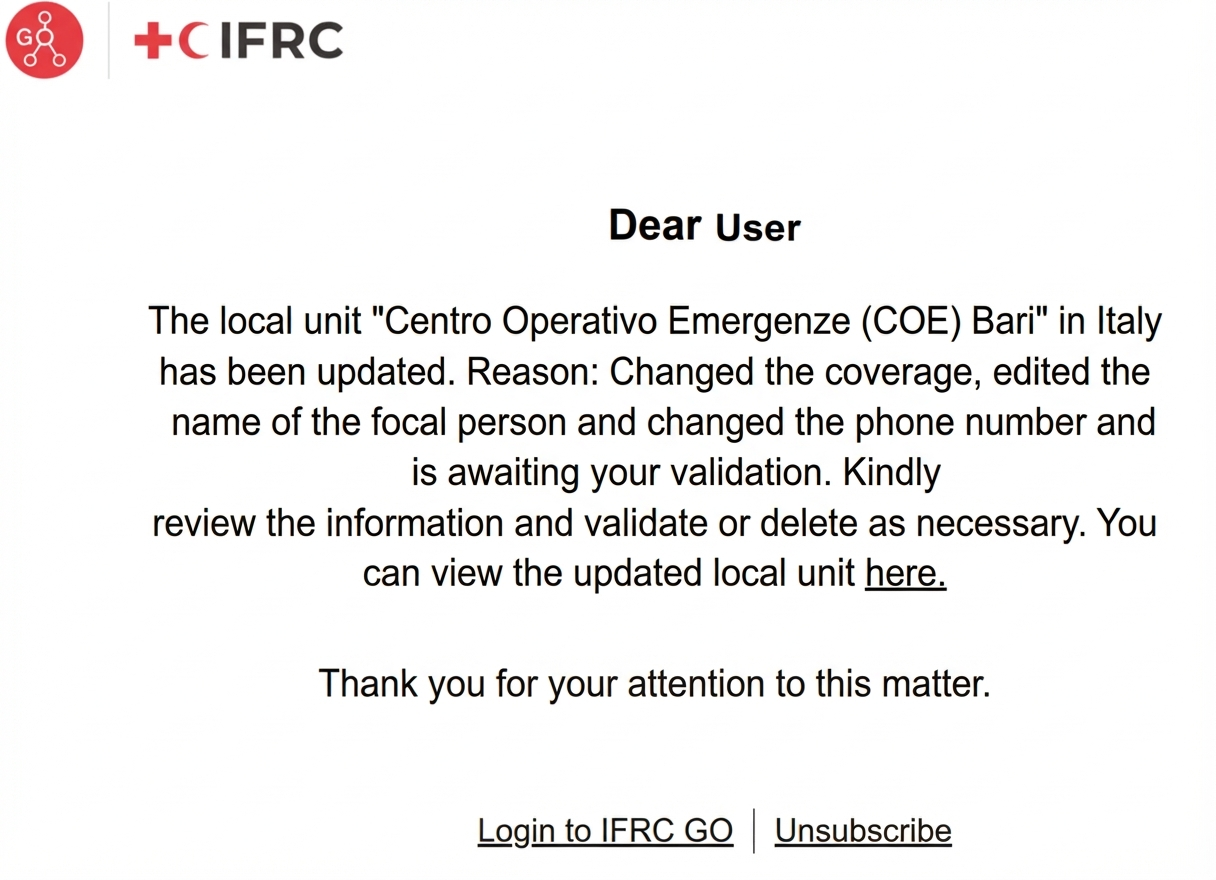
- Validators will receive a notification email about the update/ edit done to the local unit information.
- The email notification would appear like below:
To validate the pending edits for a local unit, a validator needs to:
- Go to the Context and Structure tab under National Society Overview for the country.
- Switch to List view to see local units needing review.
- Find the Review button and three dots next to each unit.
- Click Review to see requested changes, or click the three dots and select View for full details and changes.
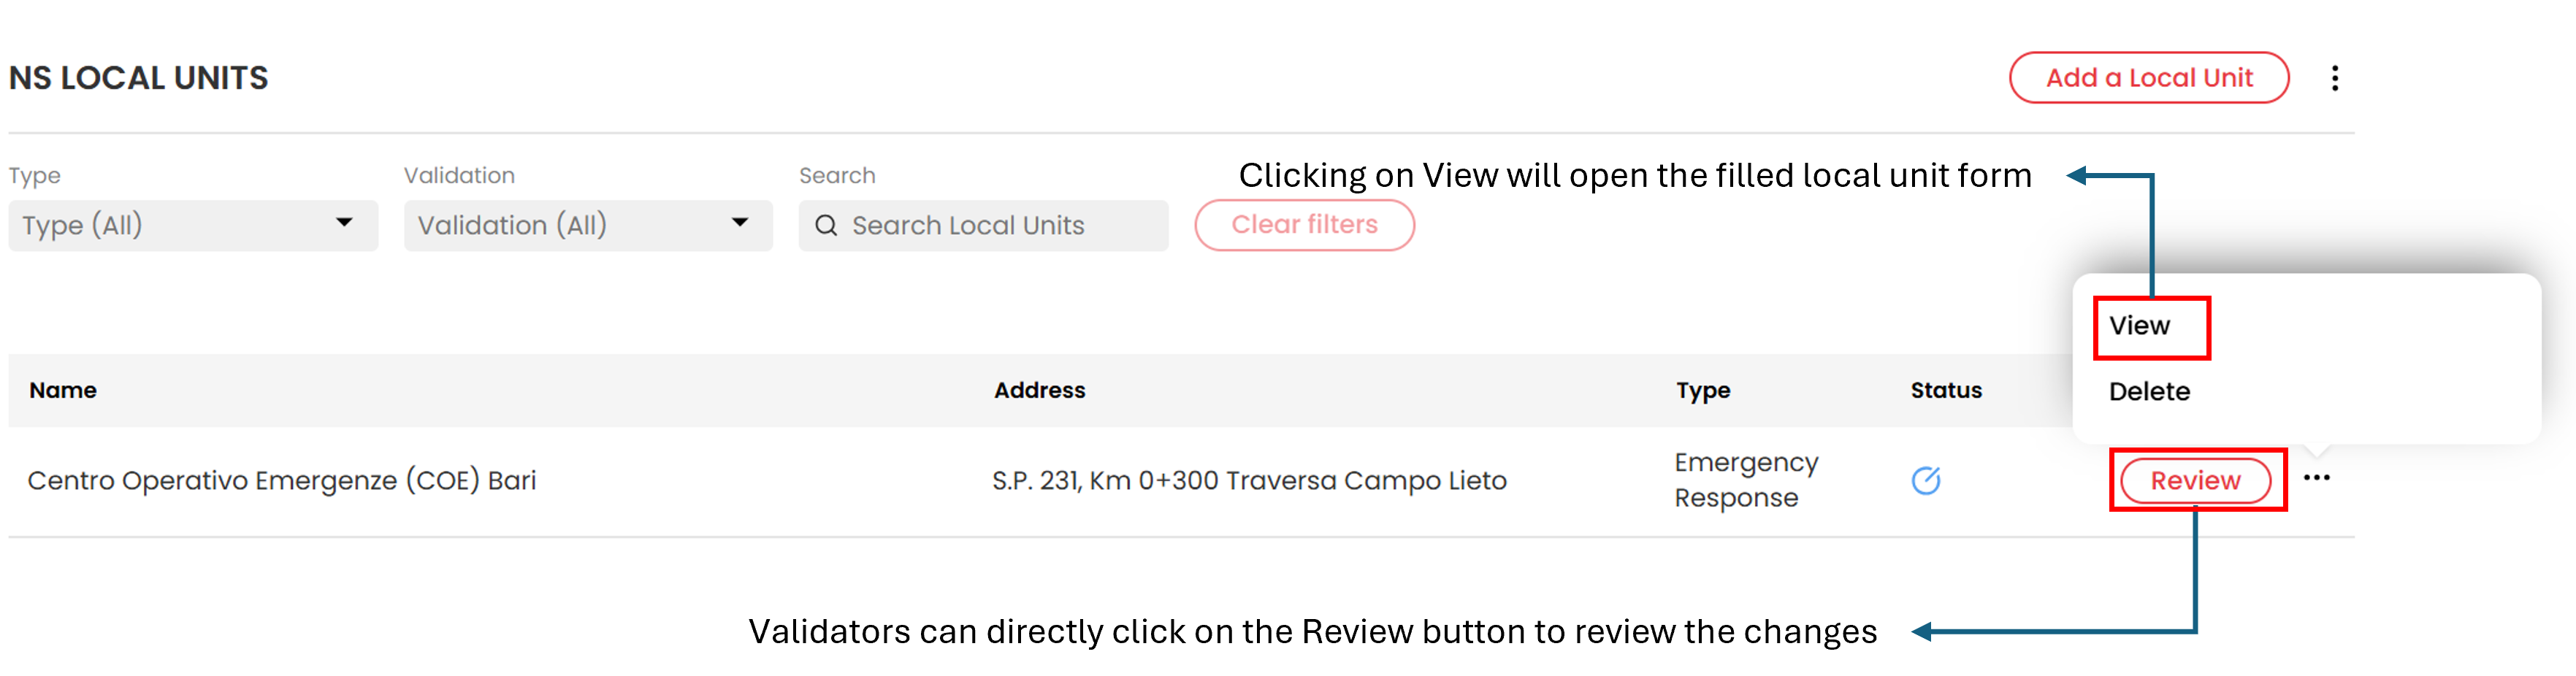
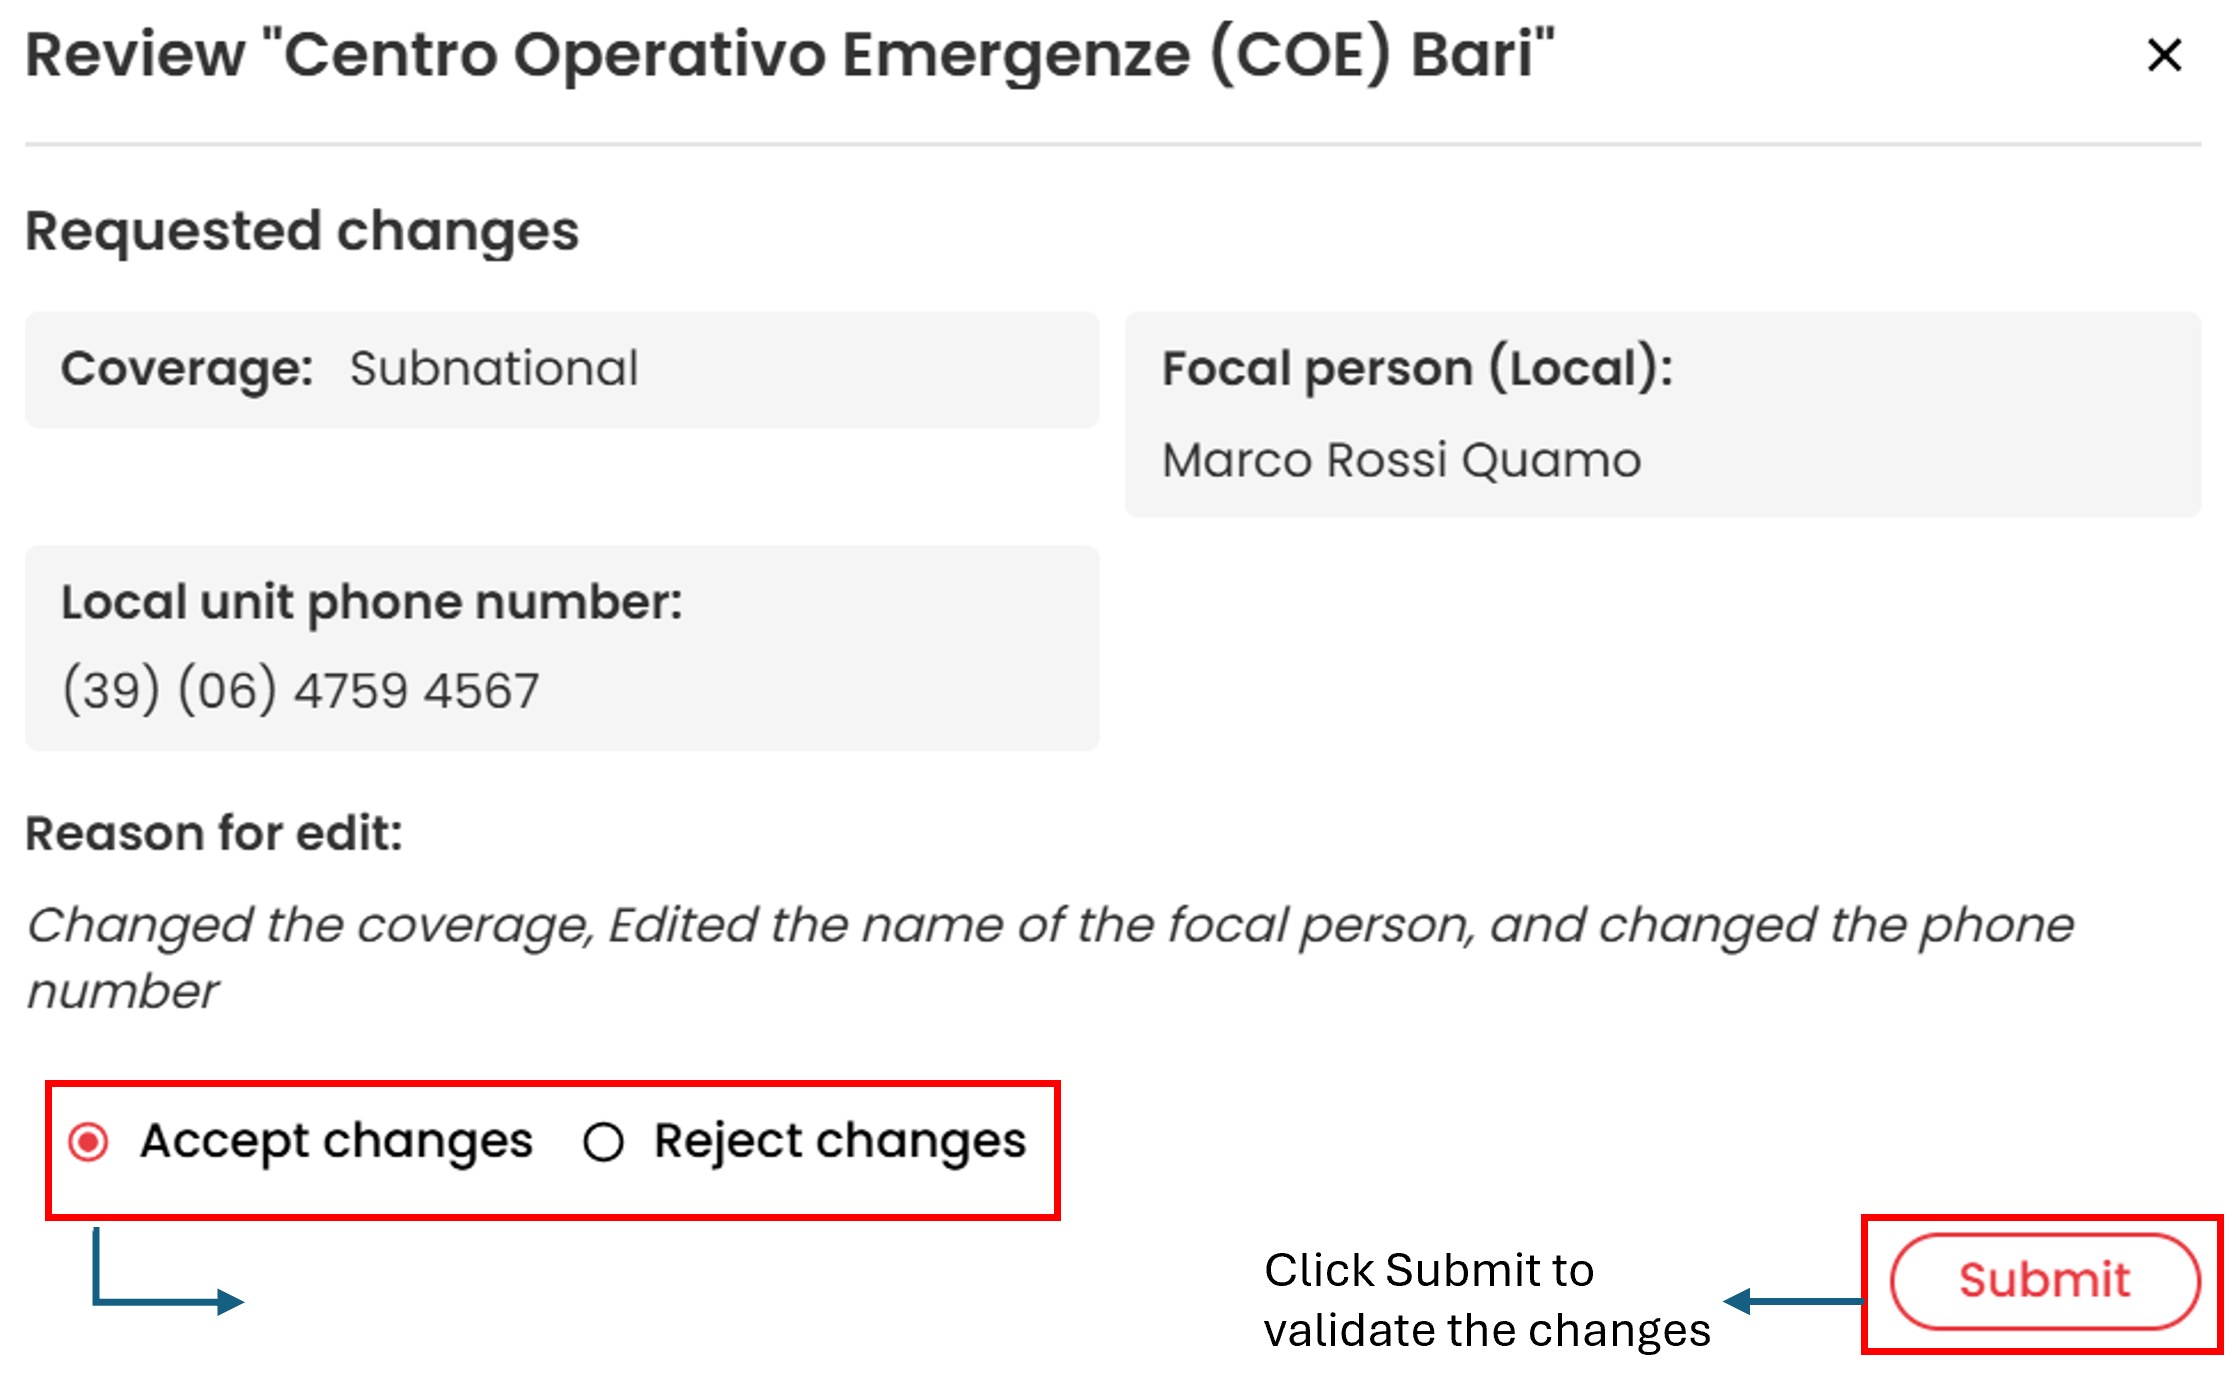
If the validator clicks on the Review button then a window will appear with the information on Requested changes.
Validator can select either:
- Accept changes or Reject Changes.
- If the validator selects Reject changes, then a reason for rejection has to be given. After that the validator needs to click on Submit button.
If the validator select the View option after clicking the three horizontal dots, the local unit form with all the information will appear on the screen as show below. Users can toggle the Highlight changes button to highlight the fields that have been changed and can also toggle the Show previous value button to see the previous information stored in those fields.
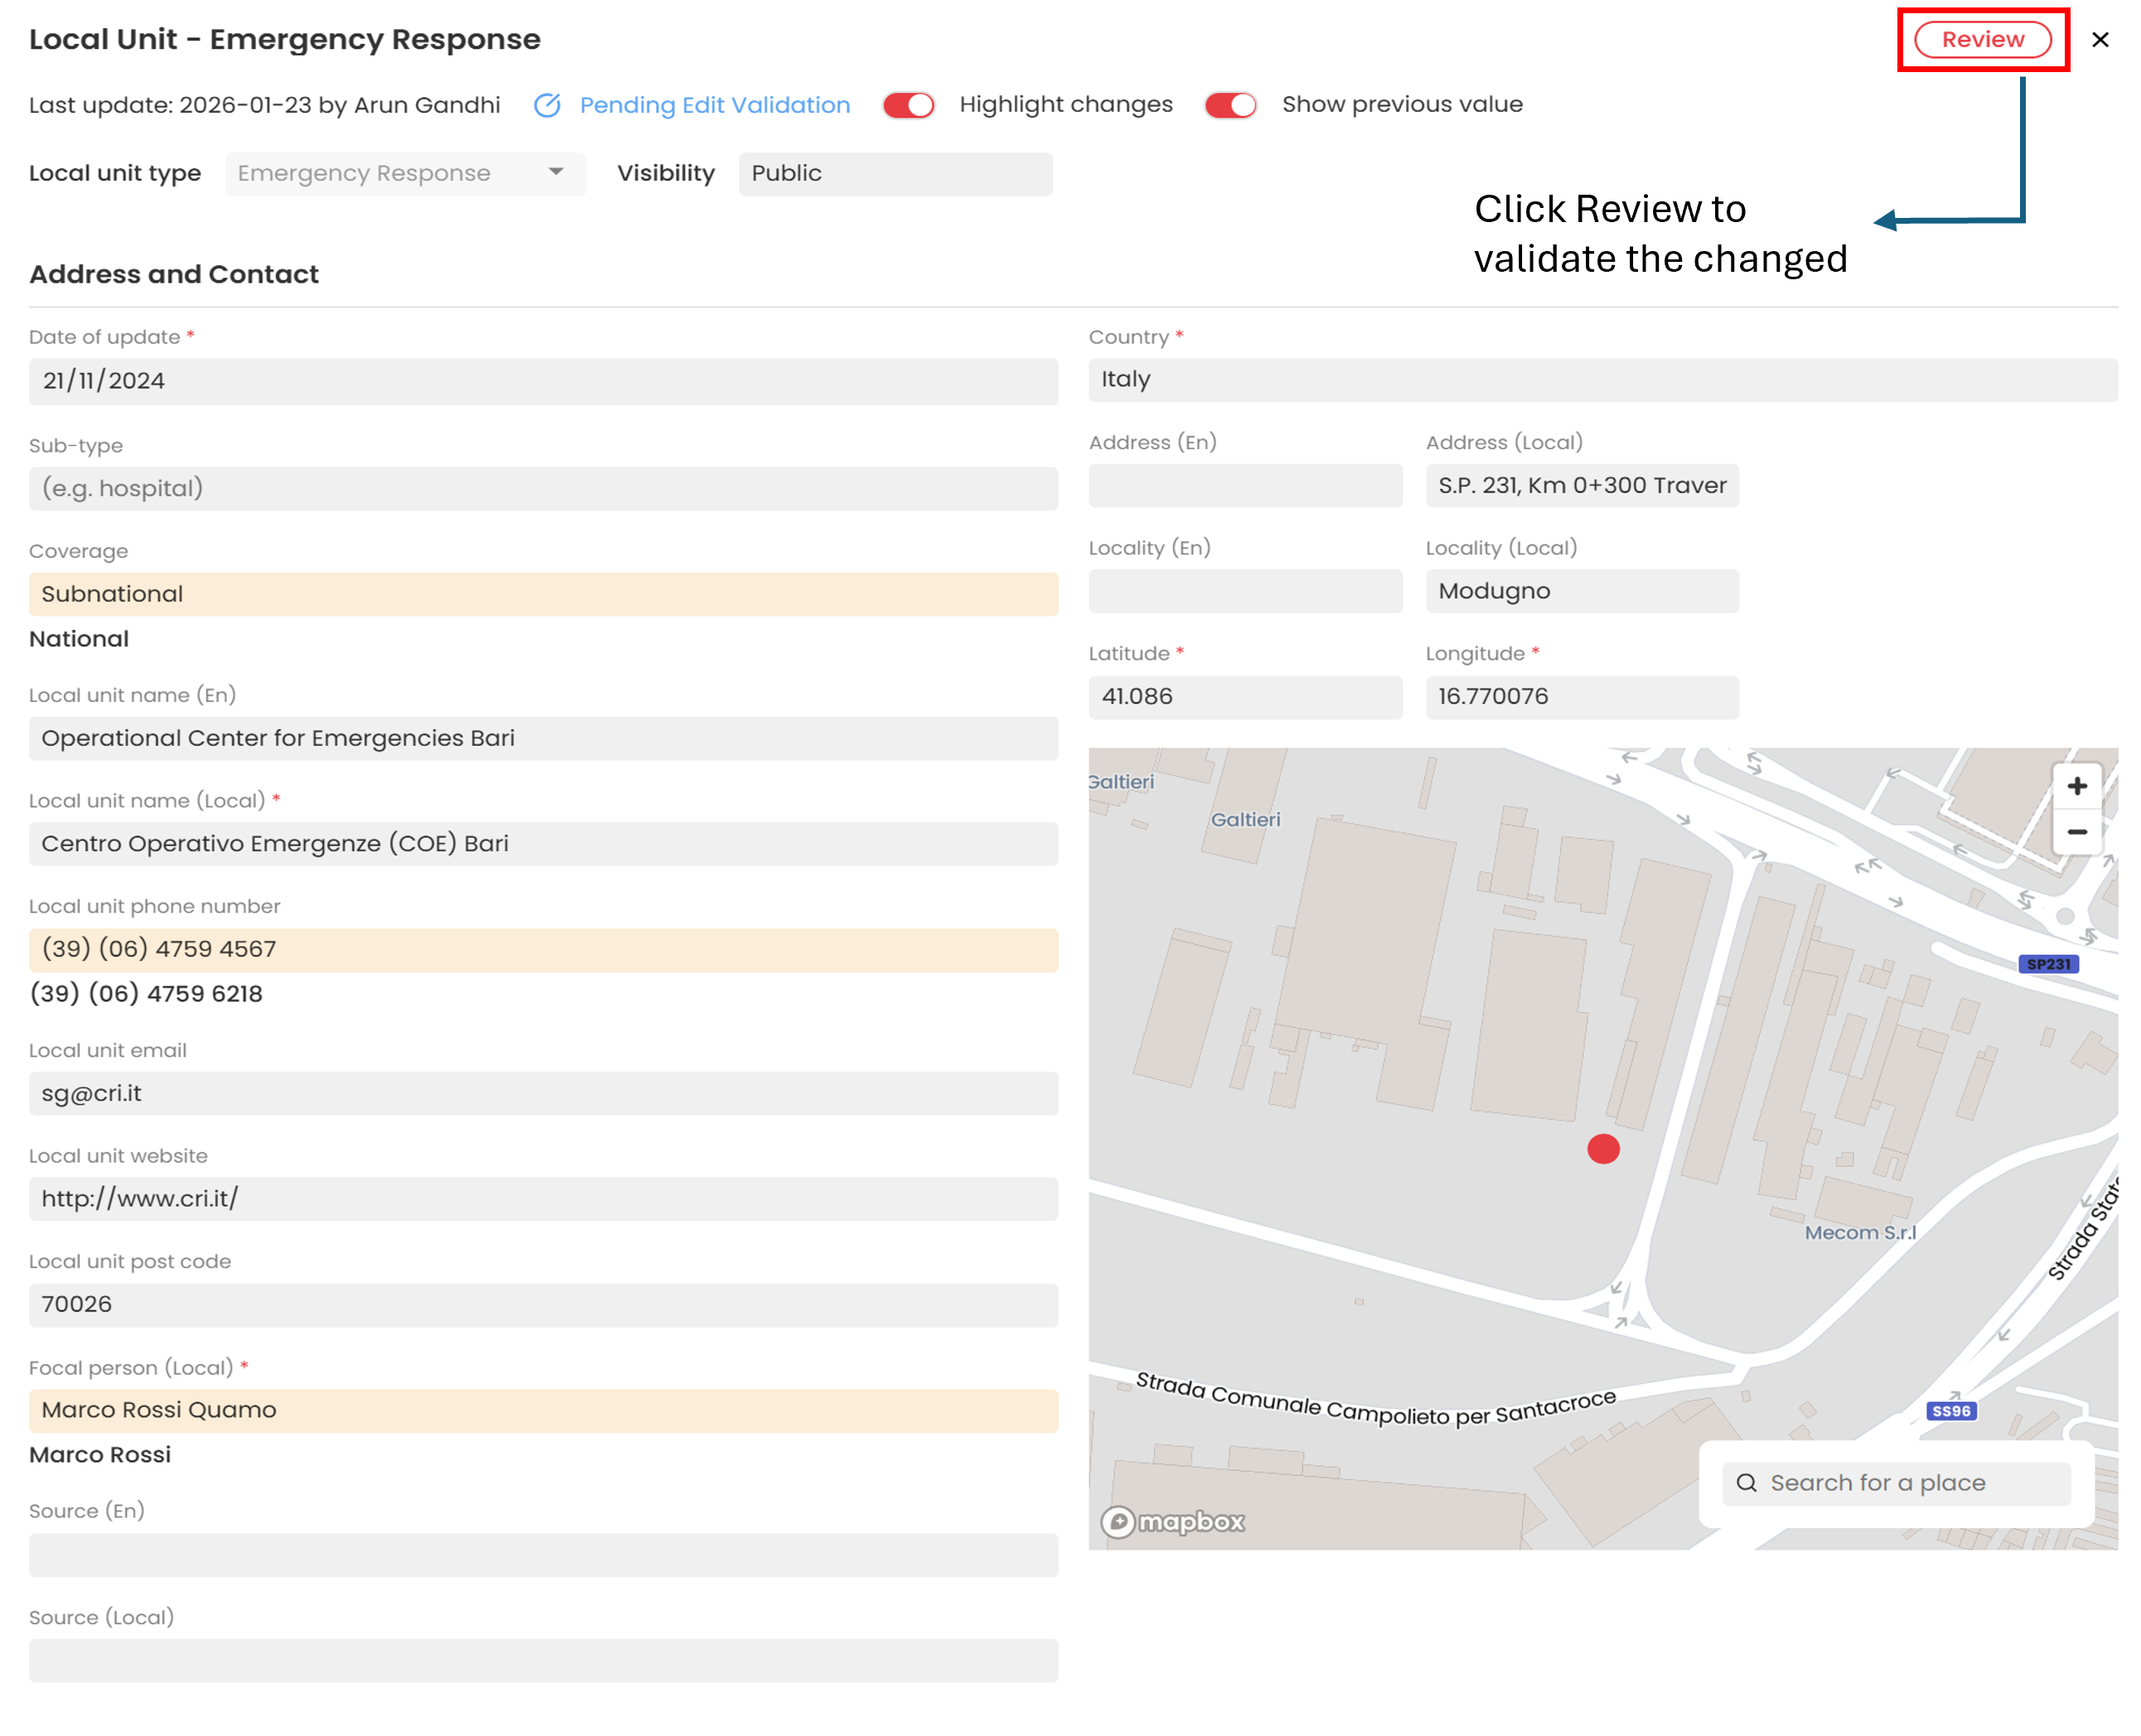
- The fields that have been changed will be highlighted.
- Validator can also click on the toggle button called View previous values to view the previous information of the changed fields.
- The validator needs to click on the Review button and a new dialog box will appear showing the Requested changes as shown below:
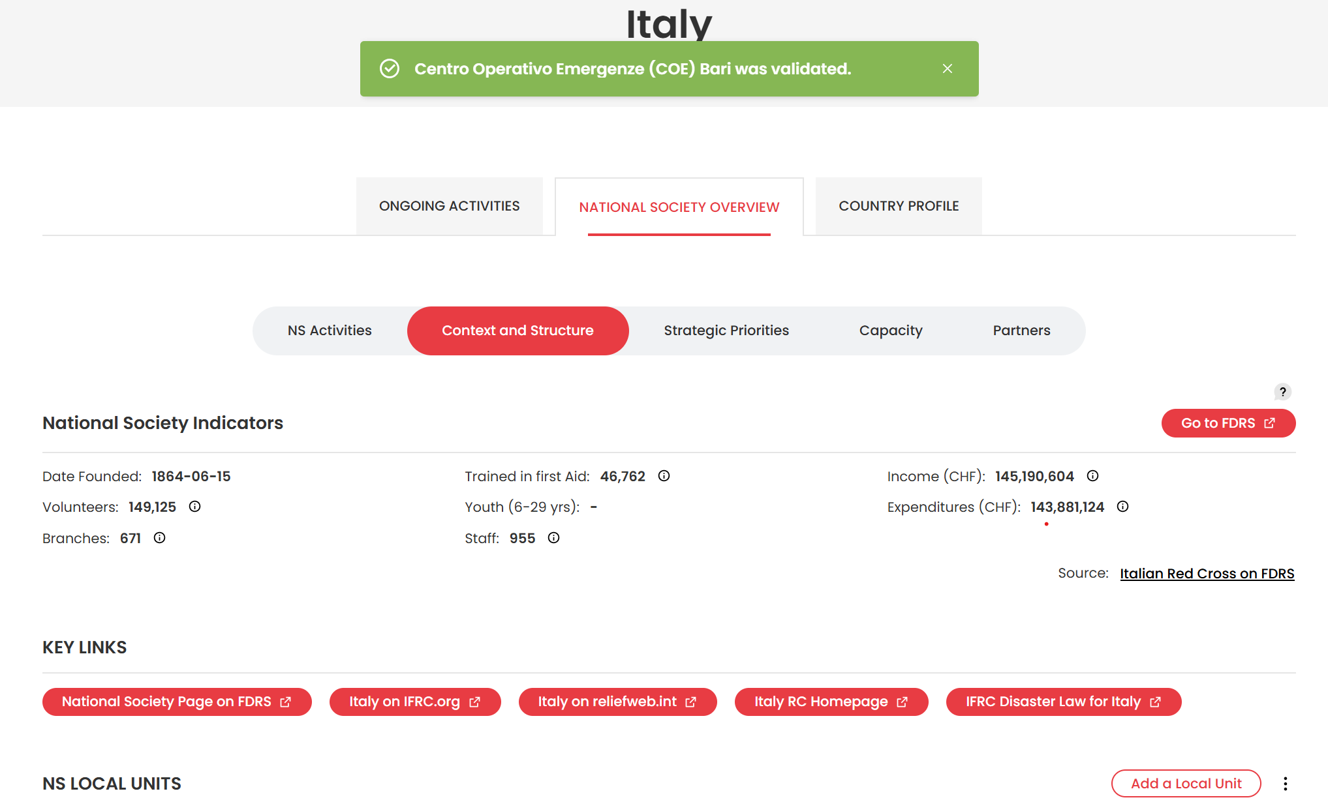
- Validator can select either Accept changes or Reject Changes. If the validator selects Reject changes, then a reason for rejection has to be given, otherwise select Accept changes.
- Click the Submit button and the edits done in the local unit information will get validated and the unit will appear as a validated unit again. Validator will also see a green notification appear on the screen as shown below:
¶ Deleting a Local Unit
Only validators and super users have the permissions to delete a local unit. Local units can be deleted if it is a Non -existent local unit, incorrectly added, if there are security concerns or for any other reasons which the validator or the super user deems fit.
- To delete a local unit navigate to the Context and Structure tab under National Society Overview for the country.
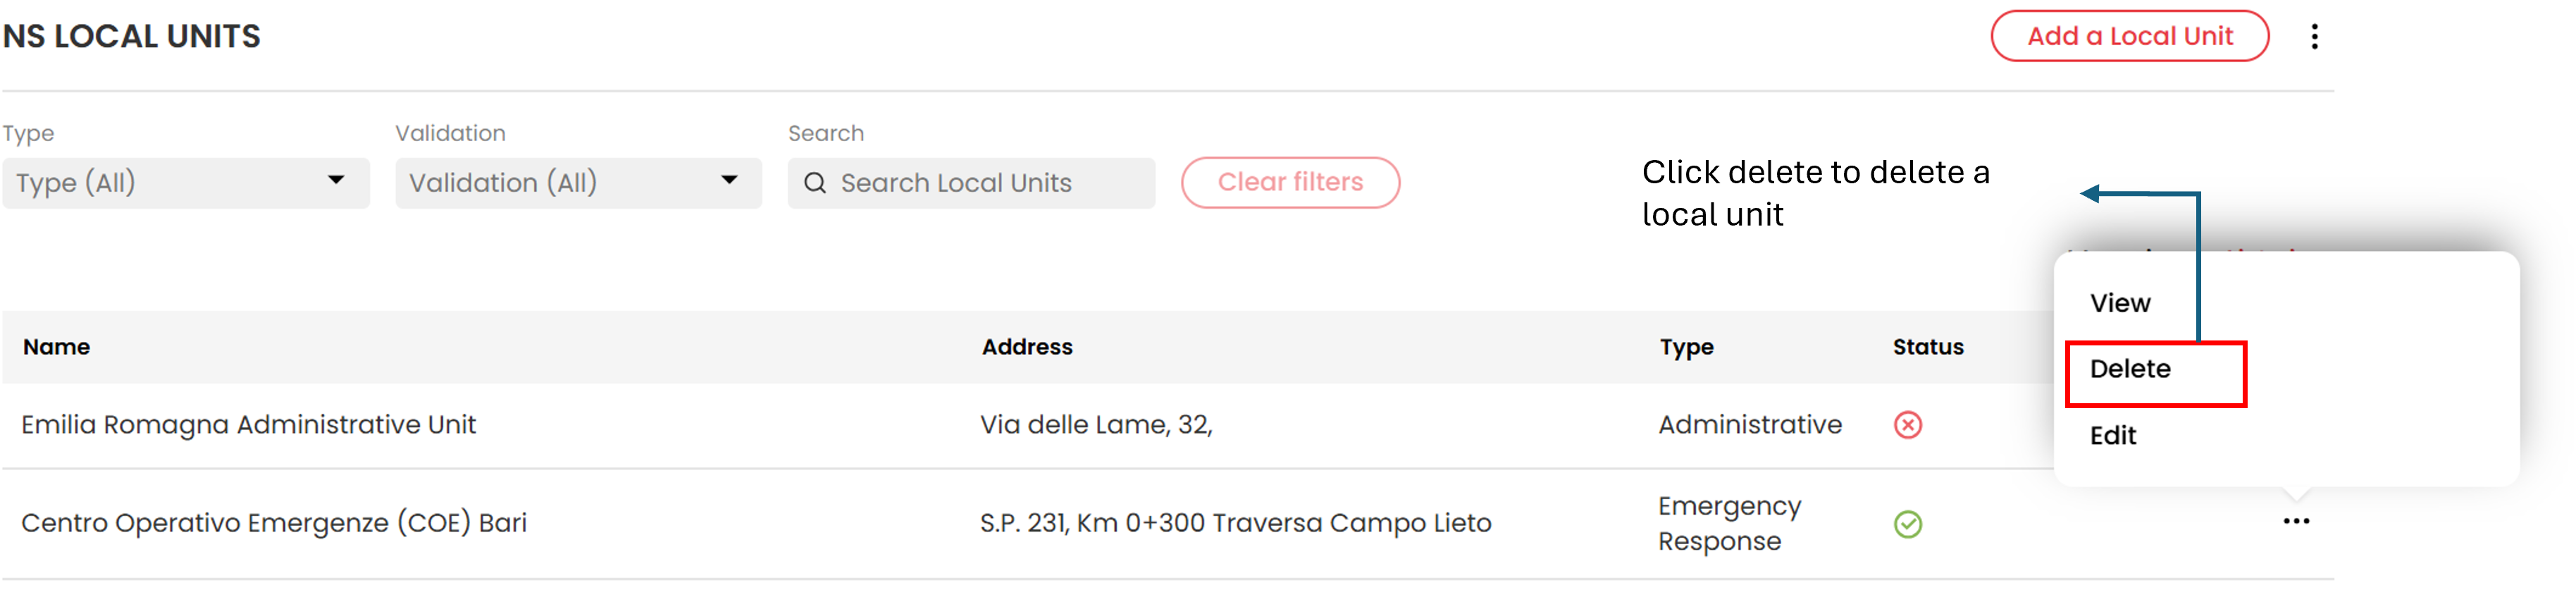
- Under List view, click the three horizontal dots on the right side of the local unit name and then click Delete button
- A new window will appear, where the validator can choose the reason for deleting the local unit.
- Also the validator will have to write a few lines to explain the reason why the local unit is being deleted in the text box that appears in the window.
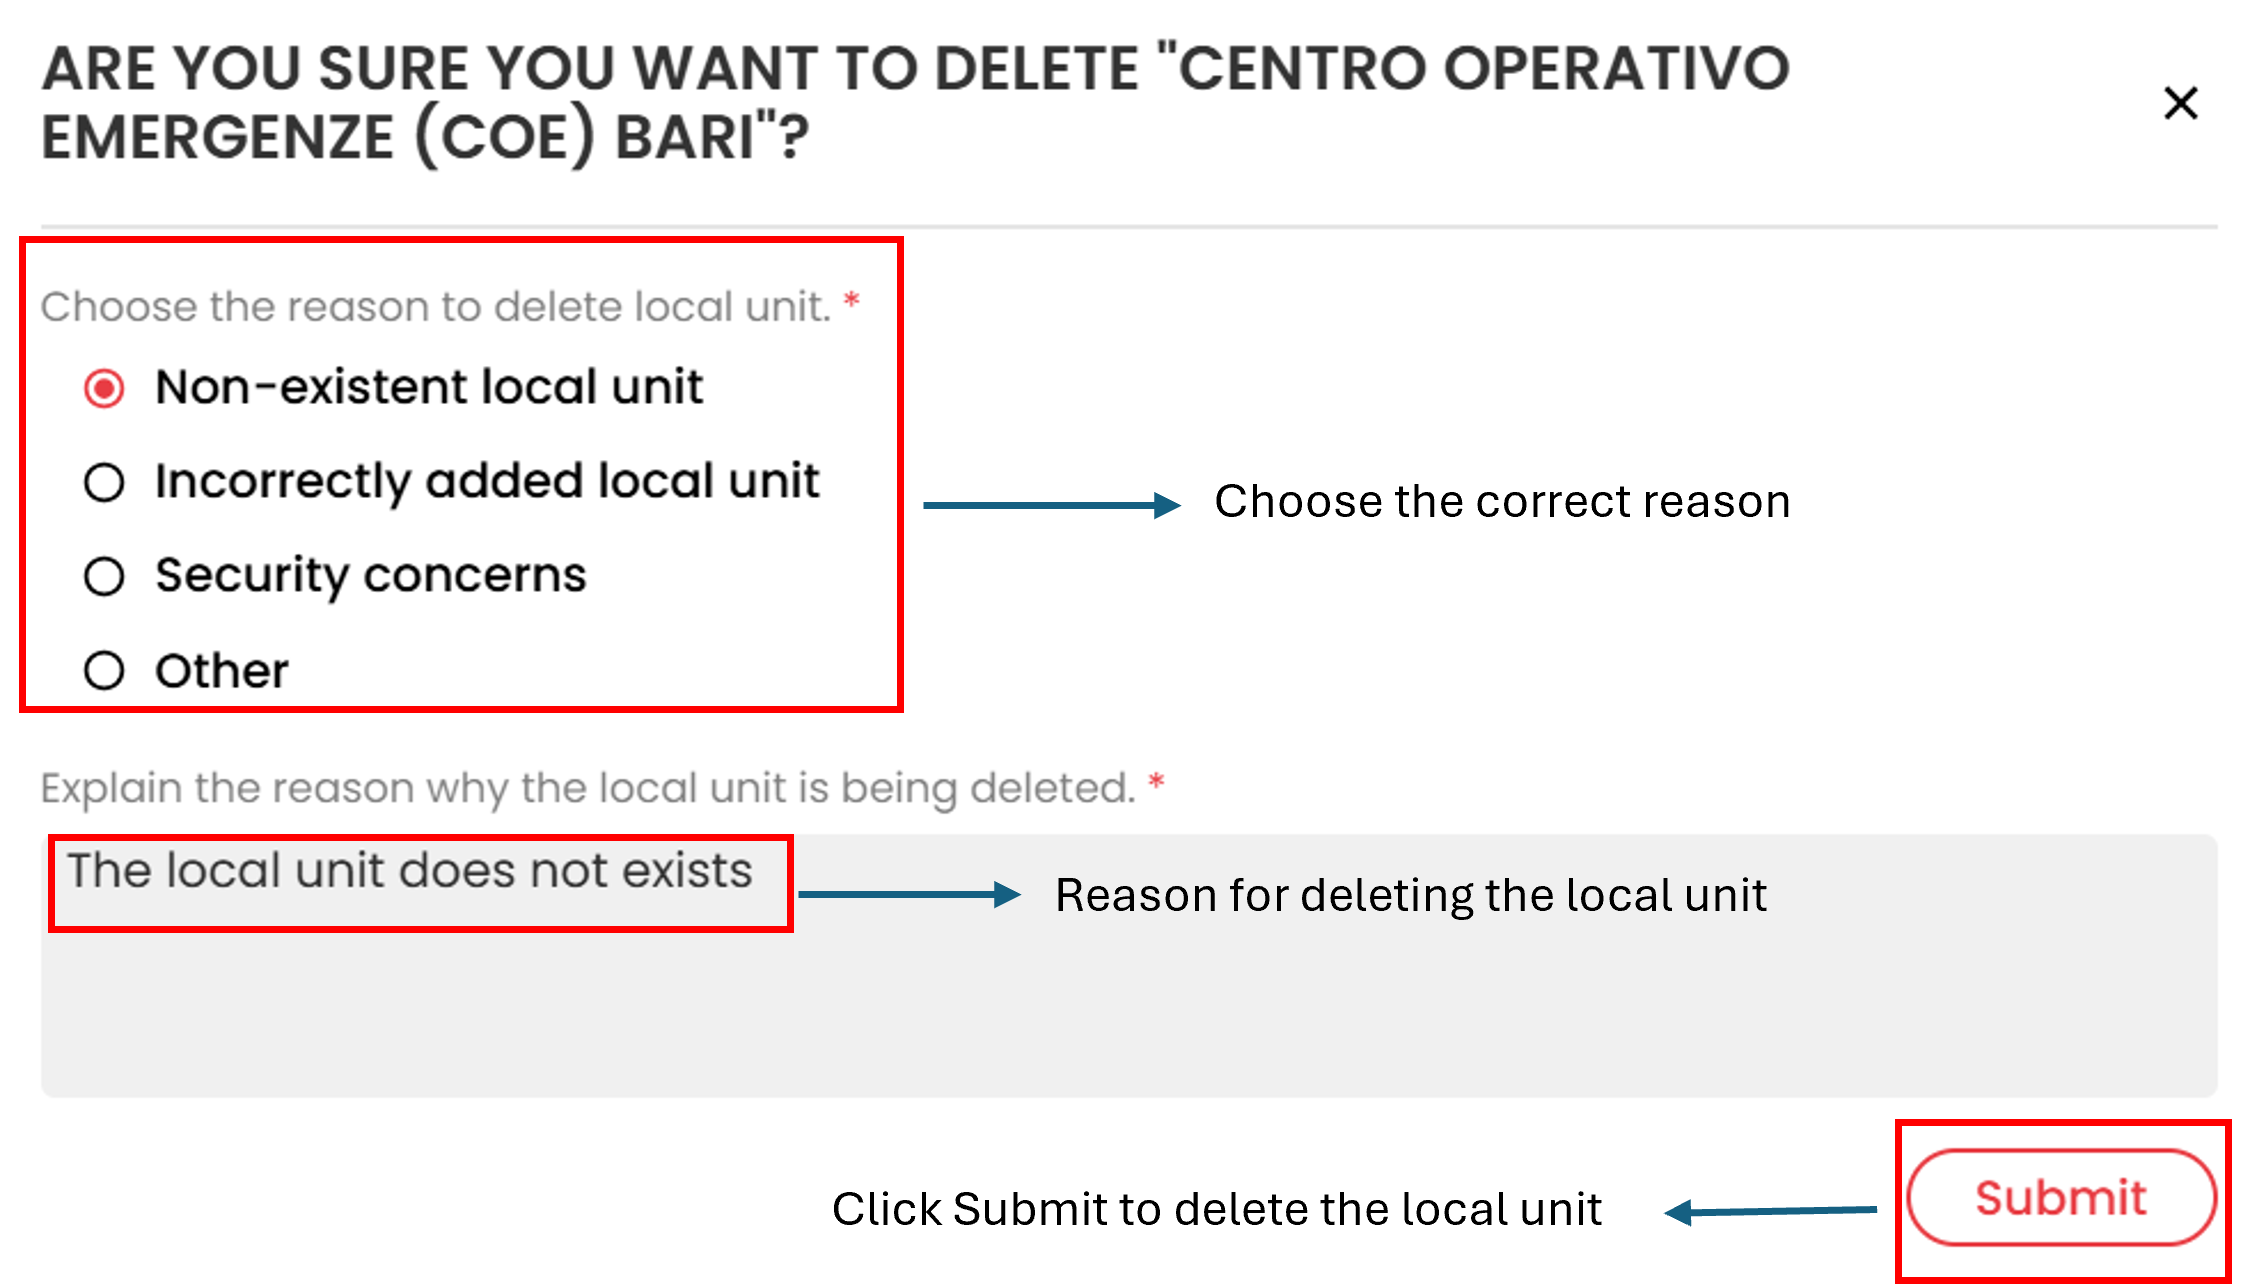
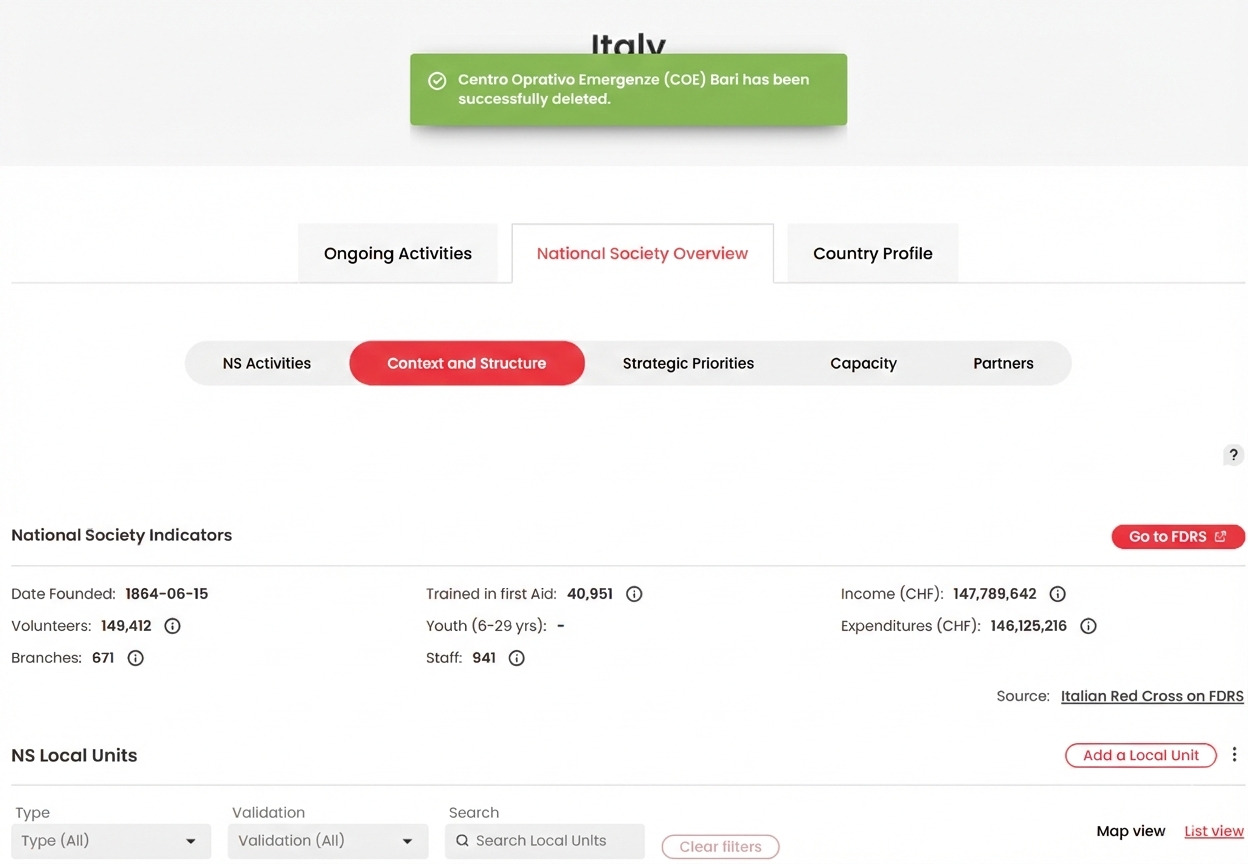
- Click on Submit button and the local unit will be deleted. A green notification will appear on the screen confirming the deletion of the local unit.
¶ Bulk Uploading Local Units
Bulk uploading a local unit can only be done if it is externally managed. Only super users have the permissions to configure a local unit as externally managed type. Validators do not have the permissions to do the same.
To Bulk Upload Local units:
- Navigate to the Context and Structure tab under the National Society Overview on the country page of the country you want to upload local unit data.
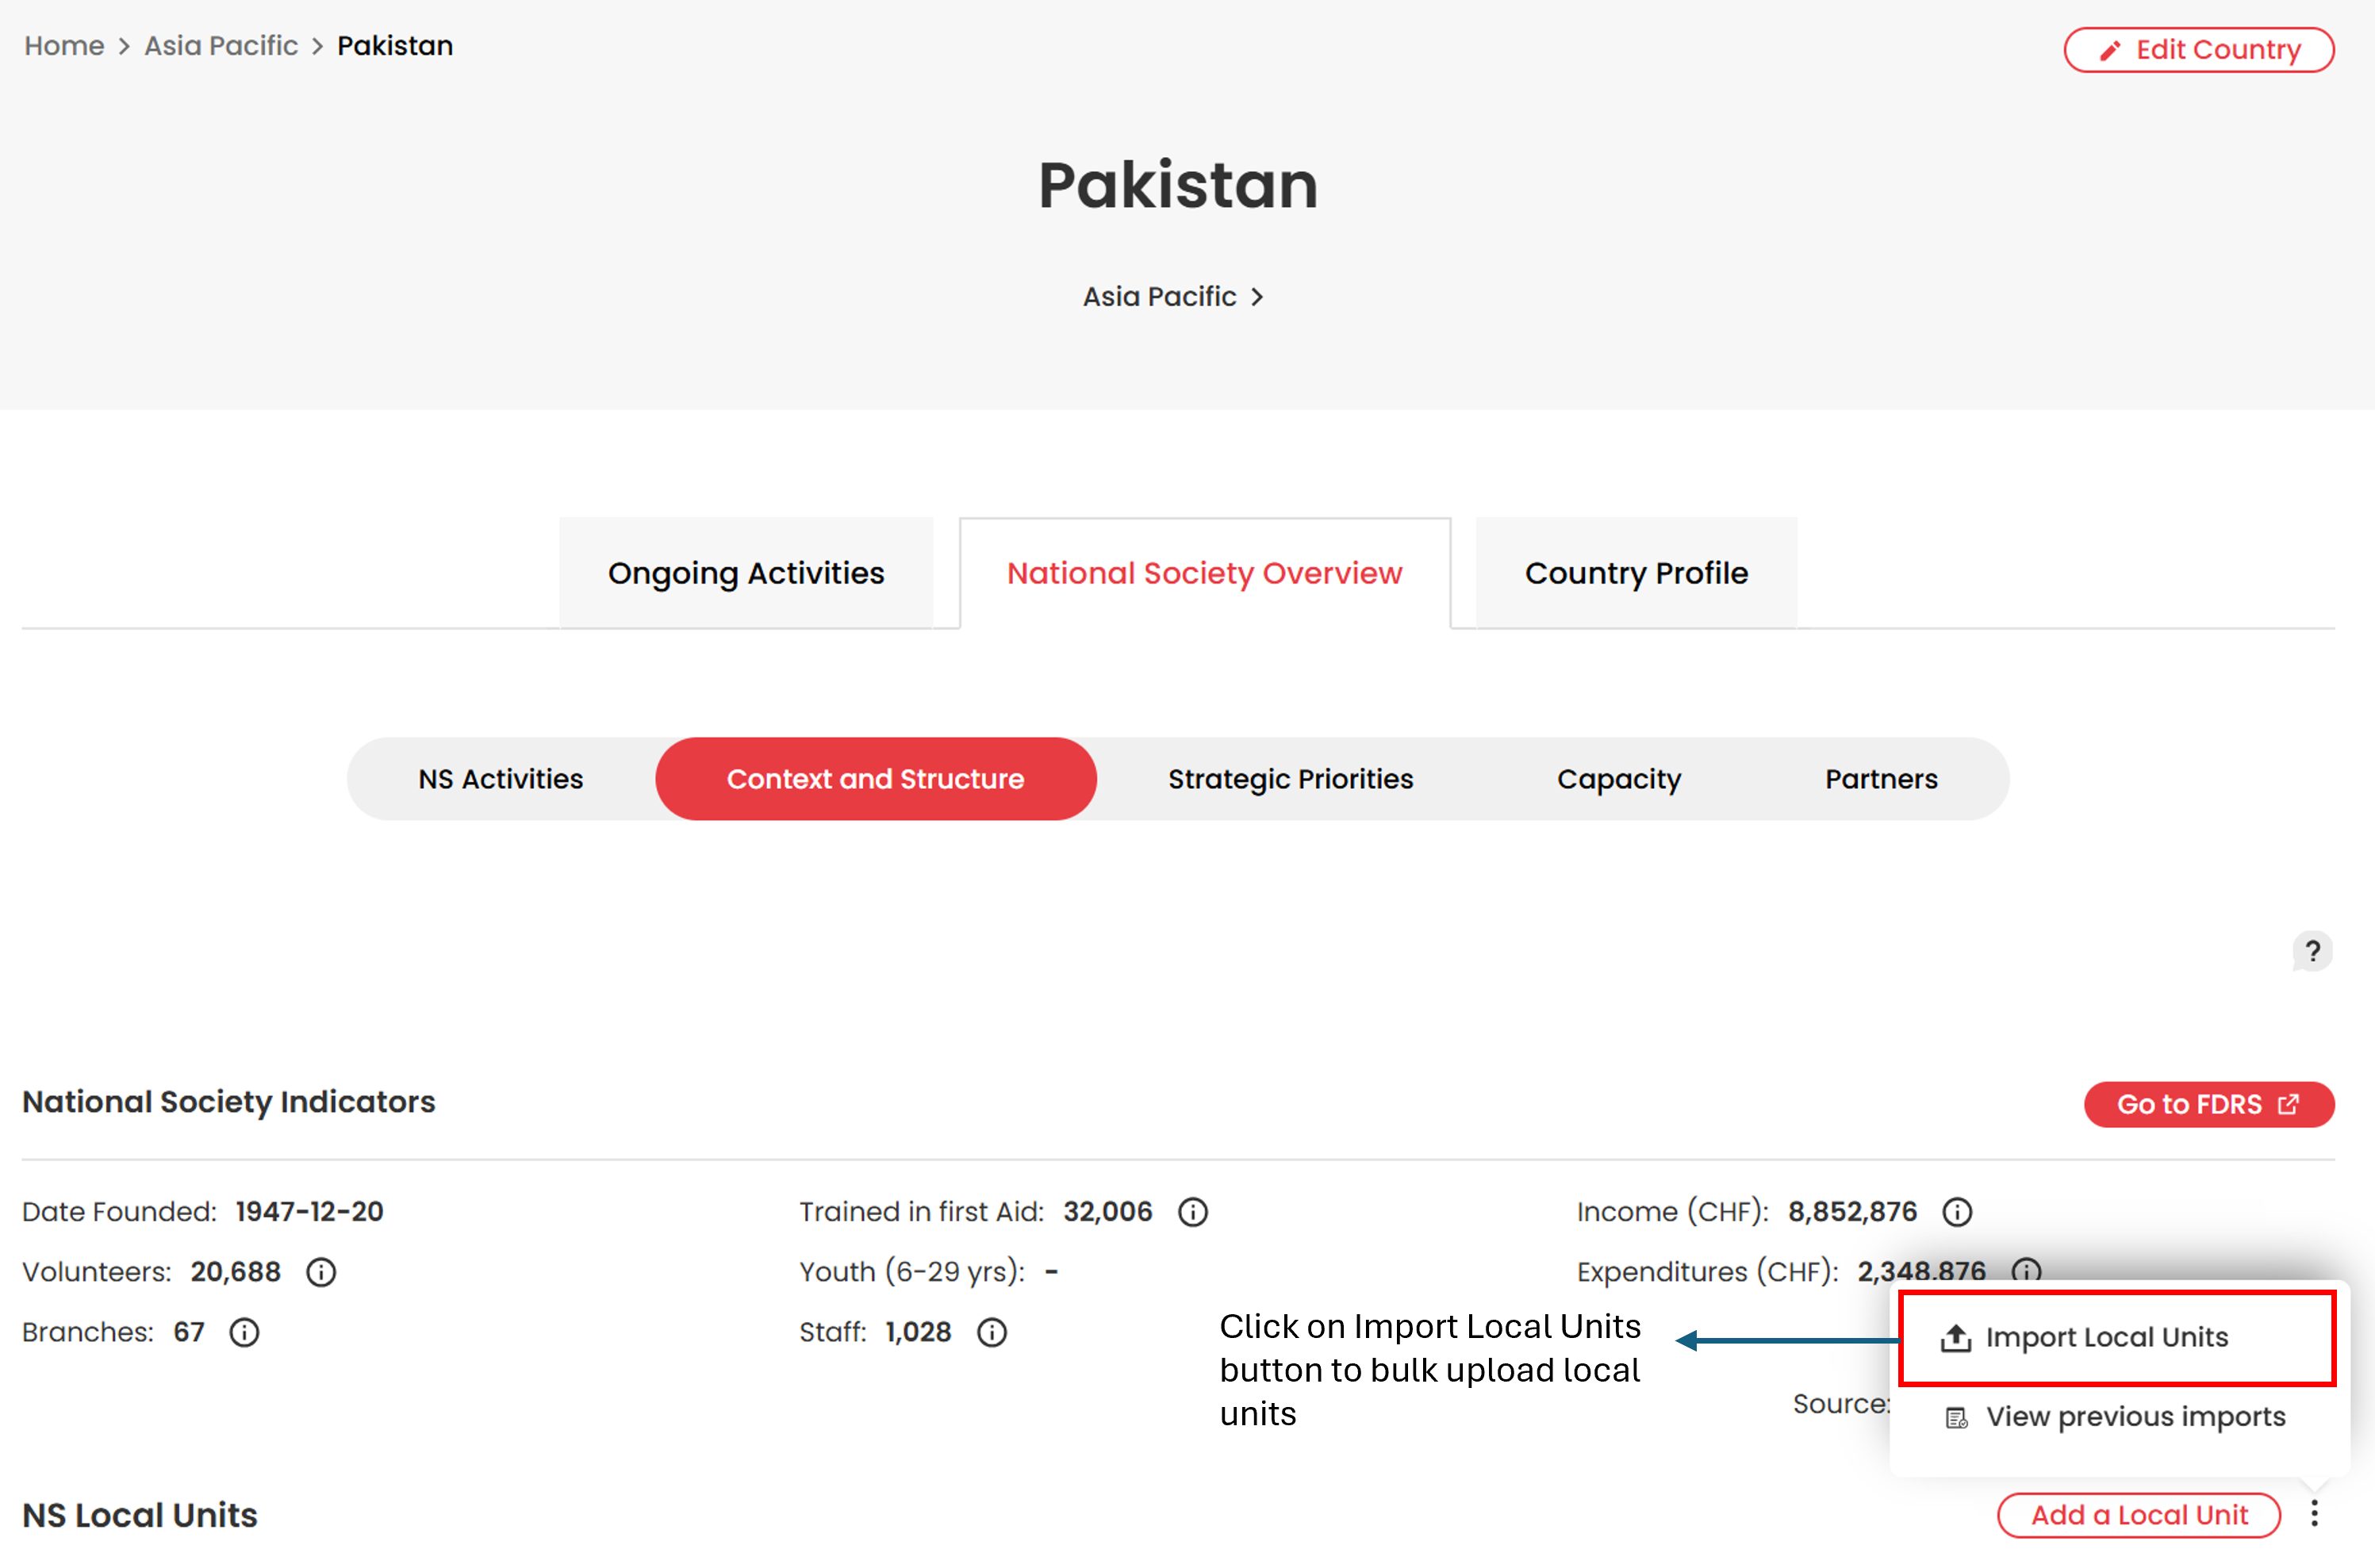
- Use the Import Local Units button to bulk upload externally managed local units.
- Super users decide which unit types can be managed externally for each country.
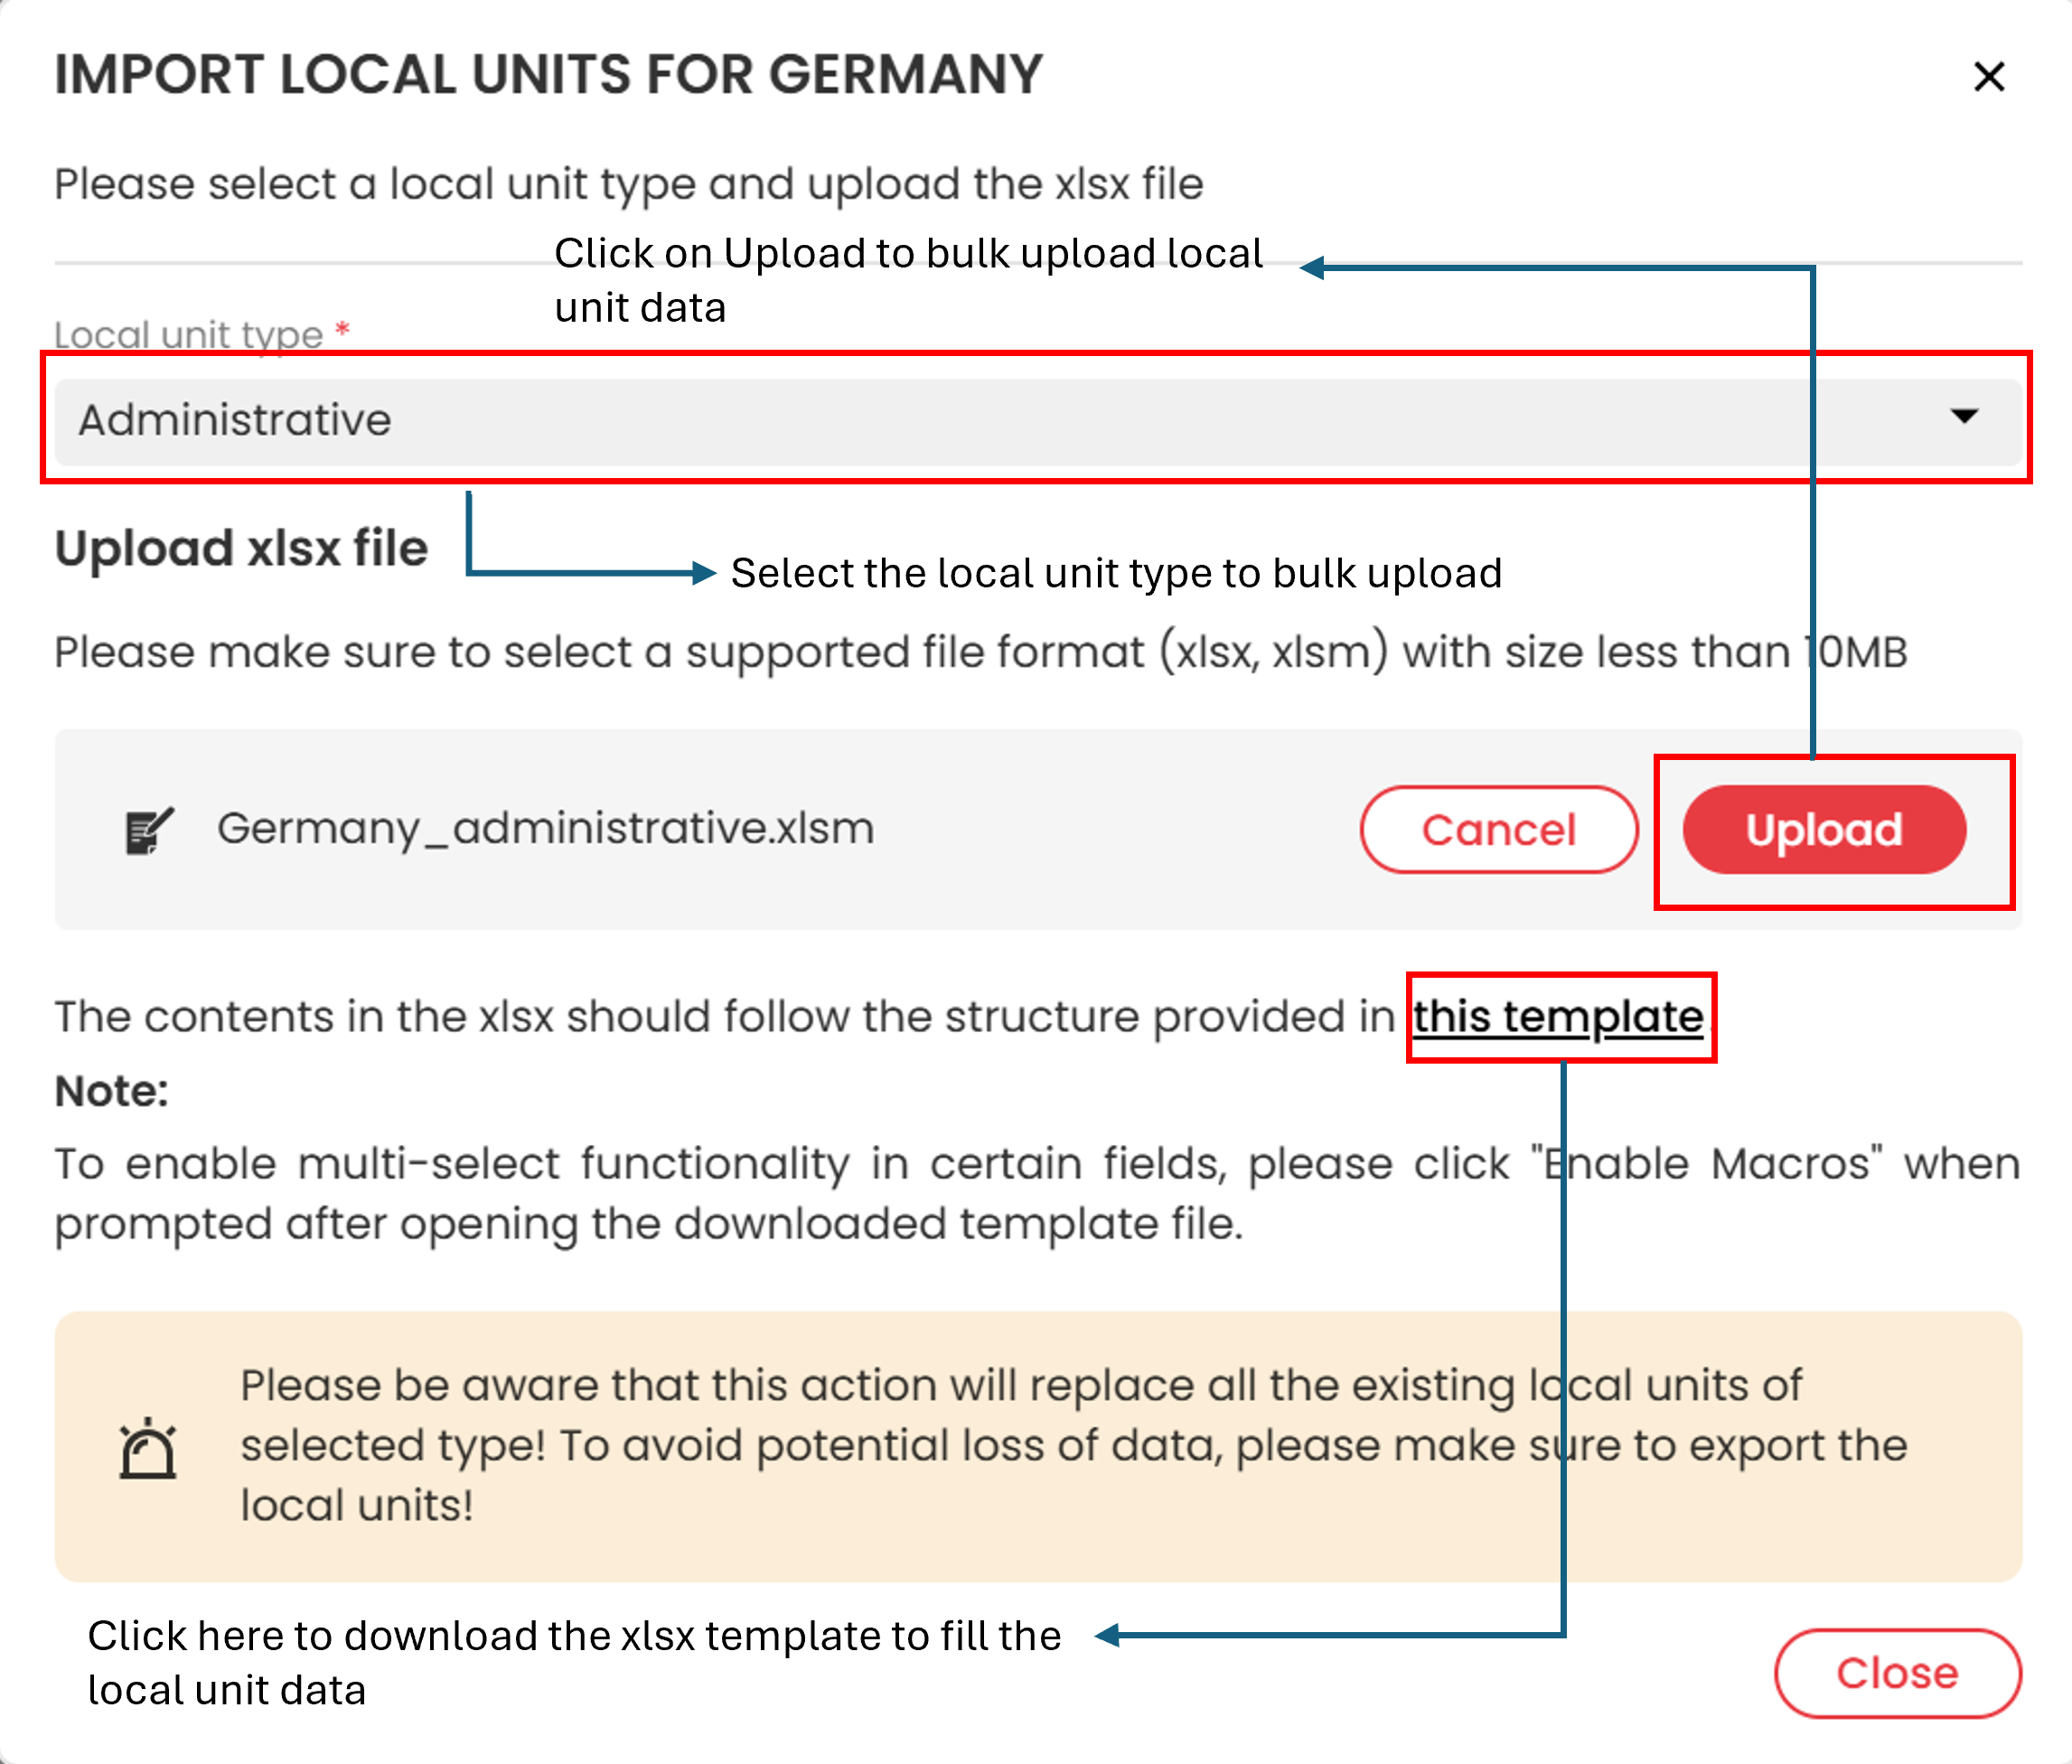
- Clicking the button opens a window with a dropdown to select the local unit type.
- Download the provided XLSX template for bulk uploads.
- Select the local unit type and click Select a File to upload your excel template with the filled data.
- Instructions for filling the data in various column are provided inside the excel tempelate
- Wait a few seconds for the data to upload.
- Once ready, an Upload button appears.
- Click Upload to complete the process.
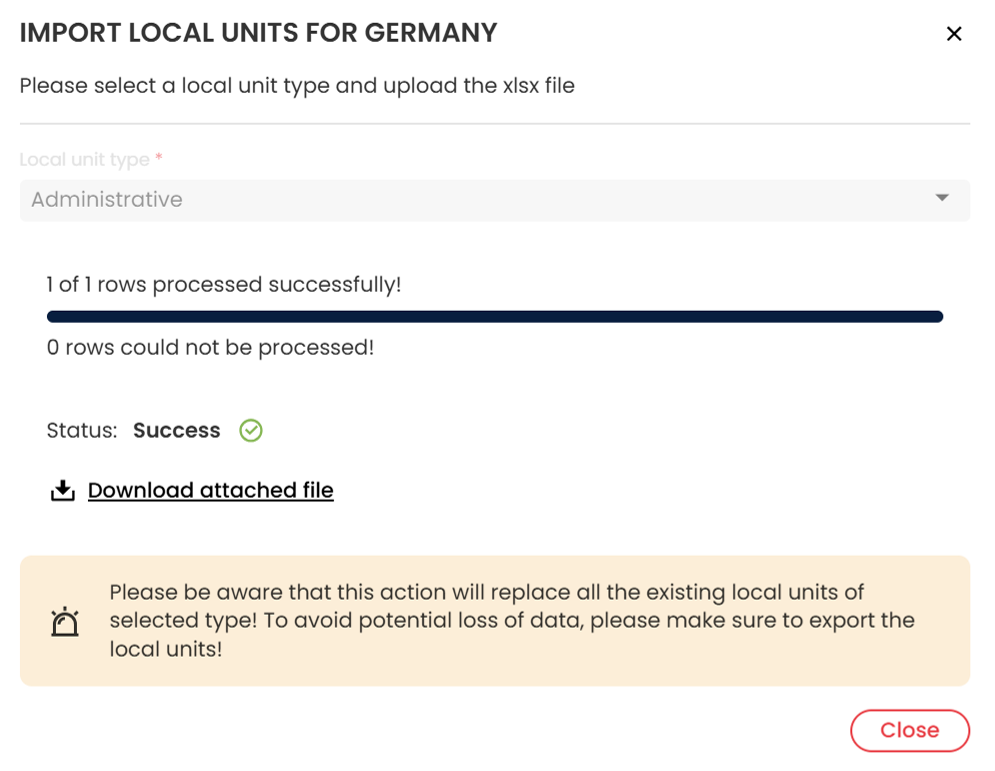
If the users have filled all the mandatory fields correctly inside the excel tempelate, they will receive a message with a Success status and also how many rows of data were processes successfully.